Furniture / Storage Shelving
IKEA TORNVIKEN Wall Shelf Assembly Instructions
Assembly guide for the IKEA TORNVIKEN wall shelf. Includes safety warnings, required tools, parts list, and step-by-step installation instructions for secure wall mounting.
Table of contents
Manual images
Click an image to enlargeImportant Safety Information
WARNING! Serious or fatal crushing injuries can occur from furniture falling down. To prevent this furniture from falling, it must be used with the wall attachment device(s) provided. Please note that screw(s) and plug(s) for the wall are not included, as they must be chosen based on the material of your wall. Assess the suitability of your wall to ensure it will withstand the forces generated. If you are uncertain, seek professional advice.
Tools Required
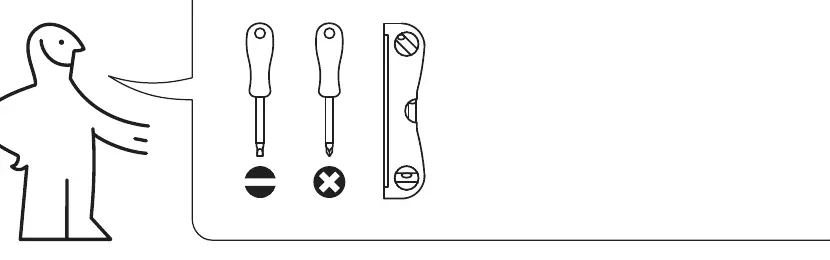
- Screwdriver (flathead and crosshead)
- Spirit level
Parts List
Ensure you have all the necessary components before starting assembly:
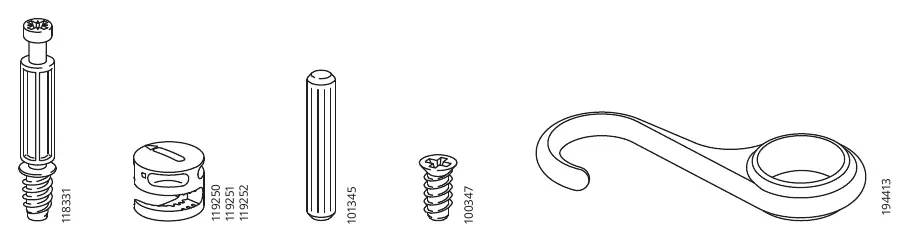
- 10x Cam lock screws
- 10x Cam locks
- 15x Wooden dowels
- 8x Screws
- 6x Hooks
Assembly Instructions
- Prepare the rail: Attach the rail to the shelf structure using the provided screws (Step 1).
- Install cam lock screws: Insert the cam lock screws into the designated holes on the side brackets (Step 2).
- Insert dowels: Place wooden dowels into the side panels (Step 3).
- Connect brackets: Attach the side brackets to the rail structure and secure them using the cam locks (Step 4).
- Assemble the frame: Continue adding the remaining side panels and brackets, securing them with dowels and cam locks (Steps 5-10).
- Attach the shelf board: Insert dowels into the main shelf board (Step 11).
- Secure the shelf: Connect the assembled frame to the main shelf board and lock it into place using the cam locks (Steps 12-14).
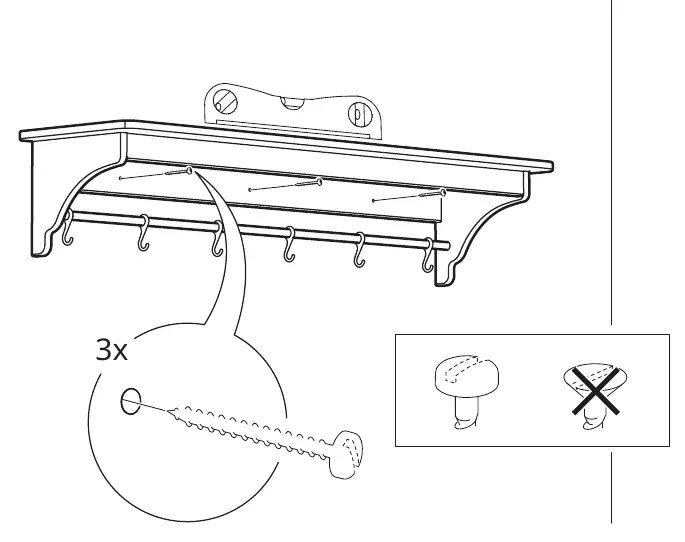
- Final mounting: Secure the shelf to the wall using the appropriate screws and plugs for your wall type, ensuring it is level (Steps 15-16).
Manufacturer information
IKEA
Practical help
Common problems
Shelf falling from the wall
Ensure the shelf is used with the provided wall attachment devices and that you have selected screws and plugs appropriate for your specific wall material.
Before use
- Check your wall material to select the correct screws and plugs (not included).
- Ensure you have a screwdriver and a spirit level.
- Verify all parts listed in the manual are present.
- Read the safety warning regarding wall attachment.
Specs in practice
- Wall attachment
- Required for safety; must be installed according to wall type.
Images and diagrams
- The assembly relies on cam locks and wooden dowels to connect the shelf components. Ensure cam locks are fully tightened.
Model compatibility
- Wall mounting hardware (screws/plugs) is not included and must be purchased separately based on wall type.

Manual page author
Michael Turner
Technical manual editor
Reviews PDF manuals for structure, safety notes, and practical product details so readers can find the right information quickly.