Furniture / Tables & Desks
Assembly Instructions for Inbox Zero Kaionna 2-Drawer Lateral File Cabinet
A comprehensive assembly and maintenance guide for the Inbox Zero Kaionna 2-Drawer Lateral File Cabinet. Includes safety warnings, parts identification, step-by-step assembly instructions, and drawer adjustment tips.
PDF source: Français · summary: English
Quick answers from the manual
Quick answer
- This document provides assembly instructions for the Inbox Zero Kaionna 2-Drawer Lateral File Cabinet, including safety warnings, parts identification, and maintenance procedures. p. 1
Key actions
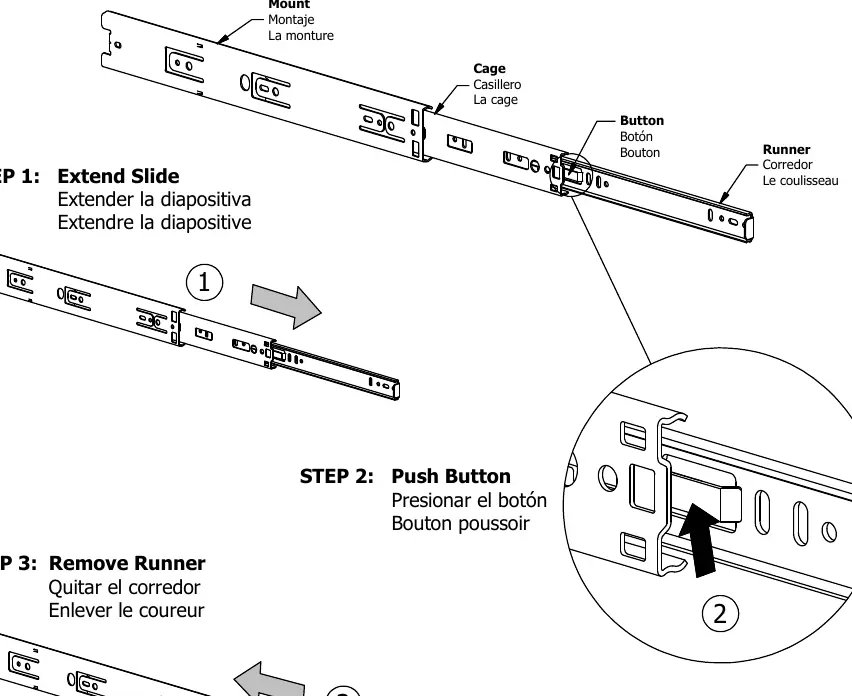
- Separate drawer slides before assembly. p. 13
- Periodically open drawers fully to reset slides. p. 32
Problems and fixes
Drawer alignment
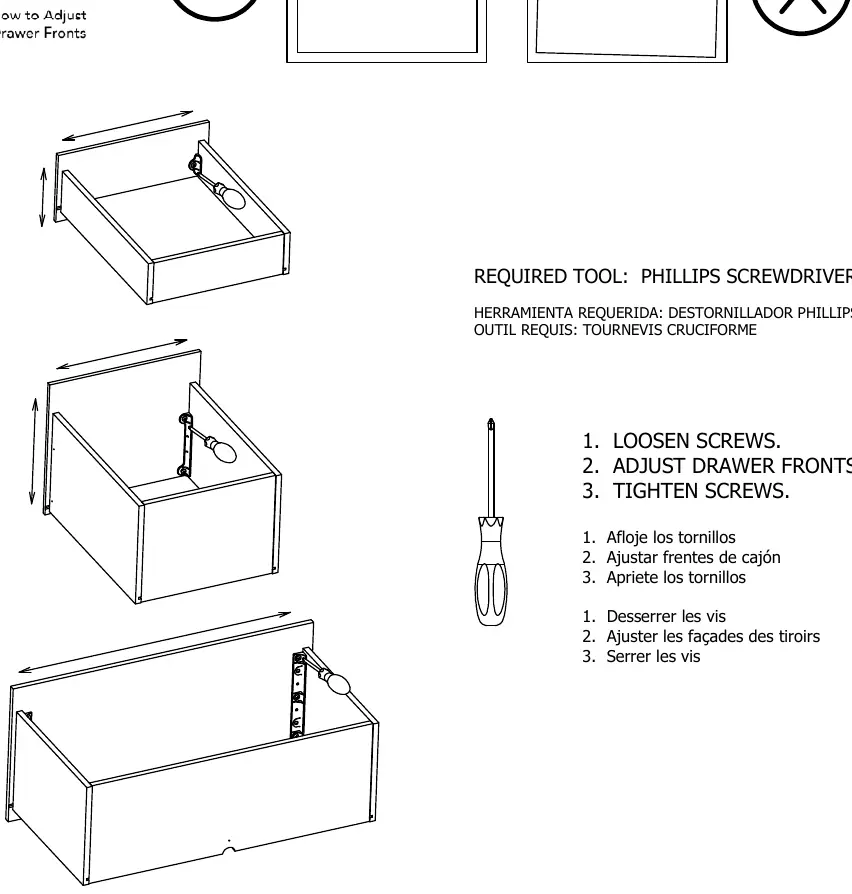
Loosen screws, adjust drawer front, and tighten screws.
p. 27Show 3 more answers Show less
Maintenance and reset
- Open each drawer to its full extension to reset slides. p. 32
Technical specifications
| Parameter | Value | Meaning | Pages |
|---|---|---|---|
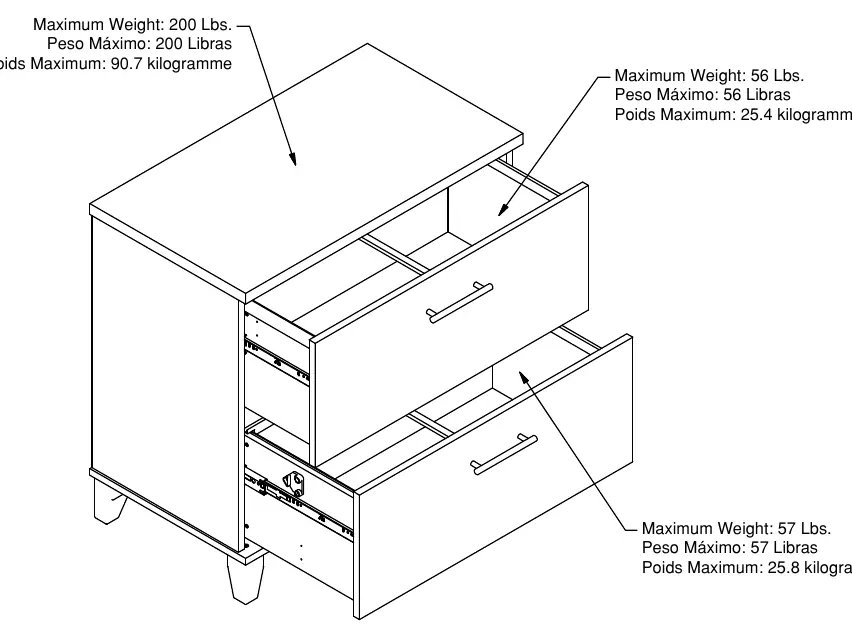
| Max Weight (Top) | 200 lbs | Maximum load capacity for the top surface. | p. 28 |
Where to find it in the PDF
- Parts Identification p. 6, 7, 8, 9
- Assembly Steps p. 10, 11, 12, 13
Table of contents
Manual images
Click an image to enlargeQuick Guide
This document provides assembly instructions for the Inbox Zero Kaionna 2-Drawer Lateral File Cabinet. Before beginning, ensure you have a #2 Phillips screwdriver. Assemble the unit on a flat, non-carpeted surface (or use the empty carton) to prevent scratching. Always follow the assembly steps in order and wear safety glasses.
Parts and Hardware
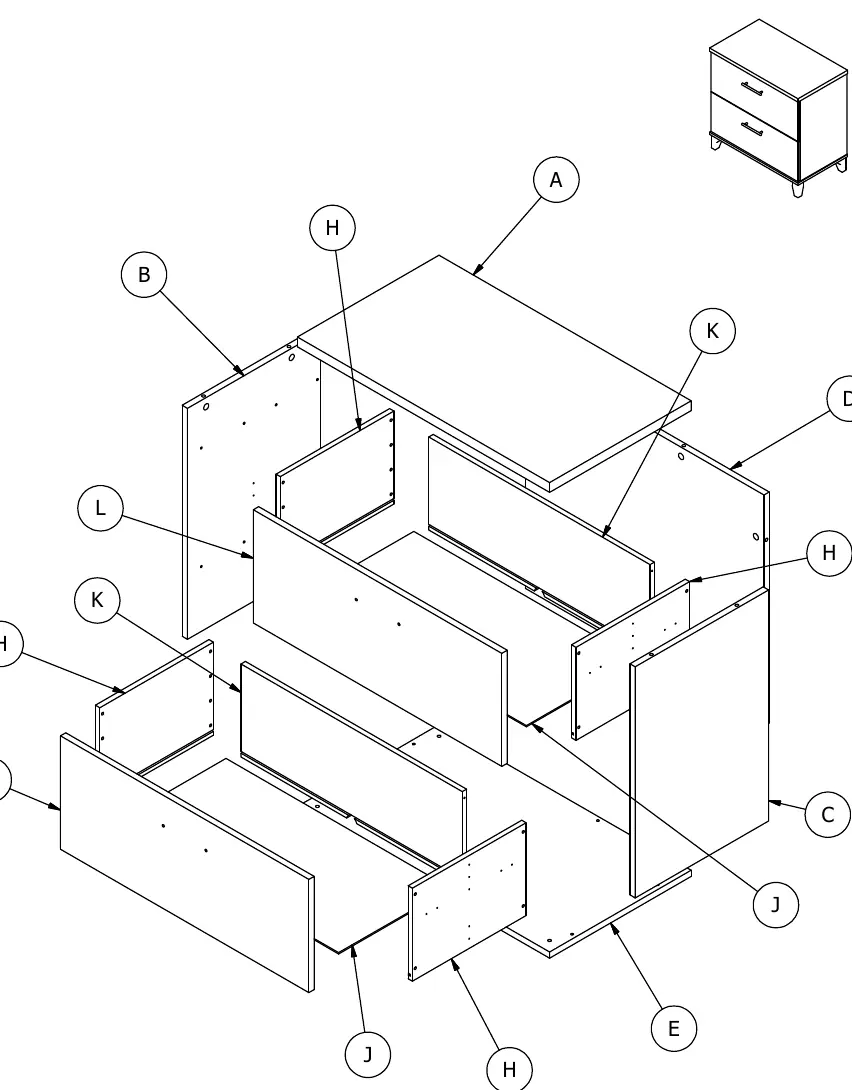
The cabinet consists of various boards (labeled A-N) and fasteners. Before starting, verify all parts against the provided lists on pages 6-9. Fasteners are shown at actual size in the manual.
Assembly Instructions
The assembly process involves the following key stages:

- Prepare Drawer Fronts: Attach drawer brackets to panels L and N.
- Build Drawers: Assemble the drawer boxes using the provided screws.
- Install Slides: Separate the drawer slides before assembly. Install the runners onto the cabinet panels.
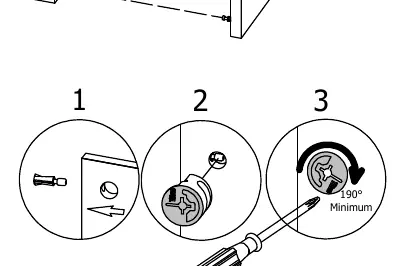
- Assemble Panels: Connect the main cabinet panels (A, B, C, D, E) using the cam lock system.
- Insert Drawers: Insert the assembled drawers into the cabinet and ensure the arm is in the locked position.
Drawer Adjustment and Maintenance
If the drawers are not aligned, you can adjust them by loosening the screws on the drawer front, adjusting the position, and retightening the screws. Periodically open each drawer to its full extension to reset the drawer slides and ensure smooth operation.
Safety Warnings
Improper use can cause safety hazards. Key safety points include:
- Anti-Tip: Properly install and maintain the anti-tip mechanism to prevent more than one drawer from opening at once.
- Loading: Do not load with a television or heavy equipment. Always load the bottom drawer first.
- Weight Limits: Do not exceed the maximum load limits: Top surface (200 lbs), Top drawer (56 lbs), Bottom drawer (57 lbs).
- Moving: Unload the unit before moving. Do not move the unit while loaded.
Practical help
Common problems
Drawer not sliding smoothly
Periodically open each drawer to its full extension to reset the drawer slides.
Drawer front alignment issues
Loosen the screws on the drawer front, adjust the position, and retighten the screws.
Difficulty inserting drawer
Ensure the arm is in the locked position (click) before inserting the drawer.
Before use
- Verify all parts and hardware are present
- Use a #2 Phillips screwdriver
- Assemble on a non-carpeted surface or empty carton
- Wear safety glasses during assembly
- Ensure the anti-tip mechanism is installed
Show more Show less
Specs in practice
- Max Weight (Top)
- 200 lbs
- Max Weight (Top Drawer)
- 56 lbs
- Max Weight (Bottom Drawer)
- 57 lbs
Images and diagrams
- Exploded view of boards and hardware
- Step-by-step assembly sequence
- Drawer slide separation and installation
- Cam lock tightening procedure
Model compatibility
- Designed for indoor use
- Not intended for heavy equipment like televisions

Manual page author
Emily Carter
User documentation editor