Furniture / Storage Cabinets
Assembly Instructions for Pantry Cabinet
A comprehensive assembly guide for the Pantry Cabinet. Includes a complete parts list, hardware identification, and step-by-step installation instructions for the frame and drawers.
Quick answers from the manual
Quick answer
- This document is an assembly manual for the Pantry Cabinet. It provides a parts list, hardware identification, and 18 detailed steps to assemble the cabinet frame and drawers. p. 1, 14
Key actions
- Assemble the main frame using cam locks and dowels. p. 6, 7, 8, 9
- Assemble the drawers and attach slides. p. 11, 12, 13
Problems and fixes
Missing parts
Cease assembly and contact support.
p. 2Maintenance and reset
- Periodically inspect screw tightness to ensure structural integrity. p. 2
Where to find it in the PDF
- Parts List p. 3, 4
- Hardware List p. 5
- Assembly Steps p. 6, 14
Table of contents
Manual images
Click an image to enlargeImportant Information
Please read the following guidelines carefully before starting assembly:
- Assemble the item on a spacious, level surface to avoid damage.
- Keep small parts out of the reach of children during assembly.
- Wear gloves during assembly to avoid scratches from sharp edges.
- Periodically inspect screw tightness while the product is in use to ensure structural integrity.
- Keep the product away from fire sources, high temperatures, and direct sunlight.
- If you spill water or liquid on the surface, wipe it clean immediately with a dry towel.
Parts and Hardware
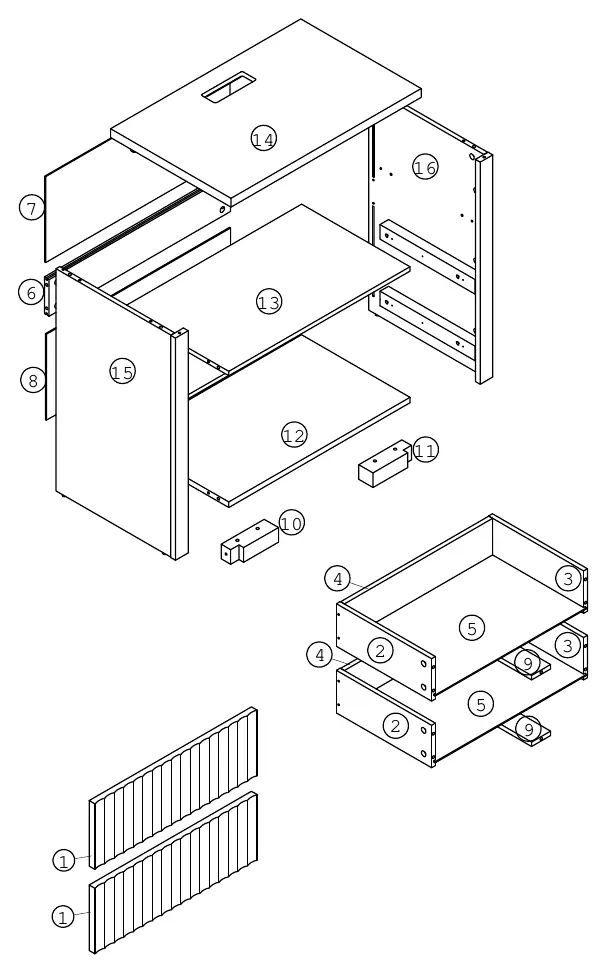
Before beginning, identify all parts and hardware provided in the package. The manual includes a detailed exploded view of the cabinet components (numbered 1-16) and a hardware list (labeled A-M) to ensure you have all necessary items.
Assembly Instructions
Follow these steps to assemble your cabinet:
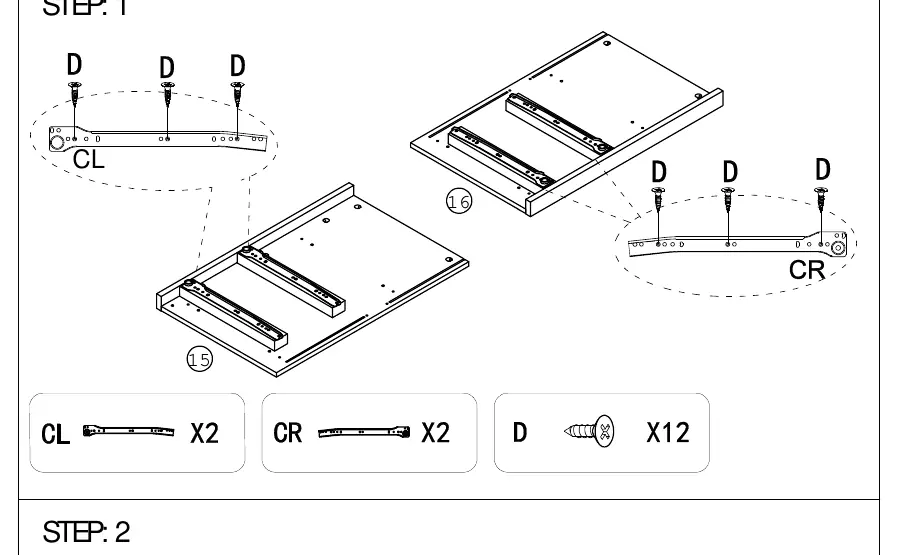
- Step 1: Attach drawer slides (CL, CR) to side panels (15, 16) using screws (D).
- Step 2: Install cam bolts (A) into panels (14, 15, 16).
- Step 3-4: Assemble the main frame structure using cam locks (B) and wooden dowels (C).
- Step 5-6: Attach the top panel (14) and support blocks (10, 11) to the frame.
- Step 7: Apply adhesive pads (L) and attach hardware (H) using the Allen key (I).
- Step 8-10: Complete the frame assembly and install the power outlet (J) into the top panel (14) using screws (D).
- Step 11-12: Assemble the drawer components (2, 3, 4, 5, 9) using screws (G).
- Step 13-14: Attach drawer fronts (1) using cam bolts (A) and cam locks (B).
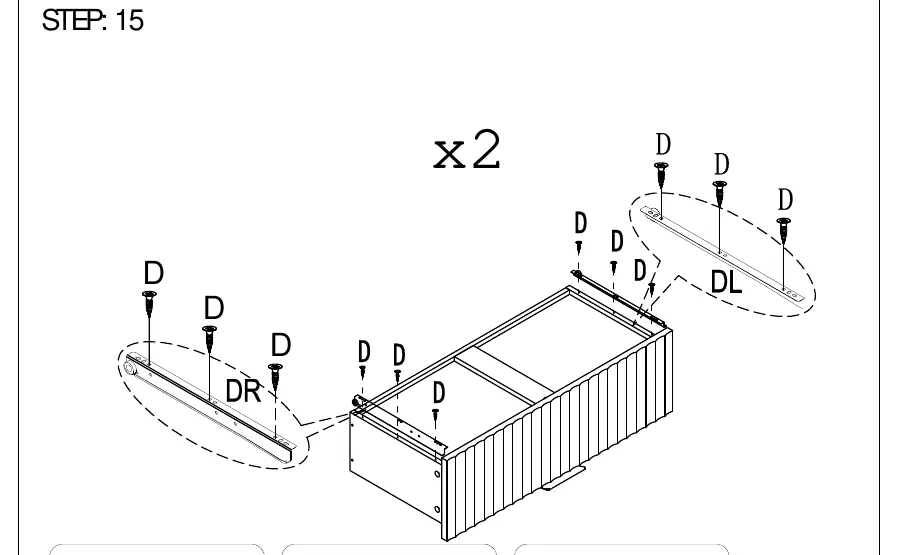
- Step 15: Attach drawer slides (DL, DR) to the bottom of the drawers using screws (D).
- Step 16: Insert the assembled drawers into the main cabinet frame.
- Step 17-18: Finalize assembly by securing the back panels using screws (F) and corner brackets (E).
Manufacturer information
Wayfair LLC
Practical help
Common problems
Missing or defective parts
Cease assembly immediately and contact customer support.
Unstable structure
Periodically inspect and retighten all screws to ensure structural integrity.
Scratches during assembly
Wear gloves and assemble on a spacious, protected surface.
Before use
- Clear a spacious, level area for assembly.
- Verify all parts against the parts list (1-16).
- Verify all hardware against the hardware list (A-M).
- Have a screwdriver ready for assembly.
- Ensure the product is placed on level, solid ground.
Specs in practice
- 2-Drawer Design
- The unit features two storage drawers with slide mechanisms.
- Integrated Power Outlet
- The top panel includes a built-in power outlet (J) for convenience.
Images and diagrams
- Exploded view (Page 3) shows the relationship between all cabinet panels and drawer components.
- Hardware list (Page 5) identifies all screws, cam locks, and slides by letter code.
- Step-by-step diagrams (Pages 6-14) illustrate the correct orientation of cam locks and screws.

Manual page author
Michael Turner
Technical manual editor
Reviews PDF manuals for structure, safety notes, and practical product details so readers can find the right information quickly.