Automotive / Car Audio
Incartec 23-229-NAV Interface Installation Guide
Installation guide for the Incartec 23-229-NAV interface for Honda Civic and CRV (2012-2017). Includes wiring instructions, radio switch settings, and steering wheel control setup.
Quick answers from the manual
Quick answer
- The 23-229-NAV is an interface for Honda Civic and CRV (2012-2017) that allows the installation of an aftermarket head unit while retaining steering wheel controls, amplifier, and subwoofer. p. 1
Key actions
- Set the rotary switch to the correct number for your radio brand. p. 2
- Connect the green/white fly lead to the car's Bluetooth module. p. 2
First start
- Set the rotary switch before plugging the interface into the vehicle. p. 2
Show 4 more answers Show less
Problems and fixes
Reset SWC to default settings
Press and release the program button on the side of the interface and wait 7 seconds for the LED to flash 4 times.
p. 1, 2Maintenance and reset
- Reset factory clock p. 1
Technical specifications
| Parameter | Value | Meaning | Pages |
|---|---|---|---|
| Rotary Switch Setting 1 | Alpine | Radio brand setting | p. 2 |
| Rotary Switch Setting 2 | JVC | Radio brand setting | p. 2 |
| Rotary Switch Setting 3 | Kenwood | Radio brand setting | p. 2 |
| Rotary Switch Setting 4 | Clarion | Radio brand setting | p. 2 |
| Rotary Switch Setting 7 | Pioneer/Other | Radio brand setting | p. 2 |
| Rotary Switch Setting 8 | Sony | Radio brand setting | p. 2 |
| Rotary Switch Setting 9 | Fusion | Radio brand setting | p. 2 |
Where to find it in the PDF
- Installation and Wiring p. 1
- Radio Settings and Bluetooth Connection p. 2
Table of contents
Manual images
Click an image to enlargeQuick guide from the manual
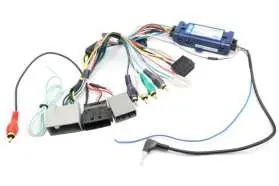
The Incartec 23-229-NAV interface is designed for Honda Civic and CRV (2012-2017) models with navigation. It allows the installation of an aftermarket head unit while retaining factory features such as steering wheel controls (SWC), amplifier, subwoofer, and reverse camera (requires separate part 27-269). Important: Before connecting the interface to the vehicle, you must set the rotary switch to match your aftermarket radio brand.
Installation
Follow these steps to install the interface:
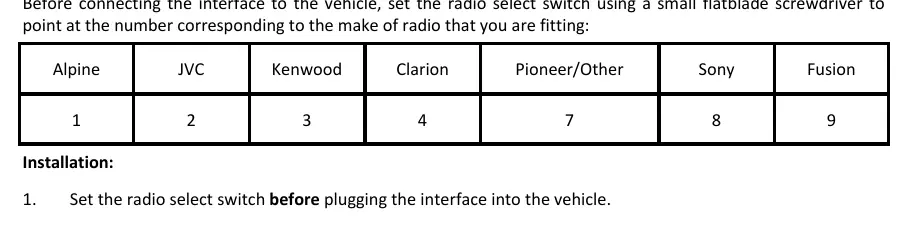
- Set the Rotary Switch: Use a small flatblade screwdriver to set the rotary switch on the side of the interface to the number corresponding to your radio brand (see the setting chart below).
- Wiring Connections: Connect the 10-pin molex, small 5-pin connector, and 4-pin patch lead to the RP4-HD11 interface box. Connect the 24-pin and 8-pin (power ISO) connectors to the vehicle harness.
- Patch Lead: Connect the patch lead to the SWC connection on the new radio. Use the blue/yellow single wire for Kenwood or JVC units, or the 3.5mm jack for most other radio types.
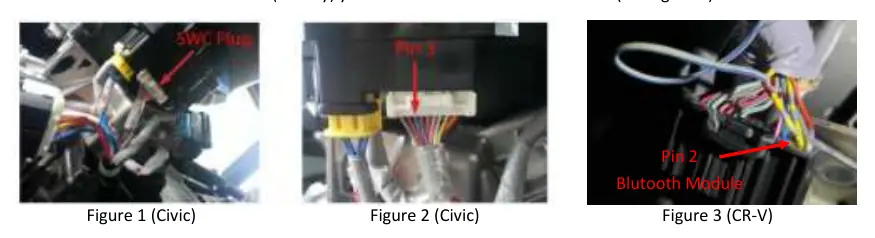
- Bluetooth Module Connection: Connect the green/white fly lead to the car's original Bluetooth/phone module.
- Civic: Connect to the blue wire in Pin 3 under the steering column.
- CRV: Disconnect the module below the radio in the center console and connect to the yellow wire in Pin 2.
- Testing: Secure all connections, insulate the hard-wired phone button connection, and test functionality before stowing cables and fitting the radio.
Steering Wheel Control (SWC) Programming
The interface comes pre-programmed for factory SWC functions. If you need to reset the SWC to default settings:
- Press and release the program button on the side of the interface.
- Wait 7 seconds for the LED to flash 4 times.
Important Notes
- Clock and Date: Once the factory head unit is removed, the factory display clock/date cannot be set. To reset the clock, disconnect the vehicle battery and reconnect it at 1:00, as this is the default time after a reset.
- Compatibility: This interface is not suitable for retaining steering wheel controls on Chinese or unbranded head units that use a 2-wire SWC interface (KEY1/KEY2).
Practical help
Common problems
Steering wheel controls not working on Chinese/unbranded head units
This interface is not compatible with 2-wire SWC systems (KEY1/KEY2).
Cannot set clock or date on factory display
The clock is derived from the factory head unit. To reset, disconnect the battery and reconnect at 1:00.
Before use
- Verify vehicle is a Honda Civic or CRV (2012-2017).
- Identify the brand of your aftermarket radio.
- Set the rotary switch on the interface before plugging it into the vehicle.
- Ensure you have the correct patch lead connection (3.5mm jack or blue/yellow wire).
Show more Show less
Specs in practice
- Rotary Switch
- Configures the interface to communicate with specific radio brands (Alpine, JVC, Kenwood, etc.).
- Green/White Fly Lead
- Required connection for the vehicle's original Bluetooth and phone module.
Images and diagrams
- The rotary switch table maps numbers 1-9 to specific radio brands.
- Figures 1, 2, and 3 illustrate the location of the Bluetooth module wires for Civic and CRV models.
Model compatibility
- Compatible with Honda Civic and CRV (EU) 2012-2017 with navigation.
- Requires part 27-269 (sold separately) to retain the reverse camera.

Manual page author
Michael Turner
Technical manual editor