Power / Batteries & Chargers
User Manual for KIMO 7601 20V Brushless Angle Grinder
Comprehensive user guide for the KIMO 7601 20V Brushless Angle Grinder. Includes setup instructions, safety guidelines, battery operation, wheel installation, and troubleshooting steps.
Quick answers from the manual
Quick answer
- The KIMO 7601 is a 20V cordless angle grinder. To operate, ensure the battery is charged, install the side handle and wheel guard, and use the slider switch to control power. p. 1, 7, 8
Key actions
- Installing the side handle p. 7, 9
- Installing a wheel p. 8, 10
First start
- Ensure the switch is OFF, install the battery, attach the side handle and guard, then slide the switch forward to start. p. 6, 7, 8
Problems and fixes
No Power
Check battery fit, charge level, or motor overload (let cool for 15 mins).
p. 11Maintenance and reset
- Clean the tool often, especially after heavy use, to remove dust and grit. p. 4
Technical specifications
| Parameter | Value | Meaning | Pages |
|---|---|---|---|
| Wheel Diameter | 4-1/2" (115 mm) | Compatible wheel size | p. 5 |
| Rated Speed | 9000 RPM | No load speed | p. 5 |
Where to find it in the PDF
- Components and Specifications p. 5
- Troubleshooting p. 11
Table of contents
Manual images
Click an image to enlargeQuick Guide from the Manual
The KIMO 7601 is a 20V cordless angle grinder designed for grinding and cutting. Before operation, ensure the battery is charged, the side handle is securely installed, and the wheel guard is properly positioned. Always wear eye protection and keep the work area clean. If the tool stops unexpectedly, check the battery level or allow the motor to cool down if it has overheated.
Components and Specifications
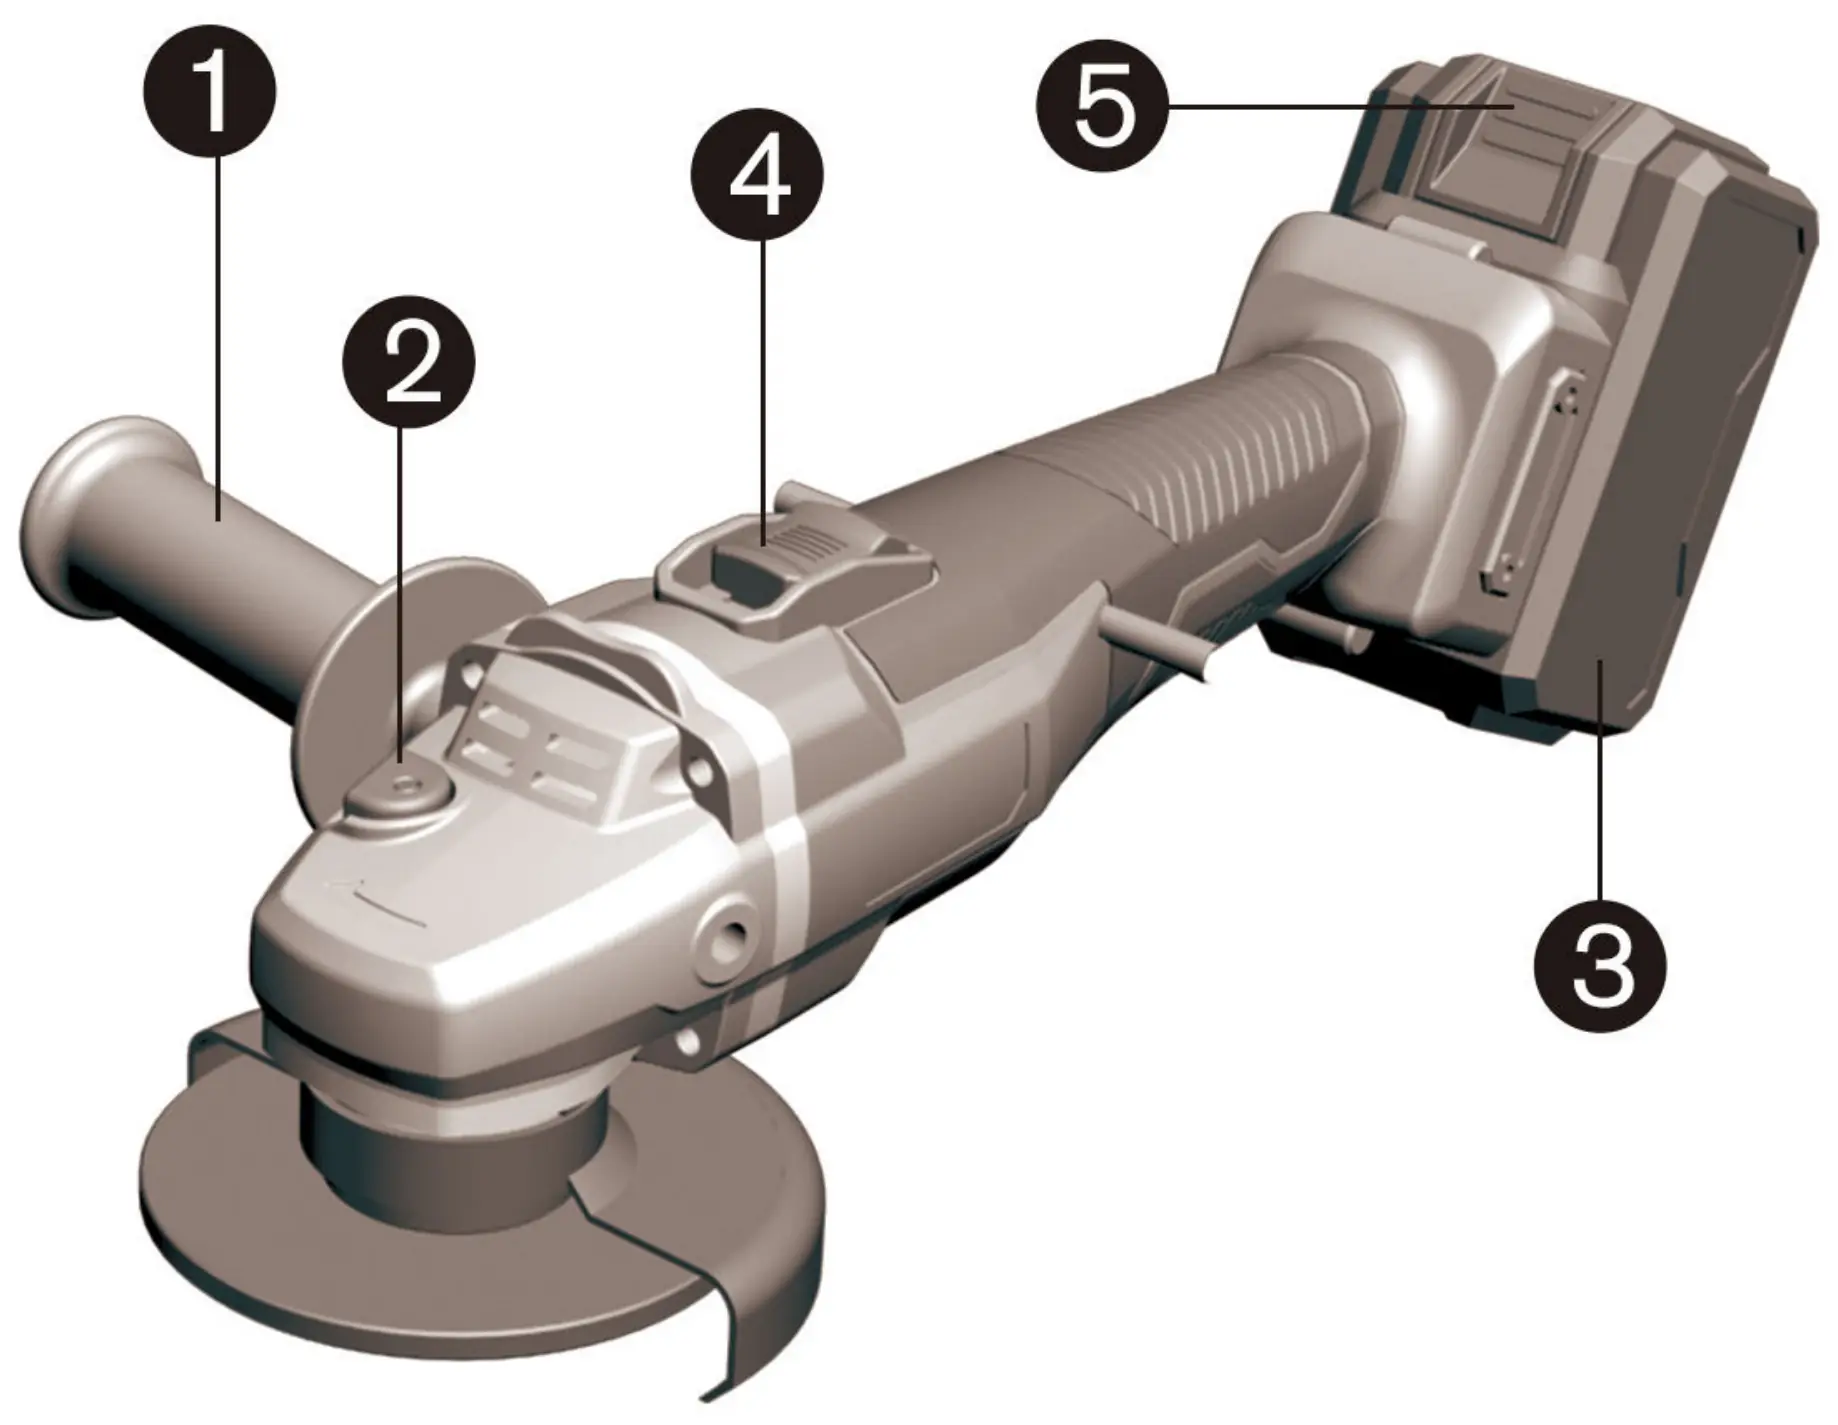
The tool consists of the following main parts: Side Handle, Spindle Lock, 20V Lithium-Ion Battery, Slider Switch, and Battery Slide Button. Key specifications include a 4-1/2 inch (115 mm) wheel diameter, a rated speed of 9000 RPM, and a weight of 5.3 lbs with the battery installed.
Specific Instructions
Setting the Depth Gauge and Switch: Ensure the slider switch is in the OFF position before connecting the battery. To start, slide the switch forward. For continuous operation, press the forward part of the switch inward.
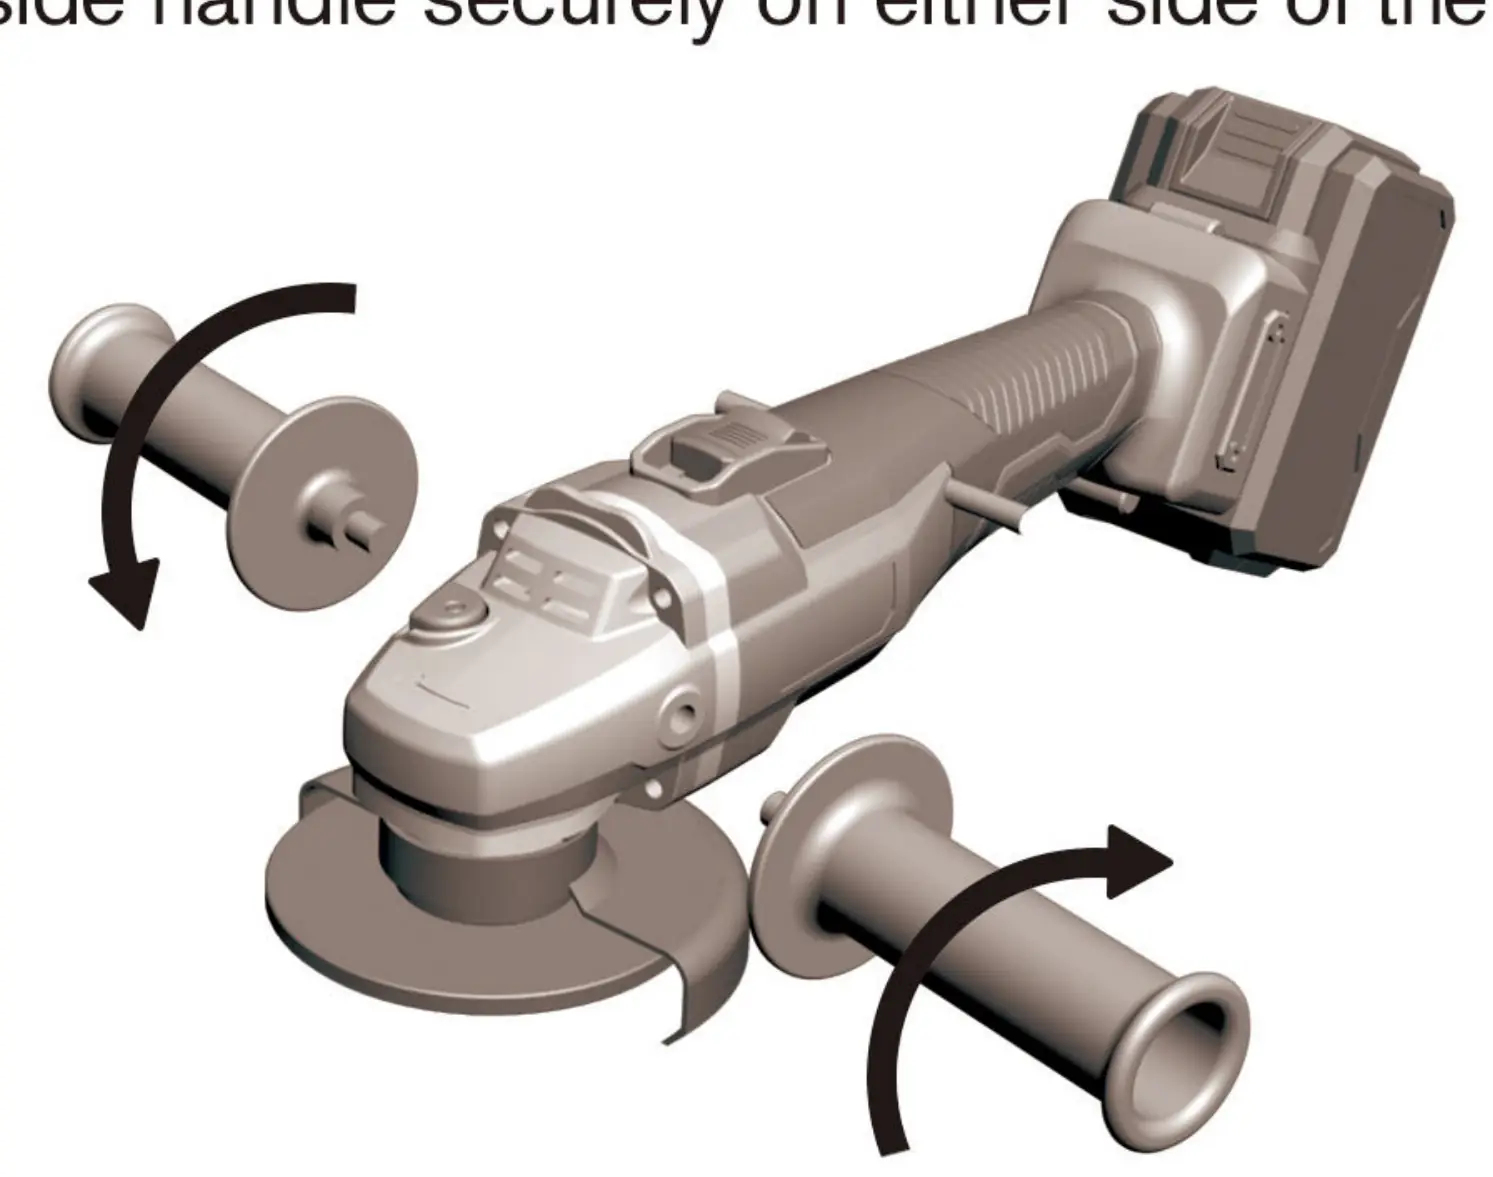
Installing Side Handle: Screw the side handle securely into either side of the tool.
Installing or Removing Wheel Guard: Mount the guard with protrusions aligned with the notches on the bearing box, rotate 180 degrees counterclockwise, and tighten the screw.
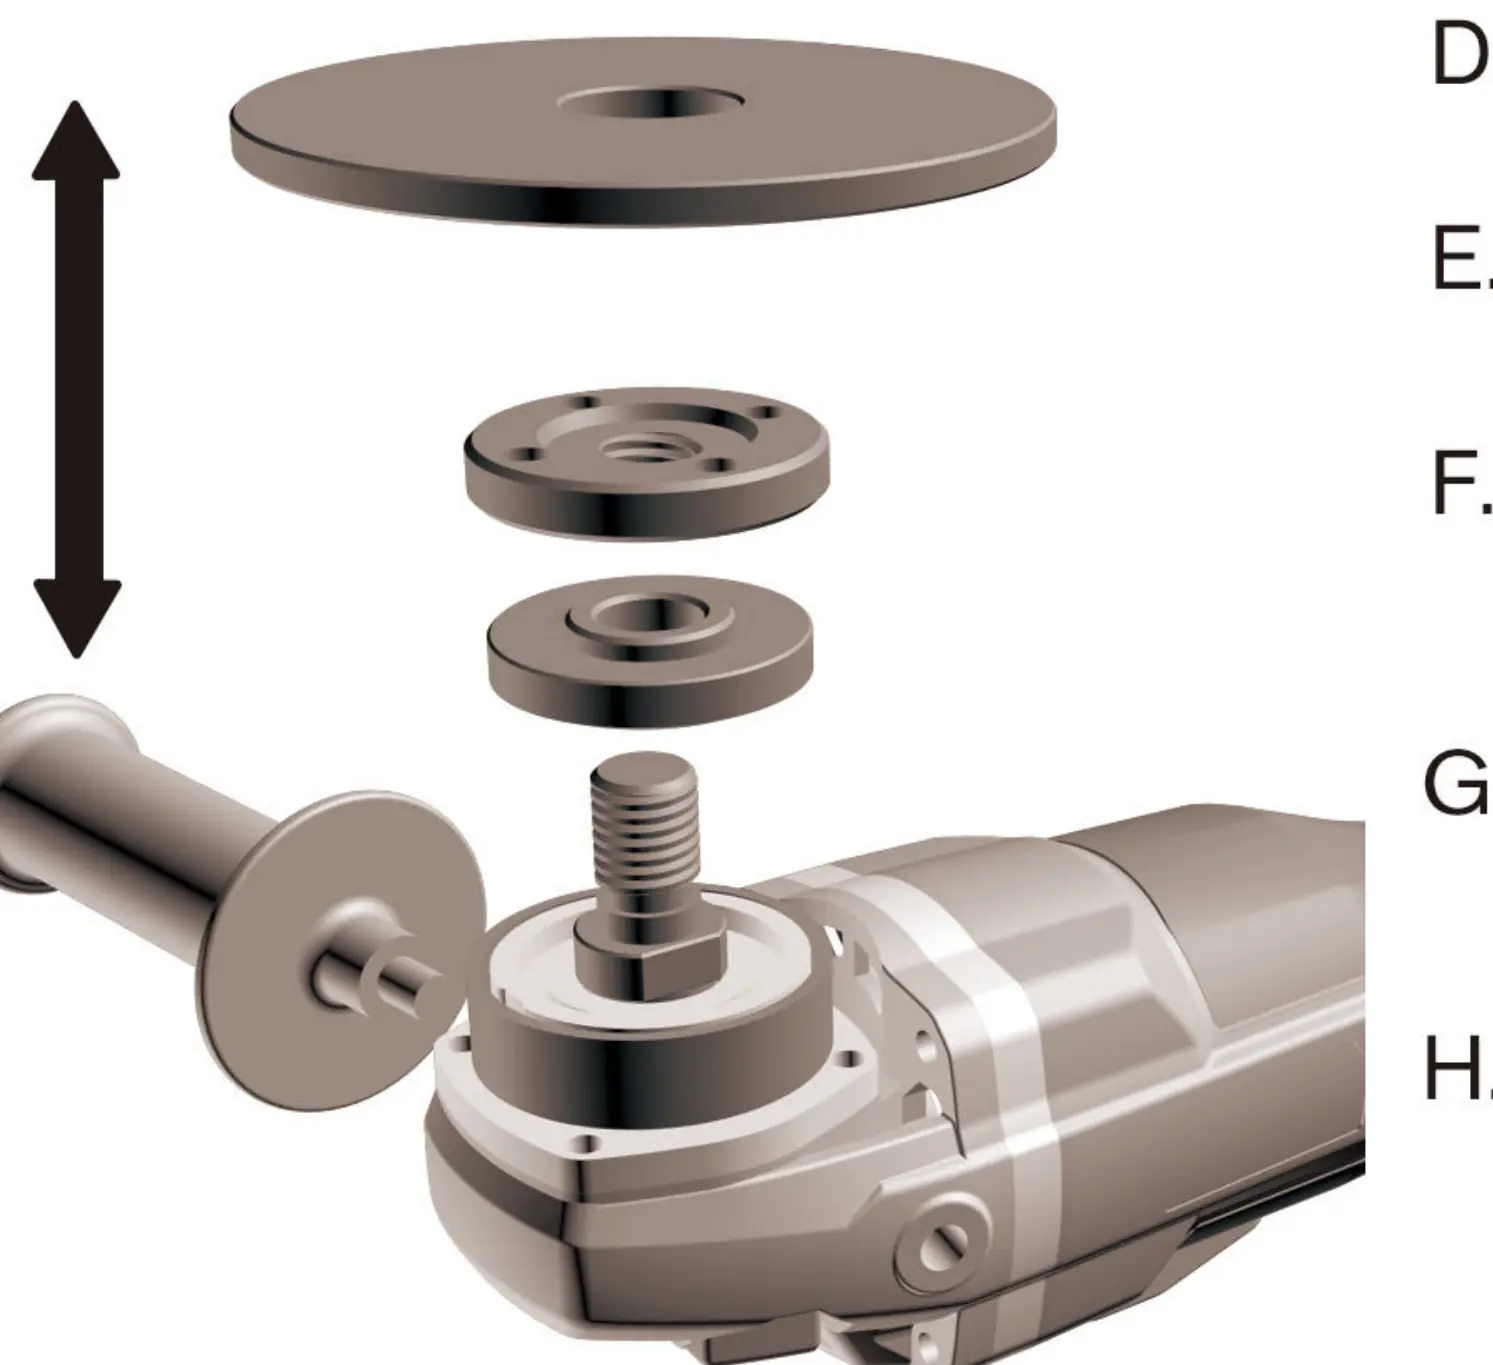
Installing or Removing Wheel: Always remove the battery first. Clean the flange and spindle. Place the flange on the spindle, align the wheel, position the flange nut, and tighten while pressing the spindle lock button.
Battery and Charging
The battery pack features a fuel gauge with four LED lights. Tap the indicator button to check the remaining charge. During charging, the lights blink in sequence and shut off when fully charged. A red light flashing on the charger indicates a hot/cold delay.
Troubleshooting
If the tool experiences issues, refer to the following:
- No Power: Check battery fit and charge level. If the motor is overloaded, let it cool for 15 minutes.
- Slow Revolutions: Check if the nut is tight and clean the spindle components.
- Smoke: Disconnect from power, remove the wheel, and clean debris.
- Noise: Do not force the tool; reduce pressure on the workpiece.
Warranty
KIMO provides a 2-year limited warranty for defects in material and workmanship. This warranty does not cover normal wear and tear, misuse, or repairs by unauthorized parties. Registration is not required for the standard warranty.
Manufacturer information
Zhejiang Kimo Power Tools Co., Ltd.
Practical help
Common problems
No Power
Check battery fit, charge level, or if the motor is overloaded (let cool for 15 minutes).
Slow Revolutions
Check if the nut is tight and clean the spindle components.
Smoke
Disconnect power, remove the wheel, and clean debris from the spindle.
Noise
The tool is working too hard; reduce pressure on the workpiece.
Before use
- Ensure the battery is fully charged.
- Verify the side handle is securely installed.
- Check that the wheel guard is properly positioned.
- Ensure the slider switch is in the OFF position before inserting the battery.
- Wear appropriate eye protection.
Specs in practice
- Wheel Diameter
- 4-1/2 inches (115 mm)
- Weight (Bare Tool)
- 3.9 lbs
- Weight (Tool + Battery)
- 5.3 lbs
Images and diagrams
- 1. Side Handle
- 2. Spindle Lock
- 3. 20V Max Lithium-Ion Battery
- 4. Slider Switch
- 5. Battery Slide Button
Model compatibility
- Use only accessories recommended by the manufacturer.
- Do not use circular saw blades or toothed blades.
- Accessories must be rated for at least 9000 RPM.

Manual page author
Michael Turner
Technical manual editor
Reviews PDF manuals for structure, safety notes, and practical product details so readers can find the right information quickly.