Home Appliances / Washing Machines
User Manual for Kogan 32" Curved QHD 240Hz Gaming Monitor (KAMN32Q24SA)
Comprehensive user guide for the Kogan 32" Curved QHD 240Hz Gaming Monitor (KAMN32Q24SA). Includes assembly instructions, connectivity guide, OSD menu settings, and full technical specifications.
Quick answers from the manual
Quick answer
- The Kogan 32" Curved QHD 240Hz Gaming Monitor (KAMN32Q24SA) is controlled via a single joystick on the back. To assemble, attach the stand base to the arm and insert it into the monitor. Connect via HDMI or DisplayPort, and use the joystick to power on and navigate the OSD menu. p. 5, 7, 9, 10
Key actions
- Assemble the stand p. 7
- Connect to computer p. 9, 10
- Navigate OSD menu p. 13
First start
- Power on the monitor p. 5, 12
Show 4 more answers Show less
Problems and fixes
No sound
Select monitor as default playback device in computer settings.
p. 11Maintenance and reset
- Restore factory defaults p. 15
Technical specifications
| Parameter | Value | Meaning | Pages |
|---|---|---|---|
| Screen Size | 32" | Display diagonal size | p. 18 |
| Resolution | 2560x1440 | QHD resolution | p. 18 |
| Refresh Rate | 240Hz | Maximum refresh rate | p. 18 |
| Response Time | 1ms | Pixel response time | p. 18 |
| Power | DC 24V 2.7A | Power requirements | p. 18 |
Where to find it in the PDF
- Safety & Warnings p. 3
- Assembly p. 7
- Connectivity p. 9, 10, 11
- OSD Menu p. 13, 14, 15
- Specifications p. 18
Table of contents
Manual images
Click an image to enlargeQuick Guide
This guide provides essential information for setting up and using your Kogan 32" Curved QHD 240Hz Gaming Monitor. Always ensure the monitor is powered off before connecting any cables. Keep the protective foam underneath the screen during assembly to prevent damage to the fragile panel.
Overview
The monitor features a single joystick on the back for all controls:
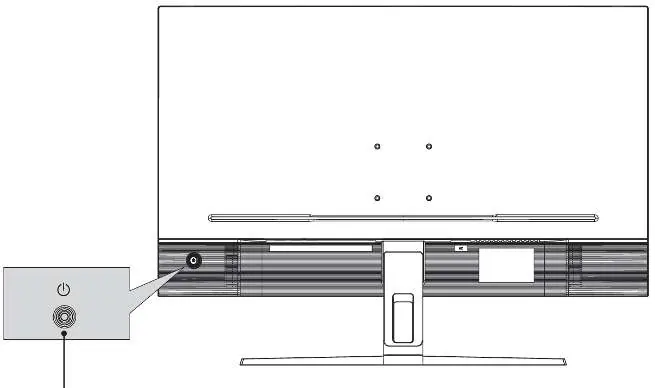
- Power On/Off: Press and hold the joystick for 3-5 seconds.
- Menu Navigation: Press the joystick to open the main menu, enter submenus, or confirm selections. Move the joystick up, down, left, or right to navigate.
Assembly
Follow these steps to assemble the stand:
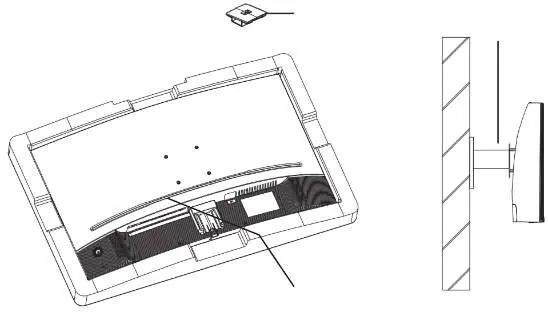
- Carefully remove the monitor, stand connector, and stand base from the box.
- Attach the stand base to the stand connector using the two provided M4x12mm screws.
- Insert the connection block into the rear of the monitor and push down until it clicks securely into place.
- Lift the monitor upright, remove the lower foam, and place it on your desk.
VESA Mount: The monitor supports a 75x75mm VESA pattern using M4 screws. Note that the VESA mount and accessories are not included.
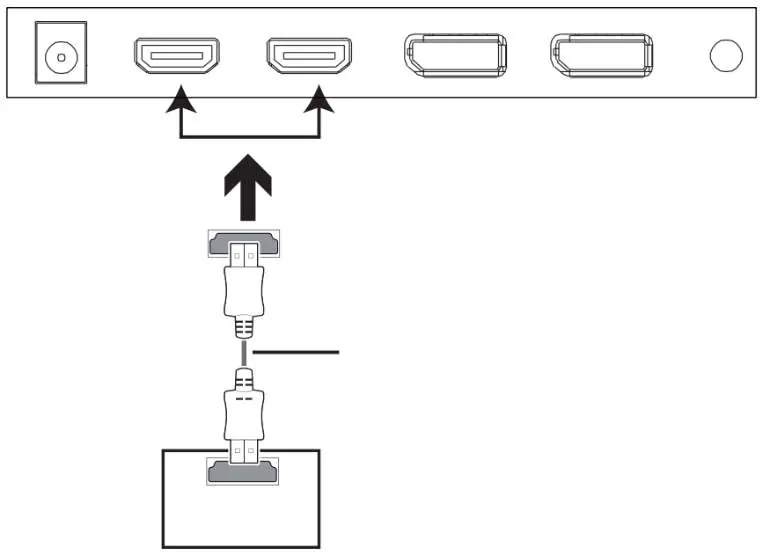
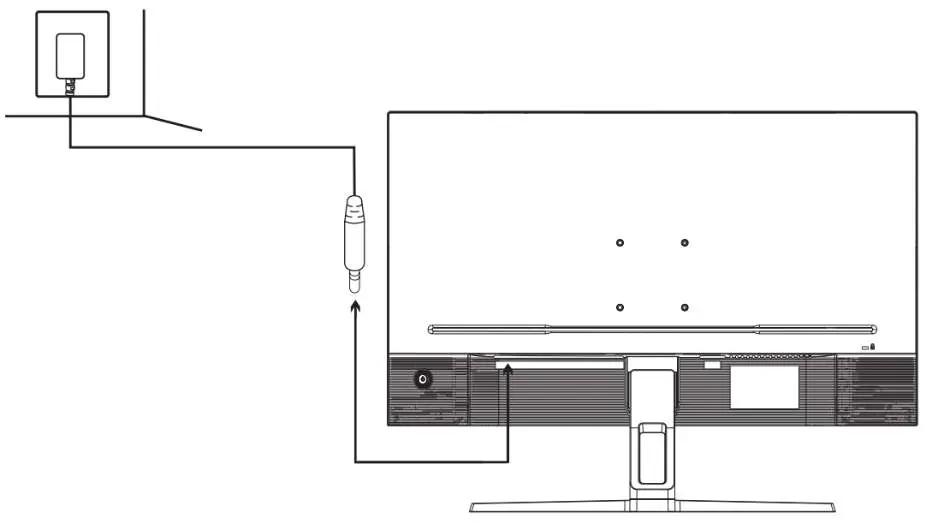
Connectivity
The monitor includes the following ports:
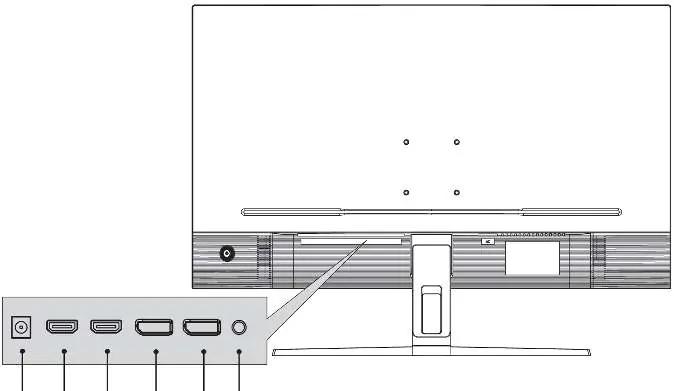
- Power Input Port (DC 12V)
- 2x HDMI Ports
- 2x DisplayPort (DP) Ports
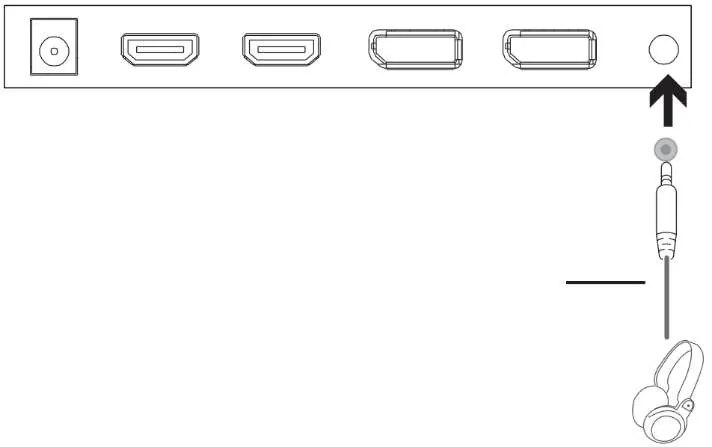
- 3.5mm Audio Output Port
To connect an external audio device, plug earphones or speakers into the 3.5mm audio port. If no sound is heard, ensure the monitor is selected as the default playback device in your computer's audio settings.
Operation
FreeSync: Ensure your hardware supports FreeSync and graphics drivers are up to date. You may need to enable this feature in your graphics card settings.
OSD Menu: Use the joystick to access the On-Screen Display (OSD) menu to adjust settings such as Brightness, Contrast, ECO modes, Aspect Ratio, Sharpness, Professional Mode, Color Temperature, and Game Modes. The monitor automatically configures optimal settings upon first use.
Cleaning & Care
- Unplug the monitor before cleaning.
- Use a clean, slightly dampened cloth for the main body.
- For the screen, turn it off, let it cool completely, and wipe with a dry micro-fibre cloth.
- Do not use alcohol, ammonia-based liquids, or harsh cleaners.
Technical Specifications
- Screen Size: 32"
- Resolution: 2560x1440
- Refresh Rate: 240Hz
- Response Time: 1ms
- Panel Type: VA
- Contrast Ratio: 4000:1
- Power Input: DC 24V 2.7A
Practical help
Common problems
No sound from connected audio device
Ensure the monitor is selected as the default playback device in your computer's audio settings.
Monitor will not turn on
Press and hold the joystick on the back of the monitor for 3-5 seconds.
Abnormal color display
If using a docking station, check the 'Colour Format' setting in the OSD menu or ensure the signal source is correct.
Before use
- Ensure the monitor is powered off before connecting any cables.
- Keep the protective foam underneath the screen while assembling the stand.
- Verify that your graphics card supports FreeSync for optimal gaming performance.
- Ensure all graphics drivers are up to date.
Show more Show less
Specs in practice
- Refresh Rate (240Hz)
- Determines how many times per second the screen updates, providing smoother motion for gaming.
- Response Time (1ms)
- The speed at which pixels change color, crucial for reducing motion blur in fast-paced games.
- Panel Type (VA)
- Vertical Alignment panel, known for high contrast ratios and deep blacks.
Images and diagrams
- The joystick on the back is the primary control for power and OSD menu navigation.
- The ports are located on the rear, including DC power, HDMI, DP, and Audio Out.
Model compatibility
- VESA mounting pattern is 75x75mm.
- Requires M4 screws for VESA mounting (not included).

Manual page author
Michael Turner
Technical manual editor