Lighting / Controllers & Dimmers
User Manual for LED World MD-012-060VWJV2 12VDC 60W LED Driver
Quick guide for the LED World MD-012-060VWJV2 12VDC 60W Class 2 Constant Voltage LED Driver. Includes installation, wiring diagrams, safety precautions, and troubleshooting.
Table of contents
Manual images
Click an image to enlargeQuick Guide
The LED World MD-012-060VWJV2 is a 12VDC 60W Class 2 Constant Voltage LED Driver designed for indoor and outdoor use. Important: This is a non-dimmable driver. Do not use with dimmer switches. The maximum continuous load should not exceed 48 watts.
Safety Precautions
- Installation must be performed by qualified personnel only.
- Ensure compliance with the National Electrical Code (NEC) and Canadian Electrical Code.
- Turn off power at the breaker before starting any installation.
- Do not install Class 2 low voltage wiring in the same run as AC main power.
- Operate only within the ambient temperature range of -20°C to 40°C (-4°F to 104°F).
- The driver must be grounded in accordance with NEC/CEC.
Installation Guidelines
The driver requires a well-ventilated area for proper operation. Do not install inside a cabinet smaller than 12 x 12 x 15 inches. If installing multiple drivers, maintain a minimum spacing of 5 inches (127mm) between each unit.
Mounting
Select a location capable of supporting the weight of the transformer. Use the four keyholes on the transformer case to mount the unit. The unit must be mounted at a height greater than 1 foot (30cm) from the ground. If used outdoors, ensure the knockouts point downwards.

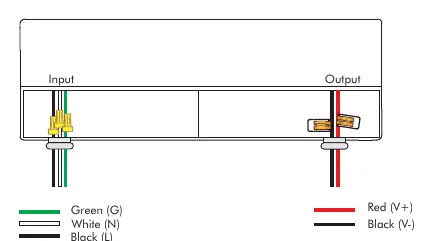
Input Connections / Grounding
Remove the wiring cover by unscrewing the two screws. Remove the wiring compartment knockout and install appropriate strain reliefs (not included). With power off at the breaker, route the input wires. Connect the input wires to the corresponding pigtail wires: Black (L) and White (N). Use UL/CSA listed wire nuts or Wago connectors. Connect the ground wire to the driver's green wire.
Output Connections
Connect the LED fixture wires to the driver's output wires: Red (+) to the positive wire of the fixture, and Black (-) to the negative wire of the fixture. After all wiring is complete, secure the wiring cover back onto the unit.
Troubleshooting
If the unit is not functioning, check the following:
- Overload: Ensure the total wattage of all connected LED fixtures does not exceed 60W (48W continuous).
- Reverse Polarity: Verify that the positive and negative wires are connected correctly.
- Damage: Do not use the driver if it appears damaged or defective; it is not repairable.
- Dimming: Ensure no dimmer switch is connected, as this unit is non-dimmable.
Practical help
Common problems
Unit overheating or failing
Ensure load does not exceed 48W continuous. Check for proper ventilation and maintain at least 5 inches of spacing between drivers.
Flickering or dimming issues
This is a non-dimmable driver. Do not connect to a dimmer switch.
Reverse polarity
Ensure the positive (+) wire connects to the red wire and the negative (-) wire connects to the black wire.
Before use
- Verify input voltage matches 100-277VAC.
- Ensure total LED fixture wattage does not exceed 60W (48W continuous).
- Confirm installation location is well-ventilated.
- Ensure you have UL/CSA listed wire nuts or Wago connectors.
- Check that power is turned off at the breaker.
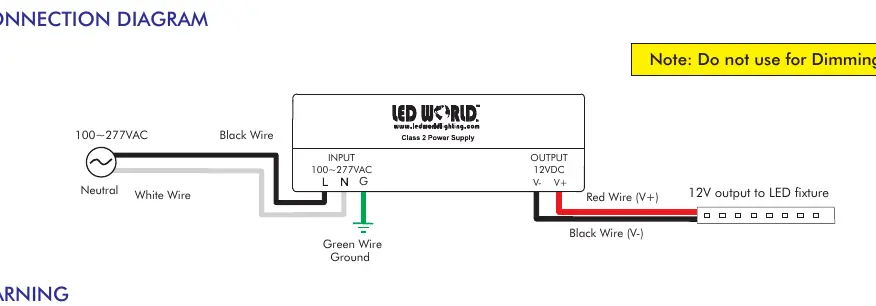
Images and diagrams
- Wiring diagram shows input (100-277VAC) connected to Black (L) and White (N) wires.
- Ground wire (Green) must be connected to the driver case.
- Output (12VDC) connects Red (+) and Black (-) to the LED fixture.
Model compatibility
- Not compatible with dimmers.
- Suitable for indoor and outdoor use (if knockouts point downward).

Manual page author
Emily Carter
User documentation editor
Prepares concise manual descriptions and highlights the most useful setup, operation, and maintenance information for readers.