Electronics / Monitors
LG LED LCD Monitor Owner's Manual
Comprehensive owner's manual for LG LED LCD monitors, including the 19EN33S, 20EN33SS, and 24EN33S series. Covers stand assembly, wall mounting, OSD menu settings, troubleshooting, and technical specifications.
Quick answers from the manual
Quick answer
- This manual covers the setup, operation, and troubleshooting for LG EN33 series monitors. It includes instructions for stand assembly, wall mounting, OSD menu navigation, and technical specifications. p. 1, 3, 8, 11
Key actions
- Assemble the stand p. 5
- Mount on a wall p. 8
- Adjust OSD settings p. 11, 12
First start
- Connect power and signal cables p. 6, 9
- Power on p. 6
Show 4 more answers Show less
Problems and fixes
No image appears
Check power connection, press power button, adjust brightness/contrast, or check PC signal.
p. 22
OSD Locked
Hold MENU button for several seconds.
p. 11, 22Maintenance and reset
- Reset to factory settings p. 12
Technical specifications
| Parameter | Value | Meaning | Pages |
|---|---|---|---|
| VESA Mount | 75x75 or 100x100 | Wall mount interface size varies by model. | p. 8 |
| Power Input | 19V 1.2A / 1.3A | Required power input for the monitor. | p. 24, 25, 26, 27 |
Where to find it in the PDF
- Assembling and Preparing p. 3, 8
- Customizing Settings p. 11, 21
- Specifications p. 24, 30
Table of contents
Manual images
Click an image to enlargeQuick guide from the manual
This manual provides essential instructions for setting up and operating your LG LED LCD monitor. Key procedures include assembling the stand, connecting the monitor to a PC via D-SUB, and navigating the On-Screen Display (OSD) menu to customize picture, color, and energy-saving settings.
Assembling and Preparing
Before using the monitor, ensure you have all included accessories: CD, D-SUB cable, power cord, AC-DC adapter, stand body, and stand base.
Stand Assembly
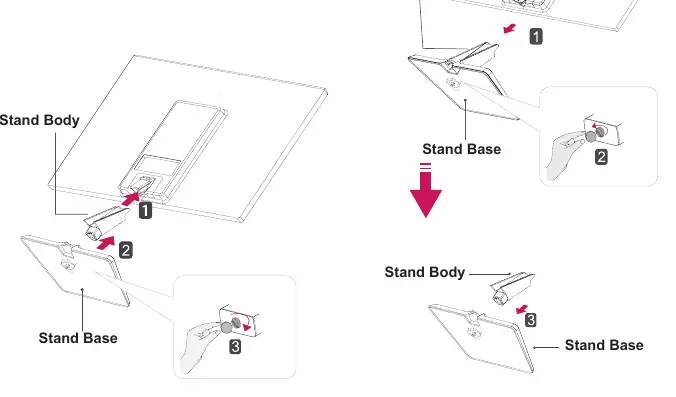
- Place the monitor face down on a flat, cushioned surface to prevent screen damage.
- Attach the stand body to the monitor.
- Attach the stand base to the stand body and tighten the screw using a coin.
Wall Mounting
- The monitor is VESA compatible. Ensure you use the correct VESA standard mount (75x75 or 100x100 depending on the model).
- Use only authorized wall mounts and screws that meet VESA standards to avoid damage.
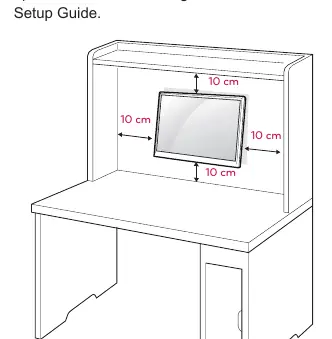
- Maintain a 10 cm clearance from the wall for proper ventilation.
Using the Monitor Set
Connect the monitor to your PC using the supplied D-SUB cable. The monitor supports Plug & Play, meaning your PC should automatically recognize the device upon connection.
OSD Menu and Settings
Use the buttons on the bottom panel to access the OSD menu:
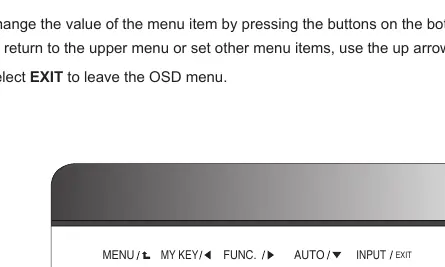
- MENU: Access main menus. Hold for several seconds to lock/unlock OSD controls.
- MY KEY: Access custom shortcut settings.
- FUNC.: Access special features like Picture Mode, Super Energy Saving, Dual Display, and Dual Web.
- AUTO: Automatically adjusts display settings (only in Analog Mode).
- INPUT/EXIT: Switch inputs or exit the menu.
Troubleshooting
If you encounter issues, check the following:
- No image: Ensure the power cord is connected, the power button is on, and the PC is sending a signal.
- OSD Locked: Press and hold the MENU button for several seconds to unlock.
- Incorrect display position: Press the AUTO button to automatically adjust the image.
- Out of Range: Adjust the PC video card frequency to match the monitor's specifications.
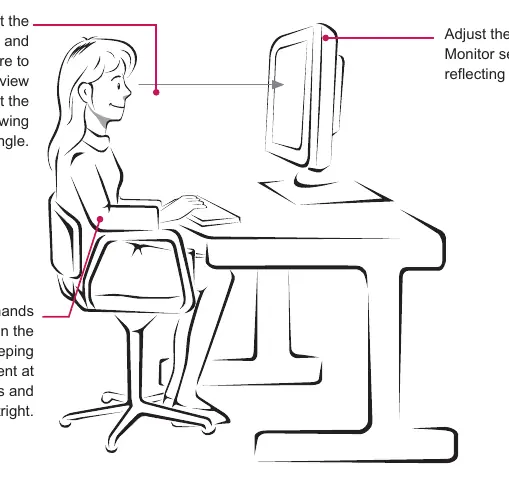
Proper Posture
For comfortable use, adjust the monitor angle and your seating position to view the screen at an optimal angle. Keep your hands gently on the keyboard with arms bent at the elbows.
Manufacturer information
LG Electronics
Practical help
Common problems
No image appears on the screen
Check if the power cord is connected properly, press the power button, and ensure the PC is turned on.
OSD LOCKED message appears
Press and hold the MENU button for several seconds to unlock the OSD controls.
Display image is incorrect or has vertical bars
Press the AUTO button on the monitor to automatically adjust the display to the ideal setting.
OUT OF RANGE message
The signal from the PC is out of the monitor's frequency range. Adjust your PC's resolution and frequency settings.
Before use
- Verify all accessories are present (CD, D-SUB cable, Power cord, Adapter, Stand components).
- Prepare a flat, cushioned surface for stand assembly.
- Ensure 10 cm of clearance around the monitor for ventilation.
- Confirm your PC has a D-SUB output or a compatible adapter.
Show more Show less
Images and diagrams
- Stand assembly: Shows attaching the stand body to the monitor and securing the base with a coin.
- Cable holder: Illustrates how to route cables through the holder on the back of the stand.
- Proper posture: Demonstrates the correct viewing angle and arm position for ergonomic use.
Model compatibility
- Requires D-SUB connection for video input.
- Macintosh users may require a separate plug adapter for the 15-pin D-SUB connector.

Manual page author
Emily Carter
User documentation editor