Lighting / Outdoor Lighting
User Manual for Lightpro Atik R2 187U LED Spotlight
Comprehensive user guide for the Lightpro Atik R2 187U outdoor LED spotlight. Includes installation instructions for ground and surface mounting, beam angle adjustment, dimmer operation, and maintenance guidelines.
Quick answers from the manual
Quick answer
- The Lightpro Atik R2 is a 12V outdoor LED spotlight. It features a built-in 6-level dimmer and adjustable beam angles (60° or 23°). It can be installed in the ground using the provided tube or mounted in a fixed surface. p. 6, 7
Key actions
- Install in ground p. 6, 7
- Install in fixed surface p. 6, 7
- Change reflector p. 6, 7
- Adjust dimmer p. 6, 7
Problems and fixes
Dimmer inaccessible
Remove fixture from ground tube to access button on underside.
p. 6, 7Maintenance and reset
- Clean stainless steel parts every 6 months with stainless steel cleaner. p. 11
Technical specifications
| Parameter | Value | Meaning | Pages |
|---|---|---|---|
| Power | 9W | Maximum power consumption | p. 6, 7 |
| IP Rating | IP67 | Protection class | p. 6, 7 |
Where to find it in the PDF
- Product Overview and Parts p. 2
- Installation Diagrams p. 3
- Reflector and Dimmer Adjustment p. 4
- Wiring Connection p. 5
Table of contents
Manual images
Click an image to enlargeQuick Guide
The Lightpro Atik R2 is a 12V outdoor LED spotlight. Key operational points include:
- System Requirement: Must be used with the Lightpro 12-volt system.
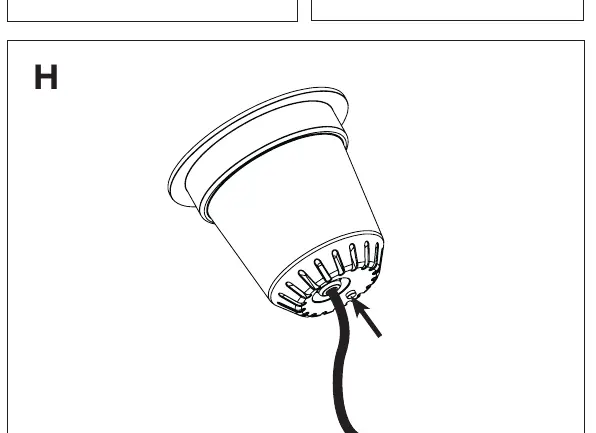
- Dimmer Access: The dimmer is located on the underside of the fixture. If installed in the ground tube, you must temporarily remove the fixture to adjust the brightness.
- Beam Adjustment: The fixture comes with a pre-installed 60° reflector. An alternative 23° reflector is included in the box.
- Installation: Can be installed in the ground (using the provided tube) or in a fixed surface (requires a 100mm hole).
Product Description
The Lightpro Atik R2 (187U) is an LED spot designed for outdoor use. It is compatible with the Lightpro 12-volt system. Any modifications to the product may affect safety, warranty, and system performance.
Installation
Option 1: Placement in the ground
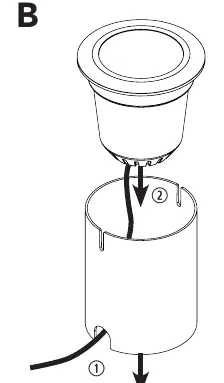
- Place the ground tube in the ground.
- Place the fixture into the ground tube.
- Note: Ensure sufficient cable length is reserved during installation so the fixture can be removed to access the dimmer on the underside.
Option 2: Placement in a fixed underground
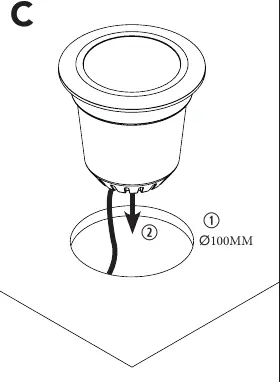
- Drill a hole with a diameter of 100mm in the surface.
- Place the fixture directly into the drilled hole. The ground tube is not required for this method.
Adjusting Beam Direction and Reflector
The pre-installed reflector provides a 60° beam angle. To change it to the 23° alternative:
- Unscrew and remove the cover ring.
- Unscrew and remove the existing reflector.
- Insert the alternative reflector and fasten it.
- The light source is secured by a spring mechanism; pull the holder up to adjust the position if necessary.
- Replace and fasten the cover ring.
Dimmer Function
The fixture features a built-in dimmer with 6 brightness levels. Press the button located on the underside of the fixture to cycle through the settings.
Maintenance
- Always install the product so it remains accessible for maintenance. Do not permanently embed or brick in the fixture.
- Turn off the system by unplugging the transformer before performing maintenance.
- Clean regularly with a soft, clean cloth. Avoid abrasives.
- Clean stainless steel parts with a stainless steel cleaning agent every 6 months.
- Do not use high-pressure washers or aggressive chemicals.
Practical help
Common problems
Dimmer is inaccessible
The dimmer is on the underside of the fixture. If installed in the ground tube, you must temporarily remove the fixture from the tube to reach the button.
Beam angle is too wide
Replace the pre-installed 60° reflector with the included 23° alternative reflector.
Before use
- Ensure you have the Lightpro 12-volt system transformer available.
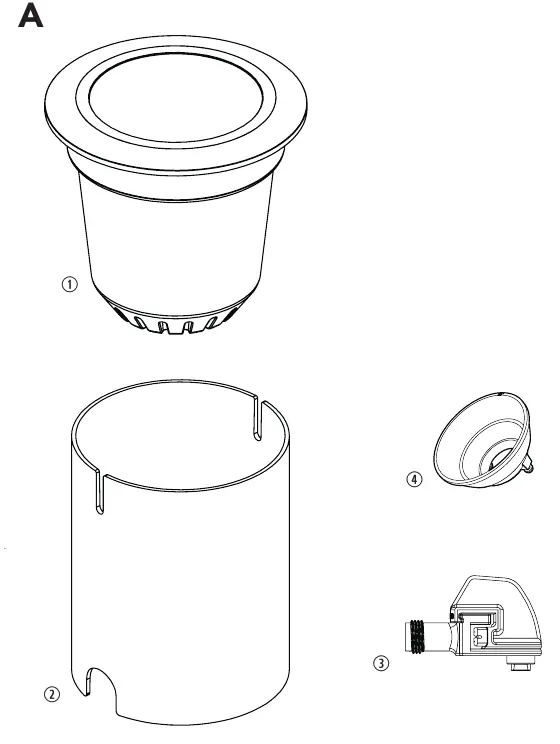
- Verify all parts are present: Fixture, Ground tube, Connector, Alternative reflector.
- Plan cable length to ensure the fixture can be removed from the ground tube for dimmer access.
- Check that the installation surface is suitable for a 100mm hole if not using the ground tube.
Specs in practice
- Protection class
- IP67 (Dust-tight and protected against immersion in water)
- Luminous flux
- 65 – 750 lm
- Ambient temperature
- -20°C to 50°C
Images and diagrams
- Figure A: Package contents identification.
- Figure B: Ground installation using the ground tube.
- Figure C: Fixed surface installation (100mm hole).
- Figure D-G: Steps to replace the reflector and adjust the beam.
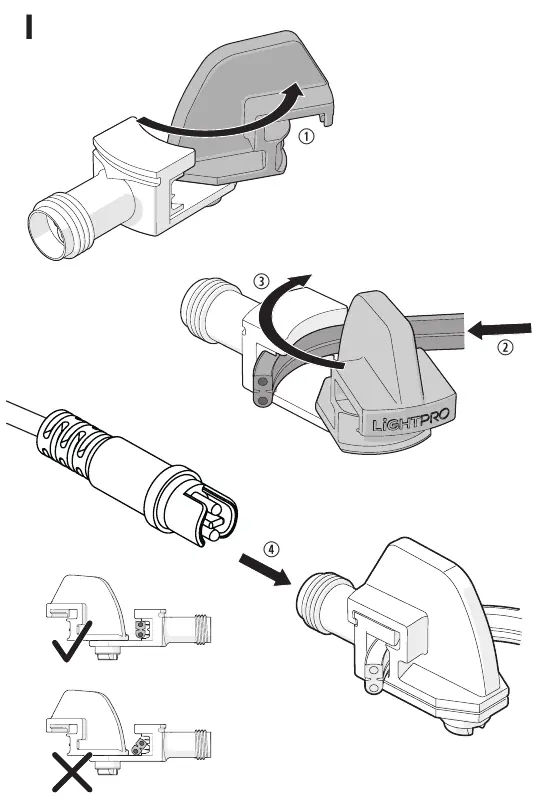
- Figure I: Correct wiring connection to the main cable.
Model compatibility
- Compatible only with Lightpro 12-volt systems.
- Do not use high-pressure washers for cleaning.

Manual page author
Emily Carter
User documentation editor
Prepares concise manual descriptions and highlights the most useful setup, operation, and maintenance information for readers.