Lighting / Outdoor Lighting
User Manual for Lightpro Onyx LED Outdoor Spotlight
Quick guide for the Lightpro Onyx LED outdoor spotlight. Includes installation steps for fixed surfaces and ground tubes, wiring instructions, maintenance, and troubleshooting.
Table of contents
Manual images
Click an image to enlargeQuick guide from the manual
The Lightpro Onyx is a 12V LED outdoor spotlight designed for use with the Lightpro 12-volt system. This guide provides essential information for installation, maintenance, and troubleshooting. Always ensure the system is powered off before performing any maintenance or installation tasks.
Product description
The Onyx series includes models 30, 60, and 90, available in RS and RA variants. These fixtures are IP67 rated, making them suitable for outdoor use. They are not dimmable and the light source is not replaceable.
Installation
Option 1: Fixed surface installation
- Position the product and lay cables to reach the transformer or main cable.
- If the product has a water drain hole, ensure it points downwards.
- Use the supplied non-corrosive fixing materials to bolt the product down.
- Connect the light to the main cable using the provided connector.
- Plug the transformer into a 230V wall socket.
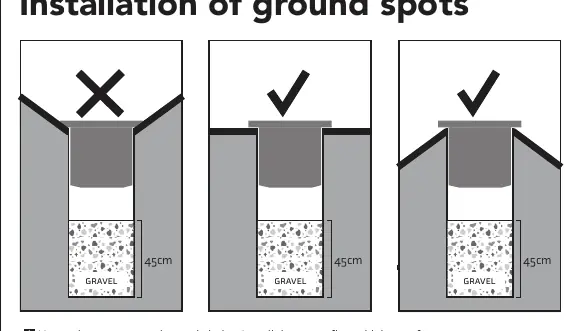
Option 2: Ground tube installation
- Place the ground tube into the ground.
- Insert the fixture into the ground tube.
- Ensure the hole for the ground spot has a layer of gravel (approx. 45 cm) to assist with drainage and prevent groundwater issues.
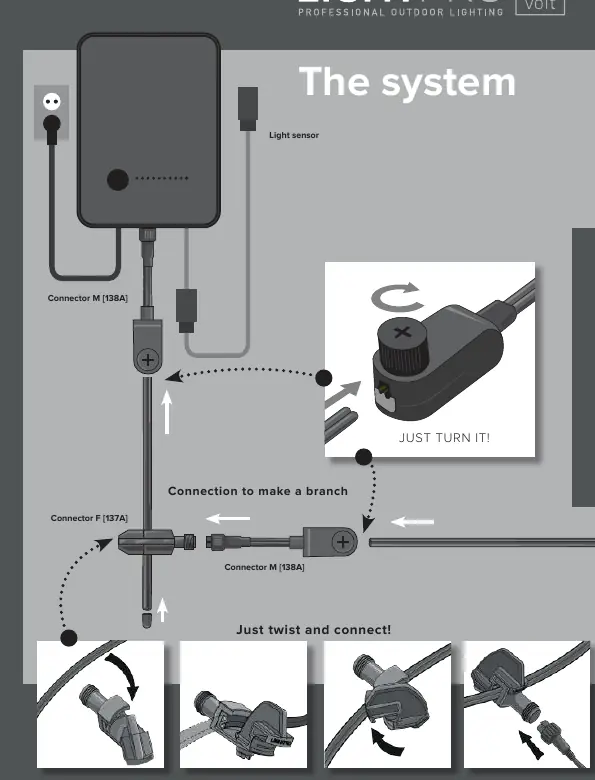
Wiring and connection
The system uses a simple twist-lock connector system. To connect lights to the main cable, use the provided connectors (Connector F and Connector M). Simply twist and connect to create a branch. Ensure all connections are secure.
Maintenance and lens replacement
To replace the lens or filter:
- Ensure the housing is clean and dry before reassembling.
- The rubber ring must be completely clean to maintain water resistance (IP67).
- Place the ring straight on top of the body and ensure it is horizontal before tightening.
- Clean the product regularly with a soft, clean cloth. Do not use high-pressure washers or aggressive chemicals.
- Clean stainless steel parts with a stainless steel cleaning agent every 6 months.
Troubleshooting
If the lamps do not light:
- Turn off the power.
- Check that all plugs are connected properly.
- Check the transformer and the fuse (test if necessary).
- Inspect cables for any damage.
- Turn the power back on.
Safety
This product must not be permanently embedded or bricked in. It is suitable for ambient temperatures between -20°C and 50°C. Do not use in areas where combustible gases, fumes, or liquids are stored.
Practical help
Common problems
Lamp does not light
Turn off power, check all plug connections, inspect transformer/fuse, and check cables for damage.
Water ingress
Ensure the rubber ring is completely clean before replacing the glass/lens to maintain the IP67 seal.
Before use
- Verify all parts are present (fixture, connector, lenses, cable, ground tube).
- Ensure the installation surface is flat or higher than the surrounding area.
- Check that the transformer is compatible with the 12V system.
- Ensure any drain holes point downwards.
- Use non-corrosive materials for fixing.
Specs in practice
- Ambient temperature
- Operating range is -20°C to 50°C.
Images and diagrams
- Connector F/M: Twist-lock mechanism for connecting lights to the main cable.
- Ground tube: Used for in-ground installation to improve drainage.
Model compatibility
- Only for use with Lightpro 12V system.
- Not dimmable.
- Light source is not replaceable.

Manual page author
Michael Turner
Technical manual editor
Reviews PDF manuals for structure, safety notes, and practical product details so readers can find the right information quickly.