Lighting / Outdoor Landscape
User Manual for Lightpro Nova 5 116S Outdoor Spotlight
Quick guide for the Lightpro Nova 5 116S outdoor spotlight. Includes installation steps, wiring instructions, light source replacement, safety guidelines, and troubleshooting.
Table of contents
Manual images
Click an image to enlargeQuick Guide from the Manual
The Lightpro Nova 5 116S is a 12V outdoor spotlight designed for garden and landscape lighting. This guide provides essential steps for installation, maintenance, and troubleshooting. Always ensure the system is connected to a compatible 12V transformer and that all connections are secure and protected from moisture.
Safety Instructions
- Do not install the product in areas where combustible gases, fumes, or liquids are stored.
- Keep the product at a safe distance from highly flammable materials.
- Ensure the product remains accessible for servicing; do not permanently embed or brick it in.
- The product is rated IP44/IP67 (splash-water-proof) and suitable for temperatures between -20°C and 50°C.
- If the protective glass is broken, it must be replaced before further use.
- Maintain a minimum distance of 0.5 m from illuminated surfaces.
- Connect only to a safety extra-low voltage power supply (max 12 Volts).
Installation
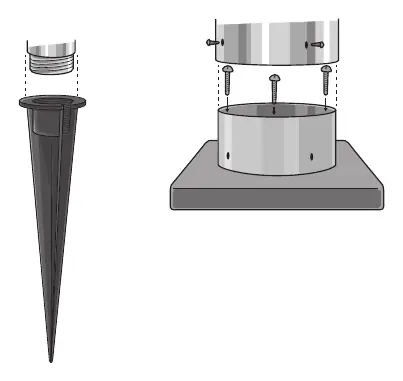
- Place the products in the desired location and lay cables to allow comfortable connection to the transformer.
- If the product has a drain hole, ensure it is pointing downwards to prevent water accumulation.
- Use the provided non-corrosive fixing materials to secure the product if bolting it down.
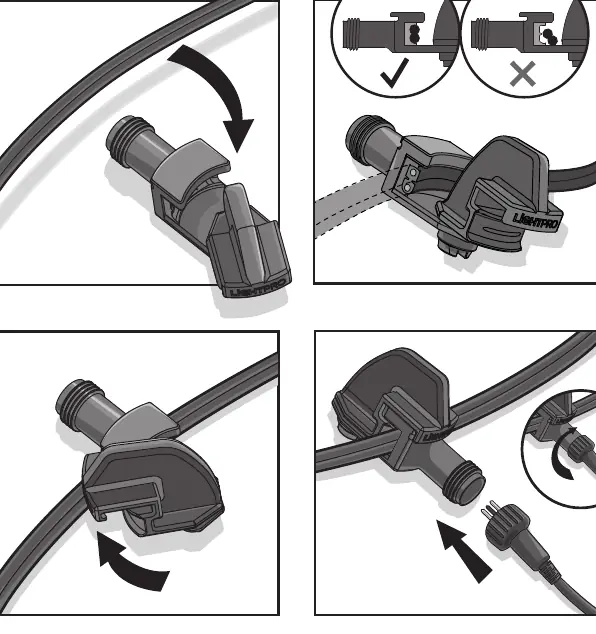
- Connect the lights to the main cable using the provided connector.
- Plug the transformer into a standard 230V 50Hz wall socket.
Replacing the Light Source
To replace the light source, follow these steps:
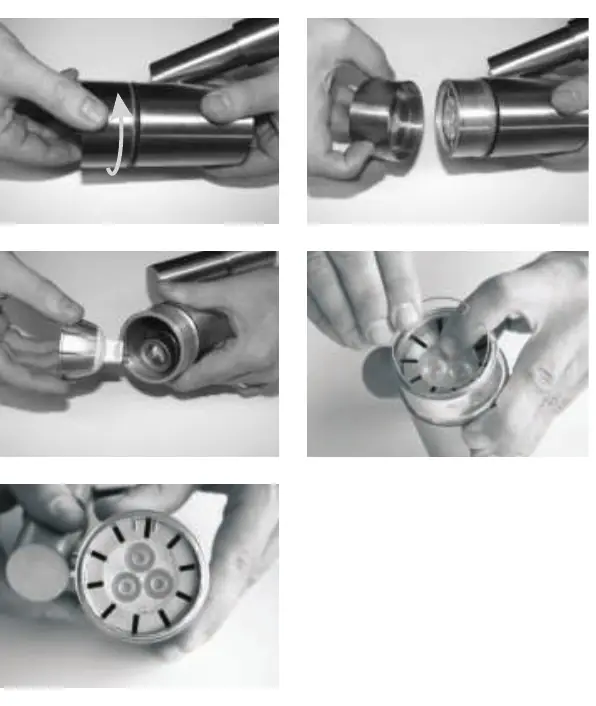
- Turn off the power supply.
- Allow the light source to cool down for at least 5 minutes.
- Open the housing, remove the old bulb, and replace it with an identical model with the same specifications.
- Ensure all parts are dry and clean before reassembling.
- Turn the power back on.
Troubleshooting
If the lamps do not light, perform the following checks:
- Turn off the power supply.
- Verify that all plugs are connected properly.
- Inspect the light source and replace it if necessary.
- Check the transformer and fuse for faults.
- Inspect cables for any physical damage.
- Reconnect the power.
Technical Specifications
- Light Source: MR16 12V GU5.3, 5W LED
- Luminous Flux: 320 Lumen
- Color Temperature: 3000 Kelvin
- Lifespan: 10,000 Hours
- Protection Class: IP44/IP67
- Voltage: 12V
Practical help
Common problems
Lamp does not light up
Check power supply, ensure all plugs are connected, inspect light source, check transformer/fuse, and inspect cables for damage.
Before use
- Ensure installation area is free of flammable materials.
- Verify the transformer is connected to a 230V 50Hz outlet.
- Ensure the drain hole is pointing downwards.
- Use non-corrosive fixing materials for mounting.
- Ensure the light source is identical to the original specifications.
Specs in practice
- -20°C to 50°C
- The operating temperature range for the device.
Images and diagrams
- Connector usage: Ensure the connector is properly seated on the main cable as shown on page 5.
- Light source replacement: Twist to open the housing, replace the bulb, and ensure parts are dry and clean.
Model compatibility
- Only use identical light source models with the same specifications.
- Do not exceed the maximum wattage indicated on the fixture label.

Manual page author
Emily Carter
User documentation editor
Prepares concise manual descriptions and highlights the most useful setup, operation, and maintenance information for readers.