Lighting / Fixtures
User Manual for Maxim Lighting CABANA VX 1-Light Outdoor Hanging Pendant
Quick guide for the Maxim Lighting CABANA VX 1-Light Outdoor Hanging Pendant (Model 40669). Includes installation steps, wiring instructions, maintenance tips, and safety warnings for outdoor use.
Table of contents
Manual images
Click an image to enlargeImportant Information
This manual provides installation and maintenance instructions for the Maxim Lighting CABANA VX 1-Light Outdoor Hanging Pendant (Model 40669). This fixture is designed for outdoor use. It requires one E26 base bulb with a maximum wattage of 60W (not included). Always consult a qualified electrician for installation to ensure safety and compliance with local electrical codes.
Safety Warnings
- Electrical Safety: Always disconnect the power source before assembling, cleaning, or replacing the bulb.
- Wet Location: For outdoor use, apply silicone sealant around the fixture to prevent water intrusion. Leave a gap at the bottom to allow moisture to escape.
- Handling: Handle the fixture with care during assembly to avoid damaging components. Do not over-tighten screws and bolts.
Parts List
Ensure all the following components are present before starting installation:
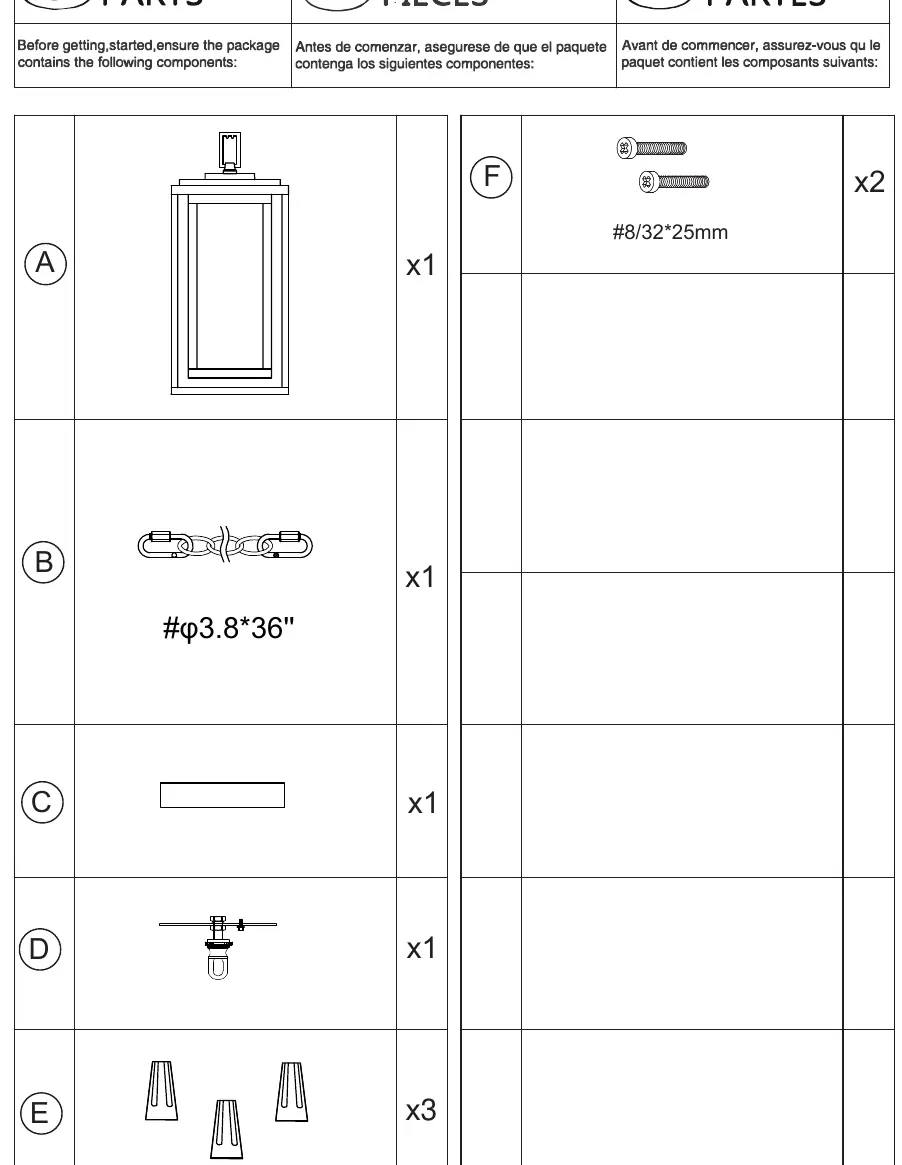
- A: Fixture body (x1)
- B: Chain (x1)
- C: Canopy (x1)
- D: Mounting bracket (x1)
- E: Wire nuts (x3)
- F: Screws #8/32*25mm (x2)
Installation and Wiring
Follow these steps to install your pendant light:
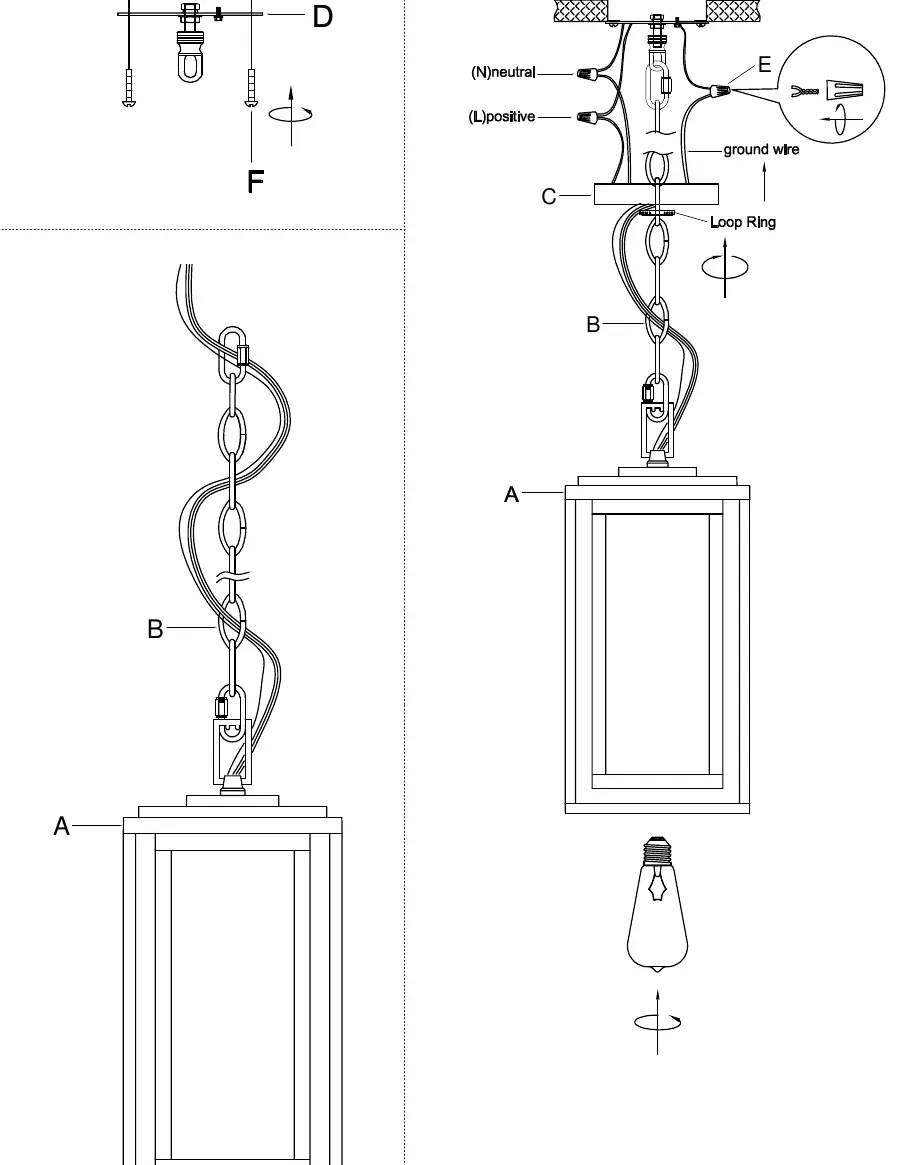
- Mounting: Secure the mounting bracket (D) to the ceiling junction box using the provided screws (F).
- Assembly: Attach the chain (B) to the fixture body (A) and the canopy (C).
- Wiring: Connect the fixture wires to the supply wires using the wire nuts (E). Ensure the neutral (N) and positive (L) wires are connected correctly. Connect the ground wire as required by local codes.
- Finalizing: Secure the canopy (C) to the mounting bracket (D) using the loop ring. Install the E26 bulb (not included).
Cleaning and Maintenance
- Cleaning: Use a soft cloth and mild detergent. Avoid abrasive or harsh cleaners.
- Polished Finishes: Use talc powder to reduce the appearance of fingerprints and smudges.
- Maintenance: Periodically (every 90-180 days) check that all screws are fully tightened.
- Heat Exposure: Prolonged exposure to heat sources may cause glazing, melting, or scorching.
Practical help
Common problems
Fixture not working
Verify the bulb is properly installed and is an E26 base, 60W max. Ensure power is connected at the junction box.
Moisture inside the fixture
Ensure the fixture is properly caulked with silicone sealant at the top for wet locations, leaving a gap at the bottom for drainage.
Before use
- Disconnect power at the source before starting.
- Verify all parts (A-F) are present.
- Ensure the mounting surface can support the fixture weight.
- Consult a qualified electrician for installation.
- Have a silicone sealant ready for outdoor installation.
Specs in practice
- Wet Location
- Suitable for outdoor use, but requires proper sealing to prevent water intrusion.
Images and diagrams
- The parts diagram illustrates the assembly of the chain (B) to the fixture (A) and the canopy (C).
- The wiring diagram shows the connection of neutral and positive wires using wire nuts (E).
Model compatibility
- Compatible with E26 base bulbs up to 60W.

Manual page author
Michael Turner
Technical manual editor
Reviews PDF manuals for structure, safety notes, and practical product details so readers can find the right information quickly.