Home Appliances / Refrigerators
User Manual for LORD L1 2.GN Refrigerator-Freezer
Comprehensive user manual for the LORD L1 2.GN refrigerator-freezer. Includes installation instructions, door reversal guide, temperature settings, food storage tips, maintenance, and troubleshooting.
Quick answers from the manual
Quick answer
- The LORD L1 2.GN is a freestanding refrigerator-freezer. It features adjustable temperature settings (1-7), reversible doors, and requires specific ventilation clearances. p. 1, 39, 40
Key actions
- Reversing the door p. 35, 36, 37, 38
- Setting the temperature p. 39, 40
First start
- Wait at least 4 hours before connecting to the power supply. p. 32
Show 4 more answers Show less
Problems and fixes
Appliance does not work
Check power supply, fuse, and thermostat setting.
p. 45Maintenance and reset
- Defrost the freezer when ice layer reaches 6-8 mm. p. 44
Technical specifications
| Parameter | Value | Meaning | Pages |
|---|---|---|---|
| Total volume | 206 dm³ | Total capacity of the appliance. | p. 27 |
Where to find it in the PDF
- Safety Information p. 27, 28, 29, 30
- Installation p. 32, 33, 34, 35
- Daily Use p. 39, 40, 41, 42
Table of contents
Manual images
Click an image to enlargeQuick guide from the manual
This manual provides essential information for the safe and efficient operation of your LORD L1 2.GN refrigerator-freezer. Before using the appliance, ensure it is installed correctly, leveled, and has been allowed to stand for at least 4 hours to allow the oil to flow back into the compressor. Always maintain proper ventilation around the appliance to ensure optimal performance.
Getting to know your appliance
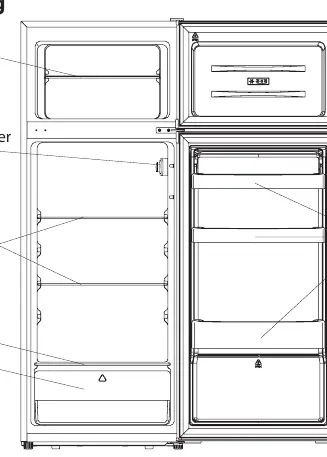
The appliance consists of a freezer compartment, a refrigerator section with adjustable glass shelves, a crisper drawer for fruits and vegetables, and door balconies for storage. The internal temperature is controlled by a thermostat located inside the fridge.
Installation
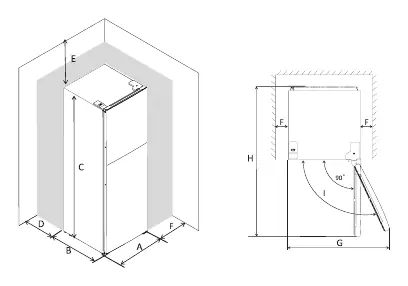
Unpacking and Positioning: Ensure the appliance is unpacked and checked for damage. Do not connect if damaged. Position the appliance away from heat sources like radiators or direct sunlight. Ensure a minimum gap of 50 mm on all sides for air circulation.
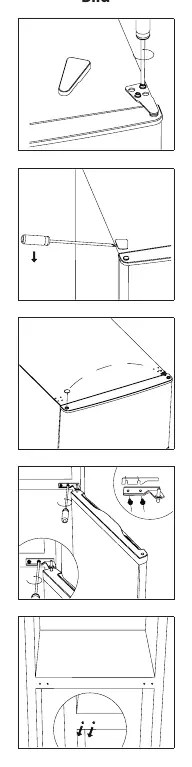
Door Reversal: The door hinge can be reversed. This process requires a Phillips screwdriver, flat-bladed screwdriver, and a hexagonal spanner. It is recommended that two people perform this task. Ensure the unit is unplugged and empty before starting.
Leveling: Use the two leveling feet at the front of the unit to ensure it is stable and level. Proper leveling is crucial for the doors and magnetic seals to close correctly.
Daily Use
Temperature Setting: The thermostat has 8 settings. 1 is the warmest, 7 is the coldest, and 0 switches the appliance off. For normal use, setting 4 is recommended. Adjust the setting based on ambient temperature (e.g., 2-4 for summer, 4-6 for winter).
Food Storage: Store different foods in appropriate compartments. Use the crisper drawer for fruits and vegetables. Use the fridge shelves for dairy, eggs, and ready-to-eat foods. Use the freezer compartment for long-term storage of frozen goods.
Maintenance and Cleaning
Cleaning: Regularly clean the interior and accessories with lukewarm water and neutral soap. Do not use abrasive cleaners or metal objects. Ensure the drain hole at the back of the fridge is kept clear to prevent water overflow.
Defrosting: The freezer compartment may accumulate frost over time. If the ice layer becomes thick (6-8 mm), defrost the freezer. Switch off the appliance, remove food, and allow the ice to melt. Do not use sharp metal tools to remove ice.
Lamp Replacement: The internal light is an LED type. If it requires replacement, contact an authorized service center.
Practical help
Common problems
Appliance does not work
Check if the thermostat is set to 0, ensure the mains plug is connected, and check the fuse.
Food is too warm
Adjust the temperature setting, ensure the door is not opened too frequently, and check that the appliance is not near a heat source.
Unusual noises
Ensure the appliance is level and not touching walls or other objects.
Water on the floor
Check if the water drain hole is blocked and clean it if necessary.
Before use
- Check for transport damage
- Clean interior with lukewarm water and neutral soap
- Wait 4 hours before connecting to allow oil to flow back into the compressor
- Ensure proper ventilation space (min 50mm)
- Level the appliance using the front feet
Show more Show less
Specs in practice
- Climate Class
- Determines the ambient temperature range for optimal performance (SN, N, ST, T).
- Thermostat Settings
- 1 is warmest, 7 is coldest, 0 is off.
Images and diagrams
- The appliance features a freezer compartment, thermostat/light, glass shelves, and crisper drawer.
Model compatibility
- Not intended for built-in use.

Manual page author
Emily Carter
User documentation editor