Lighting / Fixtures
Installation Instructions for Lucci Decor Elliot Pendant
Quick installation guide for the Lucci Decor Elliot pendant light. Includes wiring diagrams, safety requirements, and technical specifications for models 010277 and 010300.
Quick answers from the manual
Quick answer
- The Lucci Decor Elliot pendant must be installed by a licensed electrician. It is designed for indoor use, supports a maximum of 45W, and requires an ES/E27 globe. p. 1, 2
Key actions
- Adjusting suspension length p. 1
- Wiring the fitting p. 1
First start
- Ensure power is off, install mounting bracket, connect wires, attach canopy, and install globe. p. 1
Show 3 more answers Show less
Maintenance and reset
- Clean with a damp clean cloth. Never soak the fitting with water. p. 2
Technical specifications
| Parameter | Value | Meaning | Pages |
|---|---|---|---|
| Rated Voltage | 220-240V~ 50Hz | Operating voltage | p. 2 |
| Max Wattage | 45W | Maximum bulb power | p. 2 |
Where to find it in the PDF
- Installation Instructions p. 1
- Safety and Specifications p. 2
Table of contents
Quick guide from the manual
This document provides installation instructions for the Lucci Decor Elliot pendant light. Important: This fitting must be installed by a licensed electrician to ensure safety and maintain the 12-month warranty. Ensure the power is switched off before beginning any electrical work.
Installation requirements
- Must be installed by a licensed electrician.
- Suitable for indoor use only.
- The mounting point must be capable of supporting 2 times the weight of the fitting.
- Ensure the fitting is not installed in direct line of an air vent or in moist/damp areas.
- Do not exceed the maximum wattage rating of 45W.
Installation steps
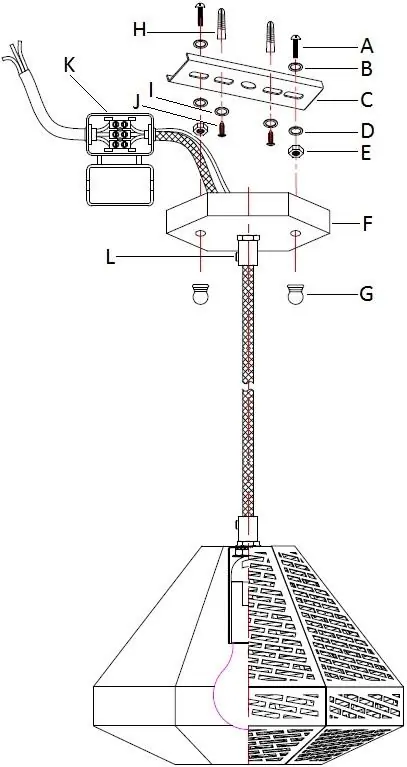
- Remove all packaging material, ensuring no accessories are discarded.
- Adjust the suspension length by loosening the cord anchorage (L), then re-tighten it.
- Attach screws (A), washers (B, D), and nuts (E) onto the mounting bracket (C).
- Use the mounting bracket (C) as a template to mark screw positions on the ceiling.
- Install the mounting bracket (C) onto the ceiling using appropriately sized mounting screws (J), washers (I), and anchors (H).
- Remove the cover from the terminal block (K) and connect the mains supply wire according to the wiring guide.
- Ensure wires are secure and no bare wires are exposed, then replace the terminal block cover.
- Install the canopy (F) onto the mounting bracket (C) and secure with decorative nuts (G).
- Install a globe (not included) into the lamp holder.
- Switch on the power to test the fitting.
Wiring
Connect the mains supply wire to the fitting wire as follows:
- Earth: Yellow/Green to Yellow/Green
- Neutral: Blue or Black to Blue
- Live: Brown or Red to Brown
Safety tips
- Always ensure the power is OFF and the fitting has cooled down before maintenance, cleaning, or changing the globe.
- To clean, wipe with a damp clean cloth. Never soak the fitting with water.
- Ensure the fitting does not come into contact with corrosive chemicals.
Technical specifications
- Rated Voltage: 220-240V~ 50Hz
- Rated Wattage: Max 45W
- Lamp Holder: ES / E27
- Weight: 1.0kg
- Dimensions: H:205mm, Dia:200mm, Susp:1200mm
Practical help
Common problems
Missing parts
Return the complete product to the place of purchase for inspection or replacement.
Fitting damaged during transport
Do not operate or install the product. Return it to the place of purchase.
Before use
- Ensure power to the circuit is switched OFF.
- Verify the mounting point can support 2 times the weight of the fitting.
- Check that the installation location is not in a damp area or direct line of an air vent.
- Ensure you have a licensed electrician for installation.
- Check all components are present before assembly.
Show more Show less
Specs in practice
- 220-240V~ 50Hz
- Standard electrical supply requirements.
Images and diagrams
- The diagram illustrates the assembly of the mounting bracket (C) to the ceiling using anchors (H) and screws (J).
- It shows the connection of the terminal block (K) to the mains supply.
- It details the suspension length adjustment via the cord anchorage (L).
Model compatibility
- Indoor use only.
- Requires ES / E27 globe (not included).

Manual page author
David Miller
Documentation analyst