Lighting / Fixtures
Installation Instructions for Lucci decor Zahra 1LT Wall Bracket
A comprehensive installation and safety guide for the Lucci decor Zahra 1LT Wall Bracket. Includes wiring instructions, mounting steps, safety precautions, and technical specifications for models 011862 and 011863.
Quick answers from the manual
Quick answer
- The Zahra 1LT Wall Bracket is a Class I indoor lighting fixture. It must be installed by a licensed electrician and requires a G9 globe (not included). p. 1, 2
Key actions
- Installation p. 2
- Maintenance p. 3
First start
- Ensure power is OFF, install the mounting bracket, connect wires to the terminal block, attach the luminaire, install the shade components, and insert a G9 globe. p. 2
Show 2 more answers Show less
Technical specifications
| Parameter | Value | Meaning | Pages |
|---|---|---|---|
| Rated Voltage | 220-240V~ 50Hz | Operating voltage | p. 3 |
| Max Wattage | 28W | Maximum power rating | p. 3 |
| Lamp Holder | G9 | Globe type | p. 3 |
Where to find it in the PDF
- Installation Requirements and Warranty p. 1
- Installation Directions p. 2
- Safety Tips and Specifications p. 3
Table of contents
Important Information
The Lucci decor Zahra 1LT Wall Bracket is a Class I lighting product designed for indoor use. It must be installed by a licensed electrician in accordance with local and national wiring rules. The mounting point must be capable of supporting twice the weight of the luminaire. Ensure the power is switched OFF before starting any electrical work.
Installation Directions
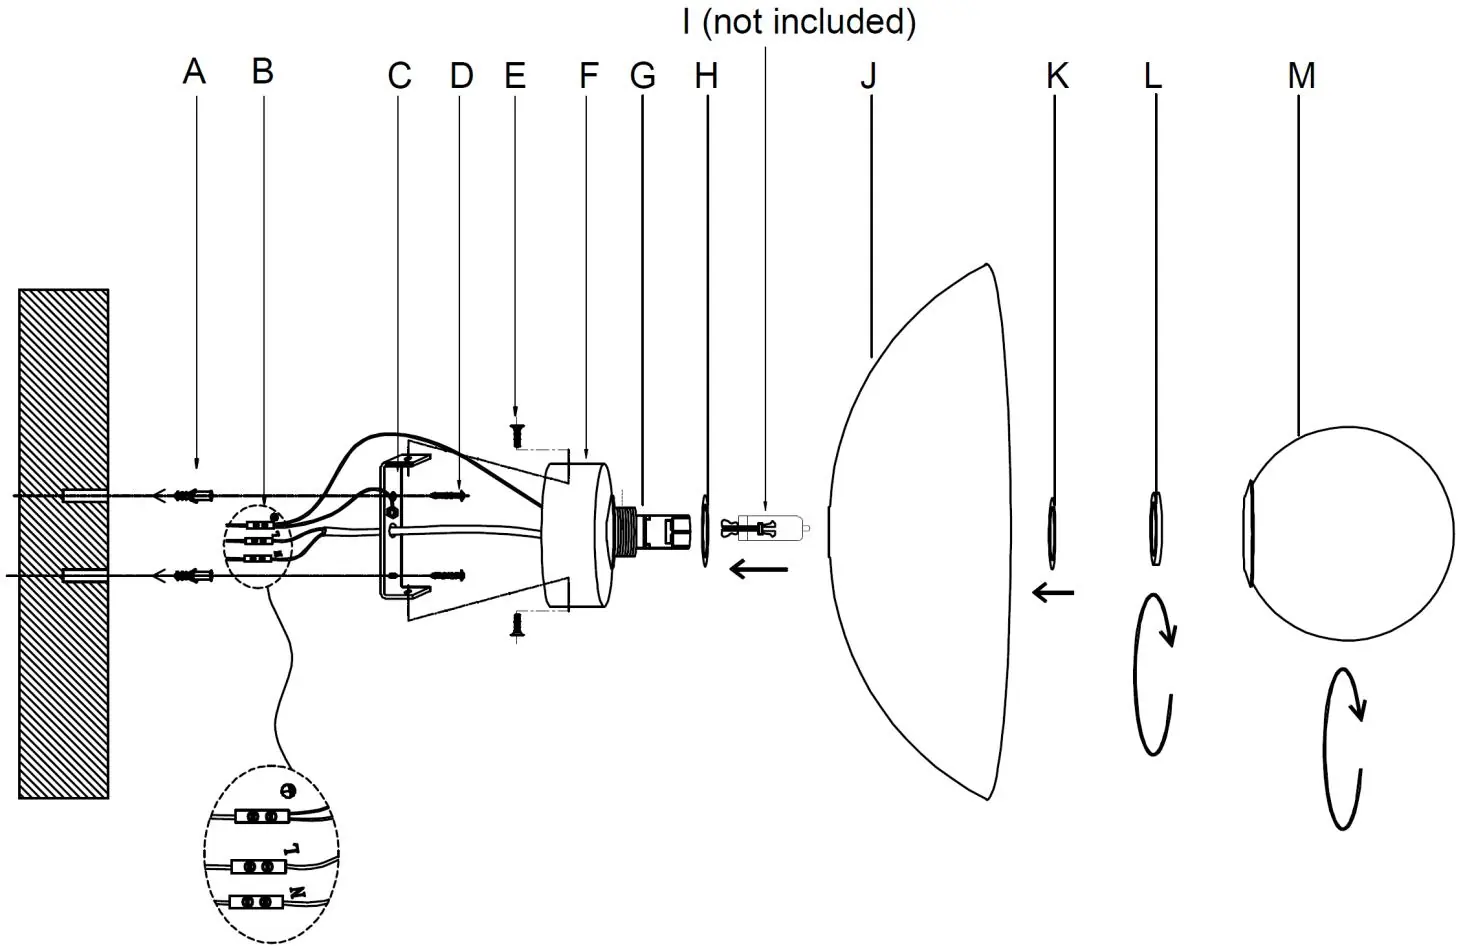
- Remove all packaging material and place the luminaire on a smooth, non-scratch surface.
- Remove the mounting bracket (C) from the luminaire (F) by loosening the side screws (E).
- Use the mounting bracket (C) as a template to mark screw positions on the wall.
- Install the mounting bracket (C) using appropriately sized screws (D) and anchors (A) suitable for the mounting surface.
- Connect the mains supply wire to the terminal block (B): Earth to Yellow/Green, Neutral to Blue or Black, and Live to Brown or Red. Ensure wires are secure and no bare wires are exposed.
- Reattach the luminaire (F) to the mounting bracket (C) and tighten the side screws (E).
- Install the gasket (H) onto the lamp holder (G), followed by the larger shade (J), another gasket (K), and secure with the lamp holder ring (L).
- Install a G9 globe (not included). If using a halogen globe, use clean gloves or a tissue to avoid touching it with bare hands.
- Install the glass ball shade (M) onto the lamp holder (G).
- Switch on the power to test the luminaire.
Safety Tips
- Always ensure the power is OFF and the luminaire has cooled down before performing maintenance, cleaning, or changing the globe.
- Do not exceed the maximum wattage rating of 28W.
- Clean the luminaire by wiping with a soft damp cloth. Do not soak or immerse in water.
- Avoid contact with corrosive chemicals, solvents, or abrasive cleaners.
- Ensure the luminaire is not installed in the direct line of an air vent or system.
- If installing in a moisture-prone area, ensure proper ventilation and use an exhaust fan if required.
Practical help
Common problems
Luminaire not working
Check if the globe is installed correctly, ensure the power is switched on, and verify that all wiring connections are secure.
Moisture damage
Ensure the installation area is well-ventilated and an exhaust fan is used if necessary; moisture damage is not covered by the warranty.
Before use
- Ensure power is switched OFF at the circuit.
- Verify the mounting point can support twice the weight of the luminaire.
- Check that all components are present before assembly.
- Ensure the installation area is suitable for indoor use.
- Verify that the mounting screws and anchors are suitable for the wall surface.
Show more Show less
Specs in practice
- Rated Voltage
- 220-240V~ 50Hz
Images and diagrams
- B: Terminal block
- C: Mounting bracket
- D: Mounting screws
- E: Side screws
- G: Lamp holder
Model compatibility
- Indoor use only.
- Requires G9 globe (not included).
- Class I product (must be earthed).

Manual page author
David Miller
Documentation analyst