Automotive / Motorcycle Accessories
Adjustable Windshield System for Kawasaki Versys 1000 and 650
Installation and adjustment guide for the Madstad Engineering adjustable windshield system designed for Kawasaki Versys 1000 (2012+) and 650 (2015+). Includes mounting steps, hardware details, and instructions for setting the optimal...
Quick answers from the manual
Quick answer
- This guide provides installation and adjustment instructions for the Madstad Engineering adjustable windshield system on Kawasaki Versys 1000 (2012+) and 650 (2015+). p. 1
Key actions
- Remove factory windshield and hardware p. 2
- Install Madstad brackets p. 2, 3
- Adjust windshield angle p. 5, 6
Problems and fixes
Windshield interferes with handlebars
Adjust the windshield position to ensure clearance at full lock.
p. 5Maintenance and reset
- Adjust pivot screw tightness p. 6
Technical specifications
| Parameter | Value | Meaning | Pages |
|---|---|---|---|
| Optimal Angle | 55-60 degrees | Recommended angle for best airflow. | p. 6 |
Where to find it in the PDF
- Parts List p. 1
- Installation Steps p. 2, 3, 4
- Adjustment Instructions p. 5, 6
Table of contents
Manual images
Click an image to enlargeQuick guide from the manual
This document provides instructions for installing and adjusting the Madstad Engineering adjustable windshield system. This system is compatible with the Kawasaki Versys 1000 (2012-up) and 650 (2015-up). The factory windshield is not compatible with these brackets.
What is in the box:
- Set of preassembled MadStad adjustable windshield brackets
- Track brackets
- 4 x 1/4 Split ring lock washers
- 4 x M6 x 20mm screws
- 4 x M5 Truss screws
- 4 x M5 black plastic flat washers
- 4 x soft rubber washers
Installation
Step 1: Remove the factory windshield and hardware
Remove the factory windshield and the sliding brackets holding it. Typically, pry off the small plastic cap in the center of each windshield knob, then use a 4mm Allen wrench to unscrew the socket-head bolts inside the knobs. Remove the knobs, the four windshield screws, and the shield.
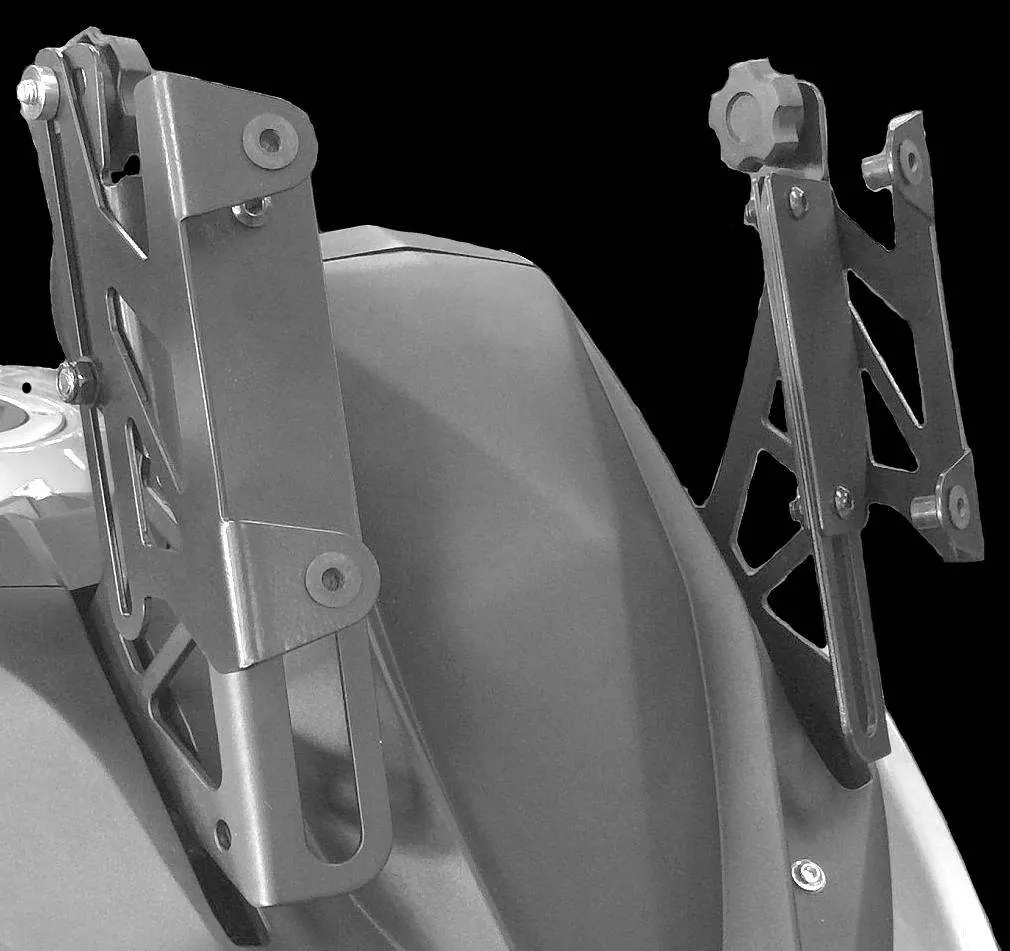
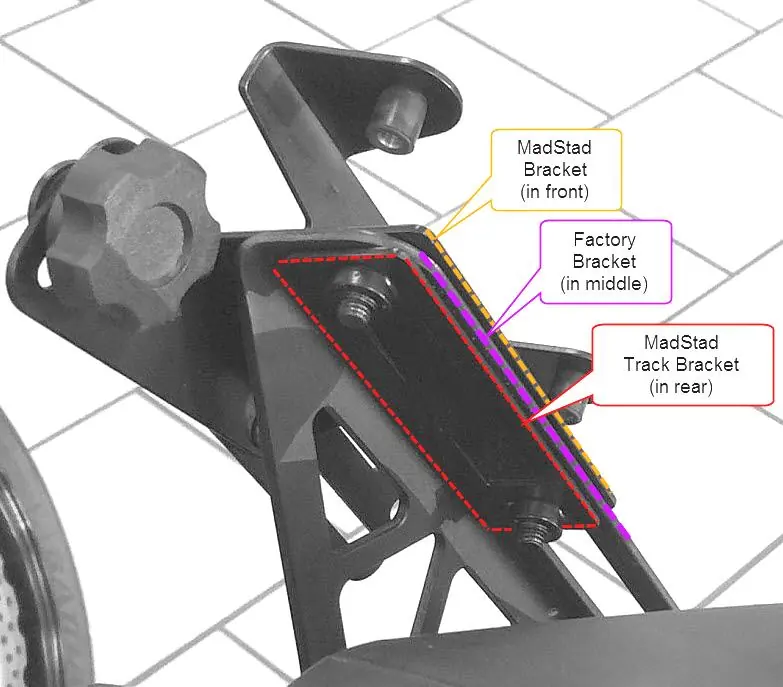
Step 2: Install the MadStad brackets
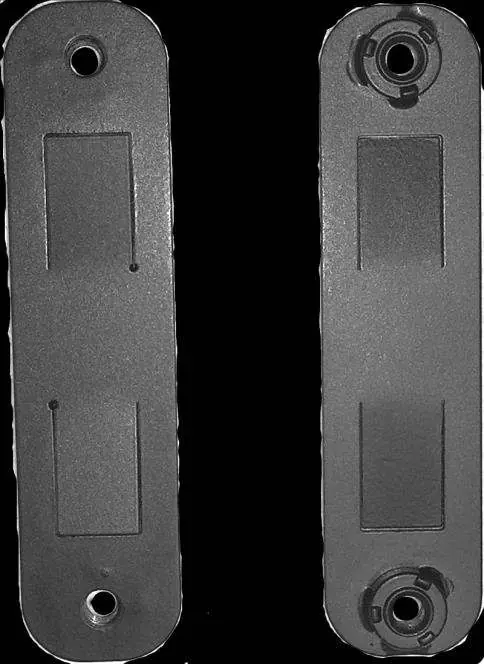
The MadStad brackets attach to the front of the slotted factory mounts. They are held in the back by the "track bracket" (a rectangular metal plate with round nuts welded to the back). The track bracket rides in the rectangular track of the factory mounts.
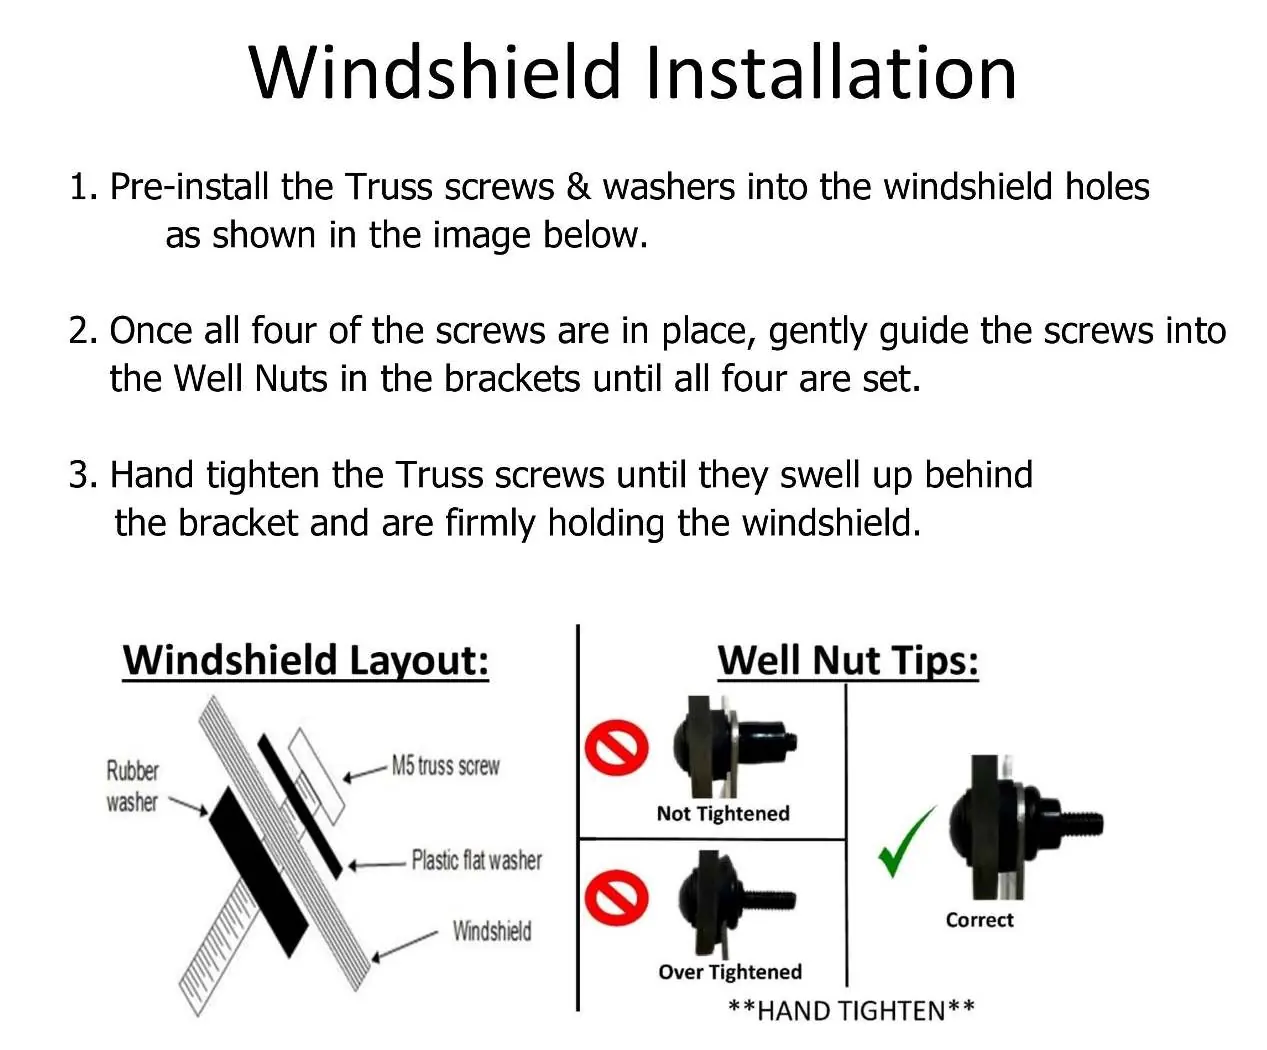
Step 3: Windshield installation
- Pre-install the Truss screws and washers into the windshield holes.
- Guide the screws into the Well Nuts in the brackets until all four are set.
- Hand-tighten the Truss screws until they swell up behind the bracket and firmly hold the windshield. Do not over-tighten.
Adjusting the MadStad Brackets
The knob screws release the brackets, allowing the windshield to slide and tilt. Never attempt to adjust the brackets while riding. Always come to a complete stop before making adjustments.
To adjust:
- Loosen the knobs 1-2 turns.
- Set the windshield so the top edge is at about your chin level while seated.
- Set the angle to approximately 60 degrees.
- Tighten the knobs securely before riding.
Ensure the windshield is not set in a way that causes your handlebars or hand guards to hit the windshield when turning.
Maintenance and Troubleshooting
Pivot Screws: The mount has a pivot screw on each set of brackets. A nylon lock nut keeps the screw in place. If you need to adjust the tightness, use a 4mm Allen wrench and a 10mm socket or crescent wrench. Do not tighten the lock nut completely, or the brackets will not slide.
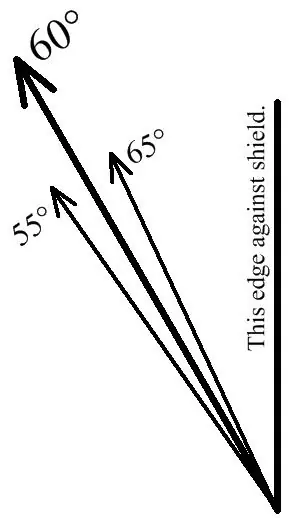
Windshield Angle: Most windshields work best at a 55-60 degree angle. Use the angle guide on the back page of the manual to check your setting. If the large arrow marked 60° points straight up when the manual's spine is against the shield, you are at a 60-degree angle.
Warranty and Disclaimer
MadStad adjustable brackets carry a lifetime warranty against manufacturing defects (excluding cosmetic issues and wear items like rubber/plastic). Windshields and deflectors are warrantied for 1 year against manufacturing defects.
Practical help
Common problems
Windshield hits handlebars or hand guards
Adjust the windshield position to ensure clearance at full handlebar lock.
Brackets do not slide
Check if the pivot screw lock nut is too tight; loosen slightly with a 4mm Allen wrench and 10mm socket.
Windshield is loose or rattling
Ensure all truss screws are hand-tightened until the well nuts swell behind the bracket.
Before use
- Verify all parts from the box are present
- Ensure motorcycle is on a center stand or held by a helper
- Have a 4mm Allen wrench and 10mm socket/wrench ready
- Check that all fasteners are tightened securely before riding
Specs in practice
- Windshield Angle
- Optimal range is 55-60 degrees for best airflow.
Images and diagrams
- The track bracket has raised tabs that must sit completely in the factory slot.
- Well nuts must be hand-tightened until they swell behind the bracket for a secure hold.
Model compatibility
- Compatible with Kawasaki Versys 1000 (2012-up) and 650 (2015-up).
- Factory windshield is not compatible with these brackets.

Manual page author
Michael Turner
Technical manual editor
Reviews PDF manuals for structure, safety notes, and practical product details so readers can find the right information quickly.