Automotive / Motorcycle Accessories
Installation Guide for Yoshimura Fender Eliminator Kit for Yamaha WR 125R
Step-by-step installation instructions for the Yoshimura Fender Eliminator Kit on the Yamaha WR 125R. Includes removal of stock components, assembly, and wiring.
Table of contents
Manual images
Click an image to enlargeImportant Information
This product is not DOT approved and is not intended for use on public highways. Yoshimura R&D of America, Inc. is not liable for any resulting events caused by the installation of this product. Check local laws and regulations for compliance prior to installation and use.
Parts List
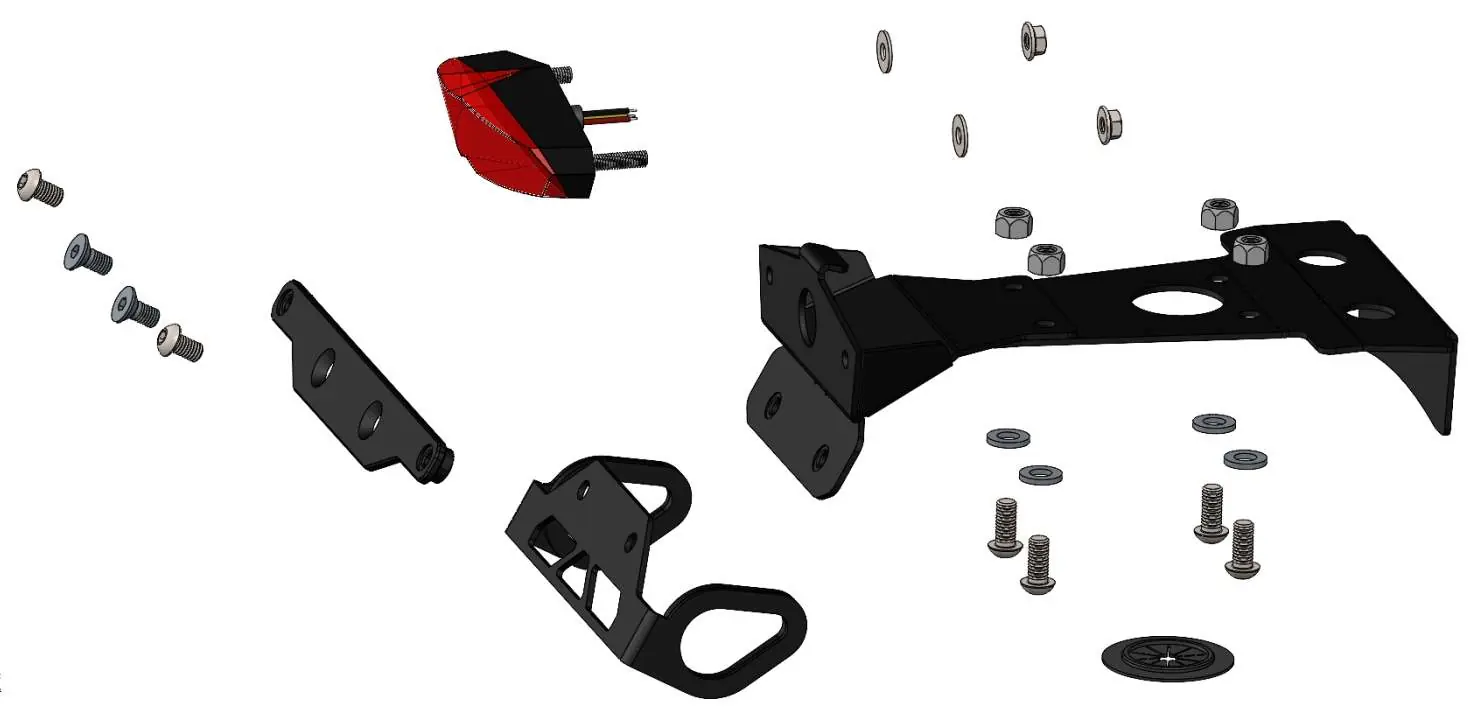
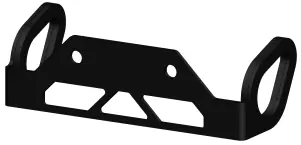
- 13125-FEBKT Fender Eliminator Bracket
- 13992-TSB-B1 OEM Turn Signal Bracket
- FE-LP-BKT License Plate Bracket
- HB025024-G Tail Light
- H-2158T-1 Wire Debris Cover
- 13125-FEBKT-PLG Frame Plug
- ZT-400 Cable Tie
- Various M6 screws, washers, and lock nuts
Removal of Stock Fender
- Remove the right and left side cowls.
- Remove the seat.
- Remove the tail cowl.
- Locate and disconnect the turn signal, license plate light, and brake light wires.
- Securely support the stock fender assembly and remove the four bolts securing it to the frame. Carefully remove the assembly, ensuring connectors are not damaged.
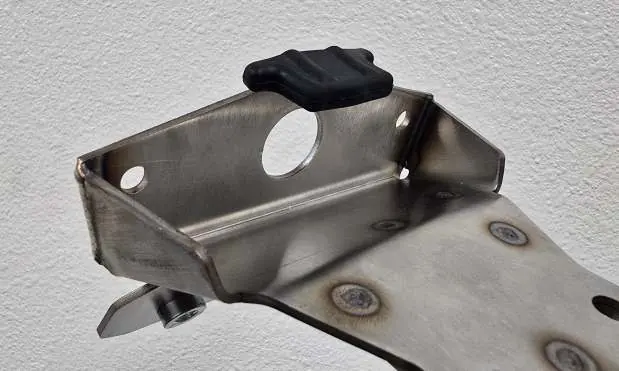
- Disassemble the rear fender assembly and remove the stock turn signals. Keep the rubber tab cover for re-use.
Installation
- Install 13125-FEBKT-PLG frame plugs into the frame tube holes. A soft mallet is recommended.
- Install stock turn signals onto the 13992-TSB-B1 OEM turn signal bracket using stock hardware.
- Install the FE-LP-BKT license plate bracket and 13992-TSB-B1 turn signal bracket onto the 13125-FEBKT fender eliminator bracket using M6X12FS-SS flat head screws.
- Insert the ZT-400 cable tie into the crescent holes of the fender eliminator bracket (do not tighten yet).
- Install the HB025024-G Yoshimura tail light onto the fender eliminator bracket using supplied hardware.
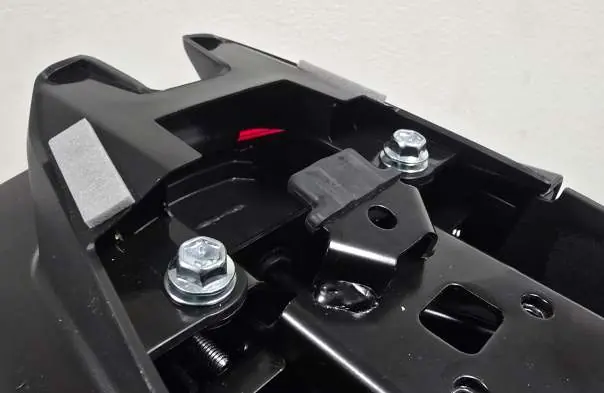
- Install the H-2158T-1 wire debris cover onto the fender eliminator bracket. Ensure it is between the bracket and frame, and properly seated in the hole.
- Install the fender eliminator bracket onto the frame using M6X14BHS button head screws, 6MMWASHER-SS washers, and 6MMLN nylon lock nuts. Install the rubber tab cover from the stock fender onto the metal tab of the new bracket.
- Route stock turn signal wires through the wire debris cover and connect to the wiring harness.
- Connect the Yoshimura tail light to the wiring harness.
- Tighten the ZT-400 cable tie to secure loose wires.
- Reinstall the tail cowl, side cowls, and rider seat.
- Check for proper function of the tail light and turn signals before riding.
Practical help
Common problems
Wire debris cover not fitting
Ensure it is properly seated in the hole of the fender eliminator bracket and positioned between the bracket and the frame.
Frame plugs difficult to install
The plugs are designed for a tap fit; use a soft mallet to seat them.
Before use
- Remove side cowls
- Remove tail cowl
- Disconnect turn signal, license plate, and brake light wires
- Support stock fender assembly
Images and diagrams
- Assembly diagram shows the order of screws, washers, and nuts for the bracket assembly.
- Wiring routing requires passing wires through the debris cover.
Model compatibility
- Designed for Yamaha WR 125R.
- Not DOT approved.
- Not intended for use on public highways.

Manual page author
Michael Turner
Technical manual editor
Reviews PDF manuals for structure, safety notes, and practical product details so readers can find the right information quickly.