Automotive / Motorcycle Accessories
Installation Guide for Ciro Flag Mount G0078621
Step-by-step installation guide for the Ciro Flag Mount (G0078621) on 2021-up Goldwing Tour motorcycles, including drilling, panel removal, and wiring instructions.
Quick answers from the manual
Quick answer
- This document provides installation instructions for the Ciro Flag Mount (G0078621) on 2021-up Goldwing Tour motorcycles. p. 1
Key actions
- Drill a 1/4” (6mm) hole in the trunk top wall. p. 1
- Clean the trunk panel with ammonia-based window cleaner before adhering the mounting tab. p. 1
Where to find it in the PDF
- Installation Instructions p. 1
Table of contents
Manual images
Click an image to enlargeQuick guide from the manual
This guide covers the installation of the Ciro Flag Mount (G0078621) on 2021-up Goldwing Tour motorcycles. The process involves drilling a hole in the trunk panel, removing side panels for access, and securing the mount with the provided hardware. Ensure you have an ammonia-based window cleaner for surface preparation before adhering the mounting tab.
Items Included
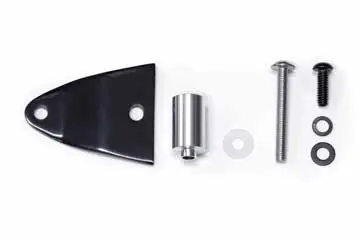
- Flag Mount
- Spacer
- Nylon Washer
- M6x50mm Screw
- 1/4-20x3/4” Screw
- Lock Washer
- Steel Washer
Installation Instructions
Preparation: Park the motorcycle on a level surface and allow it to cool completely. Remove the side covers and seat to access the trunk area.
Positioning: Decide which side of the trunk you want to install the flag mount. Place masking tape in the area shown in the figures. Position the mounting tab, aligning the front edge with the body line of the trunk. Ensure the tab does not overhang the round corner transition of the body panel.
Drilling: Mark the center of the hole in the mount tab slot. Remove the tab and drill a 1/4” (6mm) hole. Important: This hole should only go through the top wall of the trunk; do not over-drill.
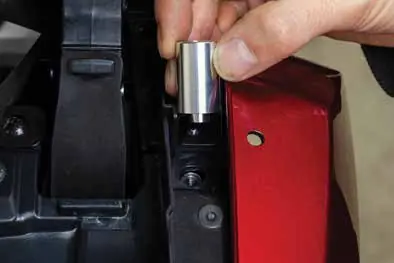
Panel Access: To access the mounting location, you must remove or flex the trunk side panel. Remove the plastic rivet and the three Phillips screws. Set these aside as they will be reused. Carefully separate the top edge of the trunk side panel to access and remove the inner screw (this screw will not be reused).
Mounting: Place the included spacer into the hole where the inner screw was removed, ensuring the stepped end is seated correctly. Reposition the trunk side panel, clearing the spacer. Test fit the mounting tab over the drilled hole using the M6x50mm screw to check alignment.
Final Assembly: Use an ammonia-based window cleaner to remove all wax and adhesive residue from the trunk panel. Remove the tape backing from the mounting tab and adhere it to the side panel. Secure the tab using the M6x50mm screw with the nylon washer between the screw head and the mounting tab. Do not overtighten. Install the flag mast using the 1/4-20x3/4” screw, lock washer, and steel washer. Route the wire from the lighted flag through the trunk to the battery and connect it according to the instructions included with the lighted flag kit.
Safety and Warranty
Ciro products are designed for easy assembly and plug-and-play installation. We recommend a competent mechanic perform the installation using standard mechanical procedures. Ciro warrants products to the original purchaser against defects in materials and workmanship for 3 years from the date of purchase, with a lifetime warranty against LED failure. Proof of purchase is required for warranty claims.
Practical help
Common problems
Drilling through the wrong panel
Ensure you only drill through the top wall of the trunk; do not over-drill.
Difficulty accessing the mounting location
Remove the plastic rivet and three Phillips screws to flex the trunk side panel out of the way.
Before use
- Park on a level surface
- Allow motorcycle to cool completely
- Verify all included hardware is present
- Have an ammonia-based window cleaner ready
- Ensure you have the lighted flag kit instructions for wiring
Specs in practice
- M6x50mm Screw
- Used to secure the mounting tab to the trunk panel.
- 1/4-20x3/4” Screw
- Used to attach the flag mast to the mount.
Images and diagrams
- Fig 1-2: Positioning the mounting tab on the trunk
- Fig 3-4: Removing panel fasteners (rivet and screws)
- Fig 5: Removing the inner screw
- Fig 6: Correct orientation of the spacer
- Fig 7: Final assembly of the mounting tab
Model compatibility
- Compatible with 2021-up Goldwing Tour models only.

Manual page author
Michael Turner
Technical manual editor
Reviews PDF manuals for structure, safety notes, and practical product details so readers can find the right information quickly.