Sports / Fitness
Magnetic Mini Exercise Pedal Cycle SF-B020026
Quick guide for the Sunny Health & Fitness Magnetic Mini Exercise Pedal Cycle SF-B020026. Includes assembly instructions, battery replacement, meter operation, and tension adjustment.
Table of contents
Manual images
Click an image to enlargeQuick Guide
This manual provides instructions for the Sunny Health & Fitness Magnetic Mini Exercise Pedal Cycle SF-B020026. The device is intended for indoor, home use only and must be used in a sitting position. Do not stand on the unit. Ensure there is at least 2 feet (60 cm) of free space around the equipment during use.
Assembly Instructions
Before assembly, ensure you have all parts listed in the exploded diagram. Use the provided spanners for tightening.
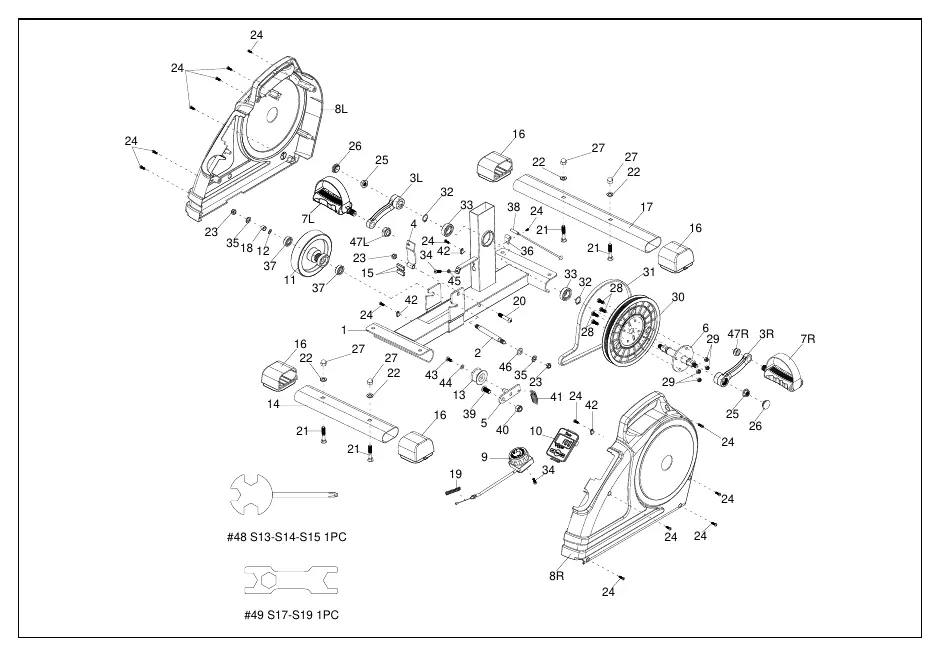
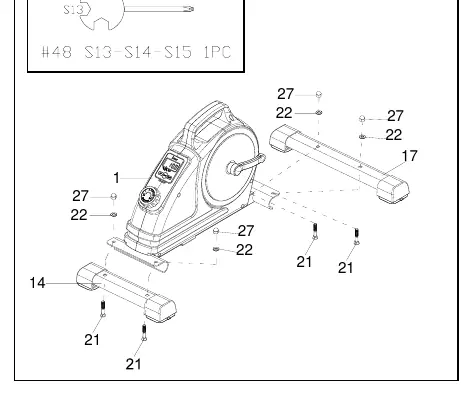

- Stabilizers: Attach the Rear Stabilizer (No. 14) and Front Stabilizer (No. 17) to the Main Frame (No. 1) using the provided Carriage Bolts (No. 21), Washers (No. 22), and High Cap Nuts (No. 27). Secure tightly with Spanner (No. 48).
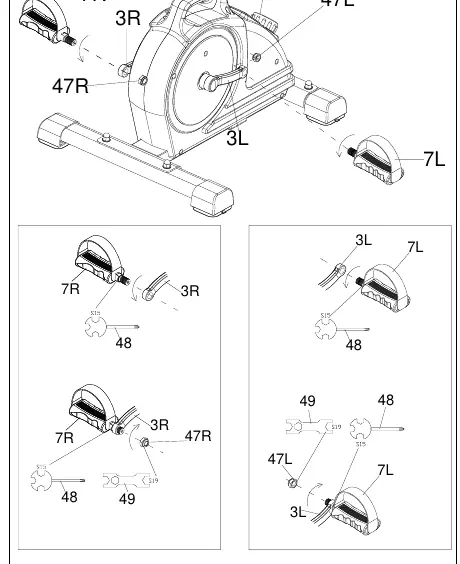
- Pedals: Note that pedals are marked L (Left) and R (Right). Remove the Nylon Nuts (No. 47L/R) from the pedals. Align the Left Pedal (No. 7L) with the Left Crank (No. 3L) at 90 degrees and screw in counter-clockwise. Secure with Spanner (No. 48). Tighten the Nylon Nut (No. 47L) clockwise using Spanners (No. 48 and No. 49). Repeat the process for the Right Pedal (No. 7R) by screwing it in clockwise and tightening the Nylon Nut (No. 47R) counter-clockwise.
Battery Installation
The exercise meter requires 1 AAA 1.5V battery.
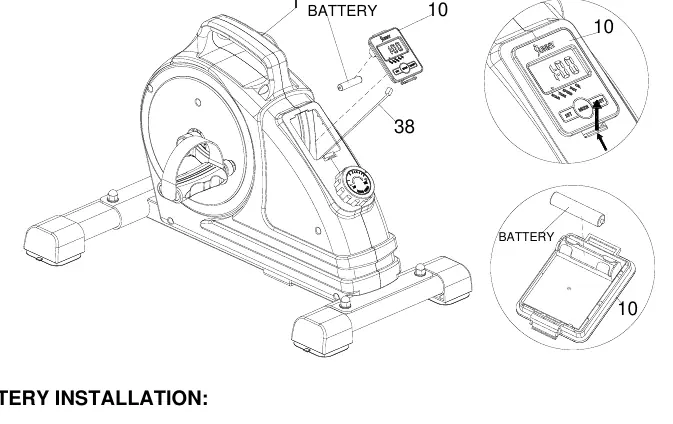
- Remove the Meter (No. 10) from the Main Frame (No. 1).
- Disconnect the link wire of the Inductor (No. 38).
- Install the battery into the case on the back of the meter, ensuring correct polarity (+/-).
- Reconnect the link wire and reattach the meter to the frame.
Exercise Meter
The meter tracks your workout progress. It automatically powers on when pedals are in motion or the MODE button is pressed.
- MODE: Select functions or hold to reset time, distance, and calories.
- SET: Set values for time, distance, and calories when not in scan mode.
- RESET: Reset time, distance, and calories.
- SCAN: Rotates through Time, Speed, Distance, and Calories every 4 seconds.
Adjusting the Tension
Adjust the resistance level using the Tension Control Knob (No. 9).
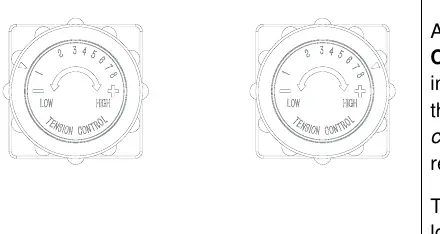
- Increase Resistance: Rotate the knob clockwise.
- Decrease Resistance: Rotate the knob counter-clockwise.
- Levels: Level 1 is the lowest resistance, and Level 8 is the highest.
Maintenance and Support
Regularly examine the equipment for damage or wear. If you hear unusual noises or find defective components, discontinue use immediately. For assistance, contact support at [email protected] or 1-877-90SUNNY (877-907-8669).
Practical help
Common problems
Abnormal display on the meter
Replace the AAA battery.
Unusual noises during exercise
Discontinue use immediately, check for defective components, and ensure all nuts and bolts are tightened.
Pedals difficult to install
Ensure you are installing the correct pedal (L or R) on the corresponding crank side and that you are turning in the correct direction (Left pedal is counter-clockwise, Right pedal is clockwise).
Before use
- Ensure all nuts and bolts are securely tightened.
- Place the unit on a solid, flat, level surface.
- Use a protective cover for your floor or carpet.
- Verify there is at least 2 feet (60 cm) of free space around the unit.
- Check that you are wearing suitable clothing that will not get entangled.
- Ensure the battery is installed correctly in the meter.
Images and diagrams
- The exploded diagram identifies all 49 parts, including hardware, frame, and meter components.
- Assembly steps illustrate the correct orientation of stabilizers and pedals.
Model compatibility
- Designed for indoor and home use only.
- Not intended for commercial use.
- Not suitable for therapeutic use.
- Use only while sitting.

Manual page author
Michael Turner
Technical manual editor
Reviews PDF manuals for structure, safety notes, and practical product details so readers can find the right information quickly.