Toys / RC Models & Drones
User Manual for Maisto Tech 2.4GHz RC City Bus
Comprehensive user guide for the Maisto Tech 2.4GHz RC City Bus. Includes instructions for battery installation, pairing the transmitter with the vehicle, operating controls, troubleshooting common issues, and safety guidelines.
Quick answers from the manual
Quick answer
- To operate the Maisto Tech RC City Bus, install 2x AAA batteries in the transmitter and 4x AA batteries in the vehicle. Turn both power switches to ON to automatically pair the devices. p. 1
Key actions
- Pairing the vehicle p. 1
- Adjusting wheel alignment p. 1
First start
- Install batteries in both transmitter and vehicle, then switch both to ON. p. 1
Problems and fixes
No function
Check battery levels, polarity, and remove foreign objects from wheels.
p. 2Maintenance and reset
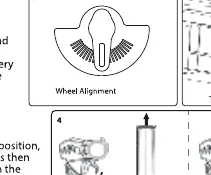
- If the vehicle does not run in a straight line, adjust the wheel alignment lever under the chassis. p. 1
Technical specifications
| Parameter | Value | Meaning | Pages |
|---|---|---|---|
| Frequency | 2.4 GHz | Operating frequency | p. 2 |
| Transmitting power | <10 mW | Max allowed transmitting power | p. 2 |
Where to find it in the PDF
- Battery installation and operation p. 1
- Troubleshooting and regulatory info p. 2
Table of contents
Manual images
Click an image to enlargeQuick guide from the manual
The Maisto Tech 2.4GHz RC City Bus requires specific battery installation for both the transmitter and the vehicle to function. The system uses automatic frequency matching; simply turn both the transmitter and the vehicle power switches to the ON position to pair them. If the LED on the controller flashes for more than 3 seconds, turn both off and try again.
Battery installation
Transmitter:
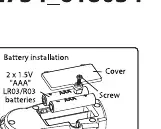
- Use a screwdriver to open the battery cover.
- Install 2 x 1.5V "AAA" LR03/R3 batteries.
- Ensure correct polarity (+/-) as shown inside the compartment.
- Close the cover and tighten the screw.
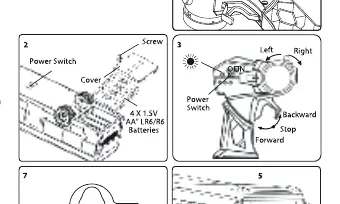
Vehicle:
- Use a screwdriver to open the battery cover.
- Install 4 x 1.5V "AA" LR6/R6 batteries.
- Ensure correct polarity (+/-) as shown inside the compartment.
- Close the cover and tighten the screw.
How to play
- Pairing: Set both the transmitter and vehicle power switches to ON. The power LED on the controller will flash for less than 3 seconds and then stay on, indicating the connection is complete.
- Driving: Use the trigger switch on the transmitter to drive the vehicle forward or backward.
- Steering: Use the steering knob on the transmitter to steer the vehicle left or right.
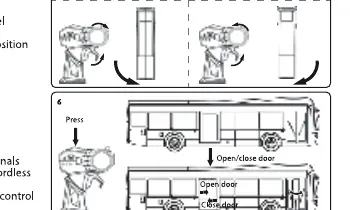
- Door Control: Press the top button on the transmitter to open and close the bus doors.
- Alignment: If the vehicle does not run in a straight line, adjust the wheel alignment lever located under the chassis.
- Power Off: Always switch both the vehicle and the transmitter to the OFF position when not in use.
Performance tips
- Do not drive the vehicle on grass, sand, or through water.
- Avoid driving in windy or rainy weather.
- Do not drive the vehicle into any hard objects.
- Keep fingers, hair, and loose clothing away from the vehicle.
- Operating range can be affected by weak batteries or interference from other radio frequency devices (e.g., other R/C items, cordless phones, high voltage transmitters).
Troubleshooting
- No function: Check if batteries are low, polarities are reversed, or if there are foreign objects obstructing the wheels.
- Slow speed / Poor turning: Replace batteries or remove foreign objects from the wheels.
- Poor distance control: Replace batteries or move to a different location to avoid interference.
Safety and disposal
- Not suitable for children under 36 months due to small parts (choking hazard).
- Do not mix old and new batteries, or different types of batteries.
- Non-rechargeable batteries must not be charged.
- Dispose of batteries and the product at designated collection points for recycling; do not dispose of them in household waste.
Practical help
Common problems
Vehicle does not function
Check if batteries are low, polarities are reversed, or if foreign objects are obstructing the wheels.
Slow speed or poor turning signal
Replace batteries with new ones or remove foreign objects from the wheels.
Poor distance control
Replace batteries or move to a better location to avoid interference.
Before use
- Install 2 x 1.5V AAA batteries in the transmitter.
- Install 4 x 1.5V AA batteries in the vehicle.
- Ensure all batteries are installed with correct polarity (+/-).
- Check that the power switches on both the transmitter and vehicle are set to OFF before installation.
- Ensure no foreign objects are obstructing the wheels.
Specs in practice
- Transmitting power
- <10 mW
Images and diagrams
- Diagram 1: Transmitter battery installation.
- Diagram 2: Vehicle battery installation.
- Diagram 3: Power switch location and pairing.
- Diagram 6: Door control operation.
- Diagram 7: Wheel alignment adjustment.
Model compatibility
- Not suitable for children under 36 months due to small parts.
- Recommended for outdoor use for optimal control range.

Manual page author
David Miller
Documentation analyst
Organizes user manual content into clear summaries, with attention to model details, product context, and everyday usability.