Toys / RC Models & Drones
User Manual for Sharper Image DX-2 Stunt Drone
Quick guide for the Sharper Image DX-2 Stunt Drone. Learn how to pair the remote, charge the battery, operate flight modes, perform stunts, and troubleshoot common issues.
Quick answers from the manual
Quick answer
- To pair the drone, turn it on and place it on a flat surface. Turn on the remote, move the left joystick down, then up, then down again. A beep indicates successful pairing. p. 1
Key actions
- Charging the drone p. 5
- Emergency Stop p. 6
First start
- Charge the drone, install batteries in the remote, pair the devices, and practice in a large, open indoor area. p. 1, 7
Problems and fixes
Remote light does not illuminate
Check that batteries in the remote are installed correctly or replace with new batteries.
p. 3Maintenance and reset
- Reset drone after hard landing p. 3
Technical specifications
| Parameter | Value | Meaning | Pages |
|---|---|---|---|
| Drone Battery | 350 mAh Li-po | Battery capacity | p. 2 |
| Charging Time | 60 minutes | Time to fully charge | p. 2, 5 |
Where to find it in the PDF
- Safety and Pairing p. 1
- Specifications and Table of Contents p. 2
- Warnings and Troubleshooting p. 3
- Battery and Contents p. 4
- Charging p. 5
- Remote Overview p. 6
- Operating Drone p. 7
- Modes and Propellers p. 8
Table of contents
Manual images
Click an image to enlargeQuick guide from the manual
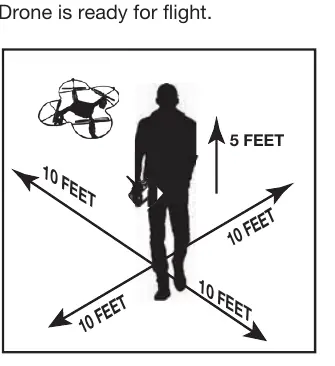
This guide provides essential instructions for operating the Sharper Image DX-2 Stunt Drone. Always ensure the drone is charged before use, and perform all flights in large, open indoor areas. Adult supervision is required for assembly, charging, and battery installation.
Getting started
Before your first flight, ensure you have completed the following steps:
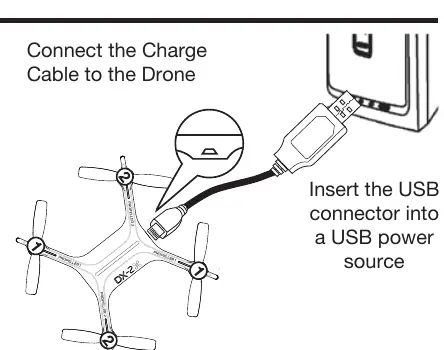
- Charge the drone: Connect the charging cable to the port on the rear of the drone and plug the USB connector into a power source. The charger light turns off when fully charged (approx. 60 minutes).
- Install remote batteries: Open the battery compartment and install 6 AA batteries according to the polarity diagram.
- Pairing: Turn the drone on and place it on a flat, level surface. Turn on the remote, move the left joystick down, then up, then down again. A beep indicates successful pairing.
Remote control overview
The remote control features two joysticks and several adjustment buttons:
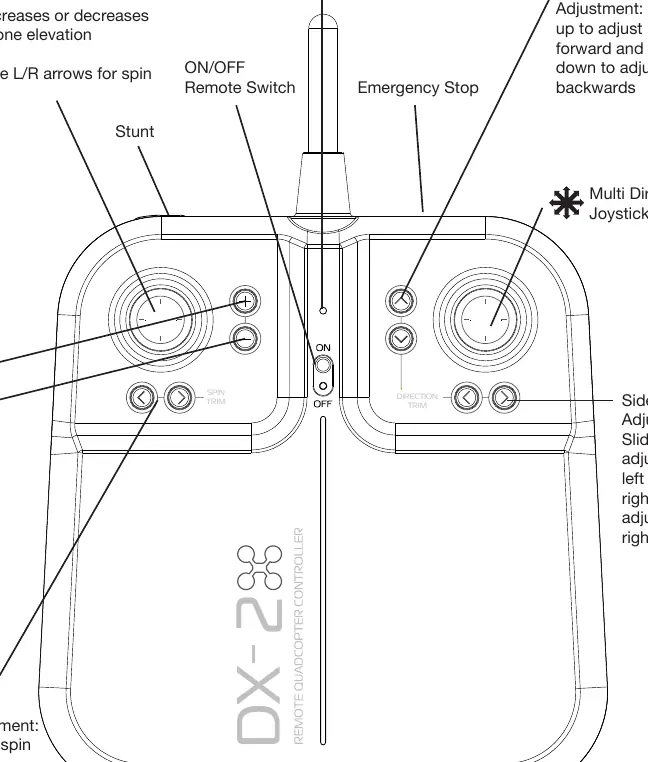
- Left Joystick: Controls elevation (up/down) and spin (left/right).
- Right Joystick: Controls flight direction.
- Direction Trim: Used to eliminate drift.
- Emergency Stop: Hold the STOP button until the drone lands completely.
Operating the drone
Follow these steps for a successful flight:
- Lift Off: Slowly bring the throttle up. If the drone drifts, use the adjustment buttons to compensate.
- Drift Adjustment: If the drone drifts, use the Forward/Backwards or Side to Side adjustments to stabilize it.
- Flight: Use the throttle to maintain elevation and the multi-directional joystick to move.
Flight modes
- Auto Landing: Press the "-" button to trigger auto-land. Do not touch the left control stick during this sequence.
- Auto Orientation: Press the "+" button to enter this mode. The drone will maintain its original forward orientation regardless of which way it is facing.
- Stunt Mode: Hover at least 10 feet high, press the Stunt Button, and move the multi-directional joystick in the desired direction to perform a flip.
Maintenance and troubleshooting
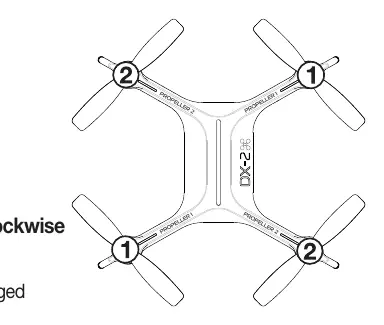
If the drone is unstable after impact, reset it by moving both joysticks to the bottom-right corner simultaneously. If the drone won't lift off, ensure the battery is charged. For propeller issues, ensure you match the numbered blades (1 or 2) with the corresponding numbers on the drone arms. Blade 1 turns counter-clockwise, and Blade 2 turns clockwise.
Manufacturer information
Sharper Image
Practical help
Common problems
Remote light does not illuminate
Check that batteries are installed correctly or replace with new batteries.
Remote LED is flashing and beeping
Remote batteries are low; replace them.
Drone pairs but will not lift off
The drone battery needs charging. Connect the charging cable.
Drone flight is unstable after trimming
One or more blades may be damaged. Replace with the correct replacement blade.
Drone and remote cannot pair
Ensure the remote is within 4 meters of the drone.
Before use
- Charge the drone battery fully.
- Install 6 fresh AA batteries in the remote.
- Ensure drone and remote are powered off before starting.
- Install blade guards.
- Review all safety warnings on page 1.
Specs in practice
- Drone Battery
- 350 mAh Li-po
- Remote Battery
- 6 x 1.5V AA
- Charging Time
- Approximately 60 minutes
- Maximum Altitude
- 115 ft
Images and diagrams
- Pairing: Turn drone on, place on flat surface, turn remote on, move left joystick down-up-down.
- Emergency Stop: Hold the STOP button until the drone lands.
- Propeller Replacement: Match the number on the blade with the number on the drone arm.
Model compatibility
- Recommended for indoor use.
- Not recommended for children under 14 years of age.

Manual page author
Michael Turner
Technical manual editor
Reviews PDF manuals for structure, safety notes, and practical product details so readers can find the right information quickly.