Electronics / Antenna Accessories
Installation Guide for Matchmaster 13MM-SM06S Antenna Mount
Comprehensive installation guide for the Matchmaster 13MM-SM06S antenna mount. Includes step-by-step instructions for swivel foot, mast, and stay bar assembly, safety precautions, and cable routing tips for metal roofs.
Table of contents
Manual images
Click an image to enlargeQuick Guide from the Manual
The Matchmaster 13MM-SM06S is an antenna mount designed for metal roofs. Installation requires careful positioning to ensure a clear line of sight to the transmitter and structural integrity of the purlin-rafter joint. Always use appropriate personal protective equipment (PPE) and ensure earth leakage protection is active when drilling.
Safety Warnings
- Electrical Safety: Be aware of live electrical cables behind roof sheets or building cladding. Use an earth leakage protection device when drilling.
- Working at Heights: Use appropriate PPE, including gloves, goggles, safety boots, and a harness.
- Structural Integrity: The SM06S relies on the purlin-rafter joint for wind load transfer. Inspect these joints before installation to ensure they are sound.
Installation Kit Parts List
- 1x 600mm mast (with 3x 5/16" bolts, 6x washers, 3x spring washers, 3x nuts)
- 1x Swivel foot mount (Clevis bracket)
- 2x Adjustable stay bars (with 8x 10G x 16mm 5/16" Hex Self Tapping Metal screws)
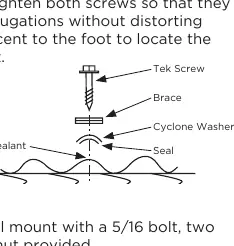
- 4x 14G x 65mm 3/8" Hex Type 17 Timber Screws (with 4x Cyclone Washers with integrated seal)
- 1x Cable grommet
Positioning the Mount
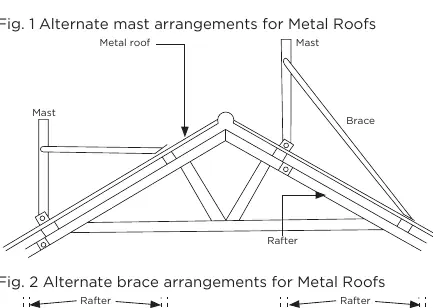
Consult with the householder to select a location that provides the antenna with a clear view to the transmitter. Position the stay bar on the high or low side of the mast. The angle between the braces must be between 60 and 120 degrees.
Swivel Foot Installation
- Remove a screw from the batten at the chosen location.
- Loosely fix one end of the foot with a Cyclone screw.
- Use the foot as a template to drill the hole for the second mounting screw.
- Install the second Cyclone screw.
- Tighten both screws until firm against the roof corrugations without distorting them.
- Drill a 10mm hole adjacent to the foot to locate the cable feed-through grommet.
Mast and Stay Bar Assembly
- Secure the mast to the swivel mount using the provided 5/16" bolt, two washers, spring washer, and nut.
- Assemble the adjustable stay bars to the mast using the remaining hardware.
- Align the opposite ends of the stay bars to the selected anchor points on the roofline.
- Remove screws from the battens and replace them with the remaining Cyclone assemblies.
- Secure the stay bars to the mast with 4 x 10G x 16mm 5/16" Hex Self Tapping Metal screws per stay bar.
Cable Routing
The mast allows for cable to be run either outside the mast or through the center. If running through the center, use the pre-cut hole near the base of the mast. Do not run the cable out the bottom of the tube onto the clevis bracket, as it may be pinched and damaged.
Waterproofing and Maintenance
While the supplied Cyclone washers provide a high degree of waterproofing, additional protection using a suitable silicone sealant under the washers is recommended. Ensure weep holes are on the inside of the upper stay bars and on the underside of the lower stay bars to allow for correct drainage.
Optional Accessories
If installing with additional accessories, follow the instructions supplied with the specific kit:
- 59MM-SM25: Gen 3 ISP Dish Pole Adaptor
- 13MM-DUOCLEAT: Duo Cleat (for moderate wind areas)
- 13MM-BK01: Batten Kit (for high wind areas)
Manufacturer information
Matchmaster Communications Pty Ltd
Practical help
Common problems
Water ingress
Apply silicone sealant under washers before tightening. Ensure weep holes are positioned on the inside of upper stay bars and underside of lower stay bars.
Cable damage
Do not run cable out the bottom of the tube onto the clevis bracket. Use the pre-cut hole near the base of the mast.
Mount instability
Do not use a cyclone washer under the clevis foot mount bracket if it causes instability on the roof surface.
Before use
- Check for live electrical cables behind roof sheets.
- Ensure earth leakage protection is used when drilling.
- Wear appropriate PPE (gloves, goggles, safety boots, harness).
- Inspect purlin-rafter joints for structural soundness.
- Verify clear line of sight to the transmitter.
Images and diagrams
- Fig 1 & 2: Illustrates correct brace angles (60-120 degrees) and mast positioning on metal roofs.
- Fig 3: Shows the cross-section of the fastening method using Tek screws, Cyclone washers, and sealant.
- Fig 4: Detailed assembly view showing the mast, stay bars, and roof connection points.
Model compatibility
- Designed for metal roofs.
- Optional accessories available for high wind areas (13MM-BK01) and moderate wind areas (13MM-DUOCLEAT).

Manual page author
Michael Turner
Technical manual editor
Reviews PDF manuals for structure, safety notes, and practical product details so readers can find the right information quickly.