Electronics / Antenna Accessories
Installation Guide for Matchmaster 13MM-SM22 1.5m Tripod Mount
Comprehensive installation guide for the Matchmaster 13MM-SM22 1.5m tripod mount. Includes step-by-step mounting instructions, safety warnings, cable routing, and compatibility details for corrugated metal roofs.
Table of contents
Manual images
Click an image to enlargeQuick Guide from the Manual
The Matchmaster 13MM-SM22 is a 1.5m fixed-height tripod mount designed for standard corrugated cladding profiles. Proper installation requires structural inspection of the purlin-rafter joint. The system includes a mast and adjustable stay bars. Optional accessories are available for high-wind areas or different roof profiles.
Safety Warnings
- Electrical Hazard: Dangerous live electrical cables may be behind roof sheets. Use an earth leakage protection safety device when drilling.
- Personal Protection: Use appropriate PPE, including gloves, goggles, safety boots, and a harness when working at heights.
- Structural Integrity: The mount relies on the strength of the purlin-rafter joint. Inspect joints near the mast before installation.
Installation Limitations
- Designed for standard corrugated cladding (e.g., CUSTOM ORB).
- Not suitable for tiled roofs or light gauge metal frame roofs.
- For profiles like TRIMDEK or SPANDEK, a cyclonic metal batten kit (13MM-BK01) must be used.
Installation Steps
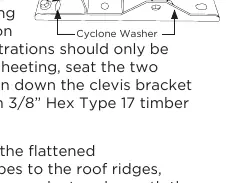

- Install Clevis Bracket: Select a suitable roof position. Remove existing roof screws, apply roofing silicone to penetration points (through ridges only), seat cyclone washers, and fasten the clevis bracket using two supplied 14G x 65mm Hex Type 17 timber screws.
- Attach Stay Tubes: Extend and attach the flattened ends of the telescoping stay tubes to the roof ridges. Apply silicone sealant under the bottom face. Use Type 17, 65mm wood screws with cyclone and rubber washers. Ensure weep holes are on the underside.
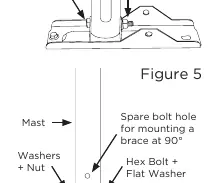
- Seat Mast: Place the bottom of the 1.5m mast into the clevis bracket. Lock it using a 5/16" hex bolt, hex nut, two flat washers, and a spring washer. Do not overtighten to avoid crushing the mast.
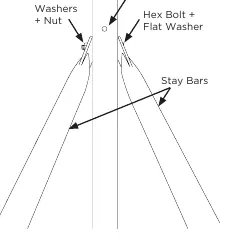
- Secure Stay Bars: Lift stay bars into place. Bend flattened ends to fit flush against the mast. Attach to the mast using a 5/16" hex bolt, flat washer, spring washer, and nut.
- Finalize Base: Tighten the Type 17 roof screws to secure the stay bar bases to the roof.
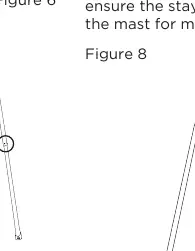
- Plumb Adjustment: Use a spirit level to adjust the mast until it is plumb. Secure the two stay bars using the supplied 10g x 16mm TEK screws by drilling into the pilot holes of the stay bar overlap.
- Antenna Assembly: Assemble the antenna per manufacturer instructions and fasten it to the top of the mast.
- Cable Routing: Run the cable either outside the mast or through the center. If using the center, route through the pre-cut hole near the base. Ensure the cable does not exceed the bend radius and is protected from sharp edges.
Optional Accessories
- 13MM-BK01: Batten Kit for High Wind Areas.
- 13MM-DUOCLEAT: Duo Cleat for Corrugated Metal Roofs (moderate wind areas).
- 59MM-SM25: Gen 3 ISP Dish Pole Adaptor.
Manufacturer information
Matchmaster Communications Pty Ltd
Practical help
Common problems
Mounting on incompatible roof type
The SM22 is not suitable for tiled roofs or light gauge metal frame roofs.
Cable damage during installation
Do not run cable out the bottom of the tube onto the clevis bracket where it can be pinched. Ensure it does not exceed the manufacturer's cable bend radius.
Structural instability
The mount relies on the purlin-rafter joint. Ensure joints are structurally sound before installation.
Before use
- Inspect roof location for structural integrity.
- Confirm roof profile compatibility (standard corrugated cladding).
- Ensure appropriate personal protective equipment (gloves, goggles, harness).
- Verify availability of required tools (spirit level, drill, wrench).
- Check if optional accessories (Batten Kit/Duo Cleat) are required for your specific roof or wind zone.
Specs in practice
- Stay Bar Length
- Maximum allowable install length of 1800mm.
- Compatibility
- Designed for standard corrugated cladding (e.g., CUSTOM ORB).
Images and diagrams
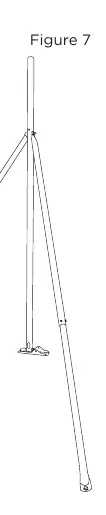
- Figure 1: Overview of the 1.5m mast and stay bar configuration.
- Figure 2: Clevis bracket installation with cyclone washers.
- Figure 6: Adjusting mast to plumb using a spirit level and securing stay bars.
- Figure 8: Alternative 90-degree stay bar installation method.
Model compatibility
- Requires cyclonic metal batten kit (13MM-BK01) for profiles like TRIMDEK or SPANDEK.
- Use Duo Cleats (13MM-DUOCLEAT) for corrugated metal roofs in moderate wind areas.
- If installing with SM25 adaptor, follow instructions supplied with the accessory.

Manual page author
David Miller
Documentation analyst
Organizes user manual content into clear summaries, with attention to model details, product context, and everyday usability.