Electronics / Televisions
Installation Guide for Matchmaster 04MM-TB17 TV Bracket
Quick installation guide for the Matchmaster 04MM-TB17 32-55" TV bracket. Includes mounting steps for wood studs and concrete walls, VESA compatibility, and adjustment instructions.
Table of contents
Manual images
Jump to the sectionQuick guide from the manual
The Matchmaster 04MM-TB17 is a tilt and swivel TV bracket designed for screens between 32 and 55 inches. The maximum weight capacity is 50kg. Ensure the wall structure is capable of supporting the combined weight of the mount and the TV. The bracket must be installed on solid wood studs or concrete/brick walls. Maintenance should be performed every three months to ensure all connections remain secure.
Installation
Before starting, ensure you have all components listed in the manual. Use the appropriate installation method based on your wall type:
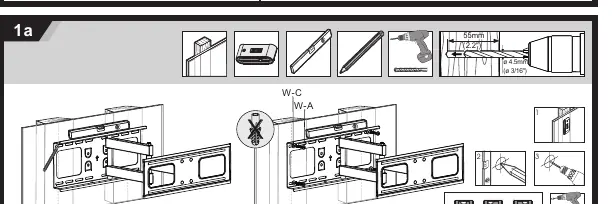
Wood Stud Installation
- Locate the wood stud.
- Use a 4.5mm drill bit to drill pilot holes to a depth of 55mm.
- Secure the wall plate using the provided wall screws (W-A) and washers (W-C).
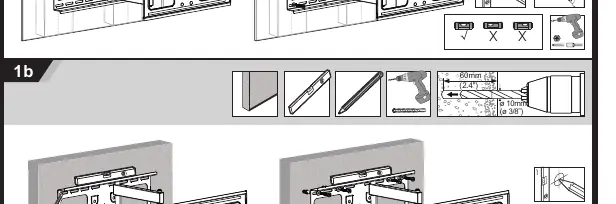
Concrete or Brick Wall Installation
- Mark the hole locations.
- Use a 10mm drill bit to drill holes to a depth of 60mm.
- Insert wall anchors (W-B) into the holes.
- Secure the wall plate using the provided wall screws (W-A) and washers (W-C).
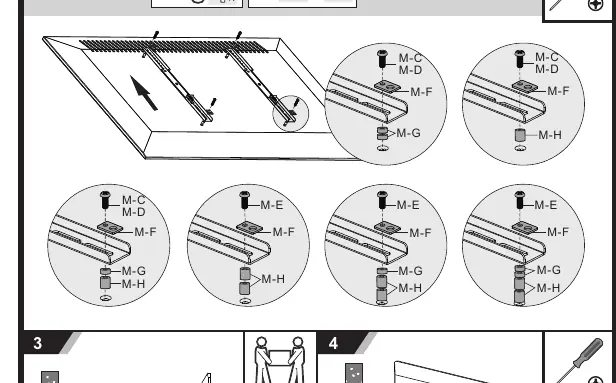
Attaching the Bracket to the TV
Select the correct screw (M-A to M-E) and spacer (M-F, M-G, M-H) combination that fits your TV's mounting holes. Attach the bracket arms to the back of the TV securely.
Mounting the TV
- Hang the TV with the attached bracket arms onto the wall plate.
- Secure the TV to the wall plate using the locking mechanism to prevent accidental dislodging.
Adjustments
Once installed, you can adjust the viewing angle:
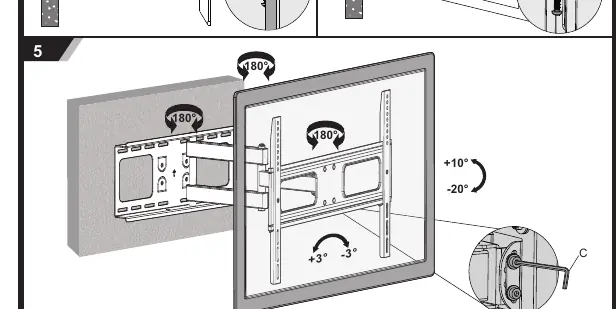
- Tilt: Adjust the tilt angle between +10° and -20°.
- Swivel: Rotate the arm up to 180° for optimal viewing.
- Leveling: Use the adjustment screw (C) to fine-tune the level of the TV if it is slightly tilted.
Manufacturer information
Matchmaster Communications Pty Ltd
Practical help
Common problems
TV is not level after installation
Use the adjustment screw (C) to fine-tune the level of the TV.
Mounting hardware does not fit the TV back
Ensure you are using the correct combination of screws (M-A to M-E) and spacers (M-F, M-G, M-H) provided in the kit.
Before use
- Verify the wall type (solid wood stud or concrete/brick).
- Check that the TV weight is under 50kg.
- Confirm VESA pattern compatibility (up to 400x400).
- Gather required tools: Drill, 4.5mm bit (wood), 10mm bit (concrete), screwdriver, and level.
- Ensure all parts from the component list are present.
Specs in practice
- VESA Compatibility
- Supports mounting patterns up to 400x400.
- Swivel Range
- Allows for 180° horizontal rotation.
Images and diagrams
- 1a: Wood stud installation procedure.
- 1b: Concrete/brick wall installation procedure.
- 2a/2b: Attaching bracket arms to the TV using spacers and screws.
- 3/4: Hanging and securing the TV to the wall plate.
- 5: Adjusting tilt, swivel, and leveling.
Model compatibility
- Designed for 32-55 inch screens.
- Must be installed on solid wood studs or concrete/brick walls only.

Manual page author
David Miller
Documentation analyst
Organizes user manual content into clear summaries, with attention to model details, product context, and everyday usability.