Tools / Saws
MAX 31131 Table Saw User Manual
Quick guide for the MAX 31131 Table Saw. Includes assembly instructions, safety warnings, operating procedures, settings, and maintenance tips.
Table of contents
Manual images
Click an image to enlargeQuick guide from the manual
This manual provides essential instructions for the safe and efficient operation of the MAX 31131 Table Saw. Always read the full safety instructions before use. Ensure the saw is disconnected from the power supply before performing any assembly, adjustments, or maintenance.
Assembly and preparation
Before starting, lay out all parts on a soft surface to prevent scratching. Do not fully tighten bolts until all components are in place.
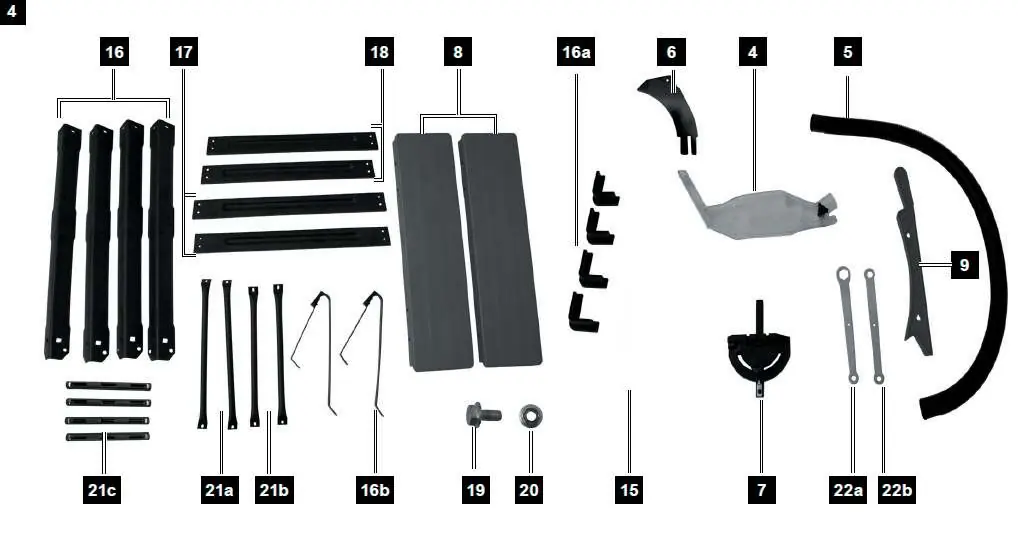

- Frame assembly: Attach legs (16) to the corners of the saw using bolts (19). Secure the supports (21a/21b) to the legs. Install rubber feet (16a). Connect short (18) and long (17) cross-braces to the legs using bolts (19) and nuts (20). Attach anti-tip mechanisms (16b) to the rear legs.
- Bench extensions: Align extensions (8) with the sides of the saw bench (1). Attach using cross-braces (21c) and bolts (19).
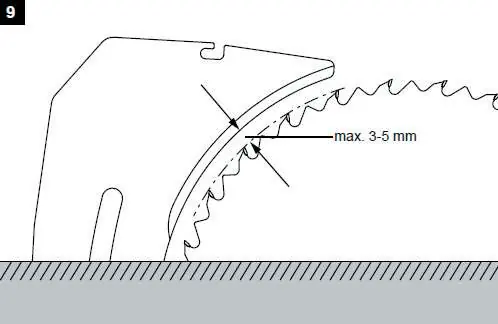
- Riving knife: Position the saw blade vertically (0°). Loosen the countersunk screw (23) to lift the bench inlay (2). Ensure a 3-5 mm gap between the saw blade (3) and the riving knife (6). Adjust if necessary using the assembly screw (24).
- Blade guard: Attach the blade guard (4) to the riving knife (6) using screw (25). Ensure it moves freely.
Settings

- Cutting depth: Turn the hand wheel (12) to raise or lower the blade (3). The blade should protrude no more than one tooth height above the workpiece.
- Blade angle: Loosen the lock knob (13), press the hand wheel (12) in, and turn to adjust the angle between 0° and 45°.
- Parallel guide: Install to the right of the blade. Use the plastic guide (15a) for short workpieces; remove it for long workpieces. Secure with the lock knob (30).
- Mitre guide: Insert into the slot (31a/31b). Loosen the wing nut (32) to set the desired angle (0-60°).
Operation
Ensure the workpiece is placed against the parallel or mitre guide. Start the saw using the green 'I' button. Feed the workpiece with a smooth, steady motion. Use the push stick (9) for small workpieces. If the blade jams, turn off the saw immediately using the red 'O' button and disconnect from power before clearing the jam.
Maintenance
- Cleaning: Regularly remove sawdust and dirt using a vacuum or brush. Ensure motor ventilation slots are clear.
- Lubrication: Lubricate all moving parts with light oil.
- Carbon brushes: Replace both carbon brushes if they are worn down.
Practical help
Common problems
Saw stops during operation
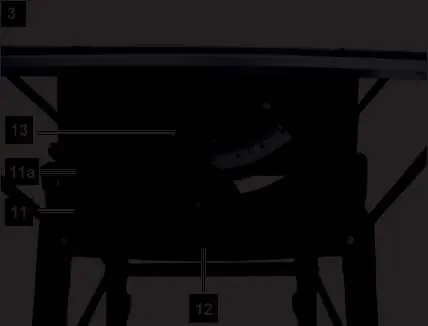
Overload protection triggered. Let the saw cool for 30 minutes, press the overload protection button (11a), and restart using the green 'I' button.
Blade binds in workpiece
Turn off the saw immediately, unplug, and clear the jam. Check if the fence is parallel to the blade and ensure the blade is not warped.
Workpiece kicks back
Ensure the riving knife is correctly installed and aligned. Never stand directly behind the blade while sawing.
Before use
- Ensure the saw is disconnected from the power supply before assembly or maintenance.
- Check that the saw blade is correctly adjusted and does not protrude too far above the table surface.
- Verify that the riving knife is correctly installed and aligned (3-5 mm from the blade).
- Ensure all bolts and nuts are tightened.
- Wear appropriate PPE: ear protection, eye protection, dust mask, and gloves.
Specs in practice
- Voltage/Frequency
- 220-240 V~ 50 Hz
- Cutting depth (90°/45°)
- Max 85/65 mm
Images and diagrams
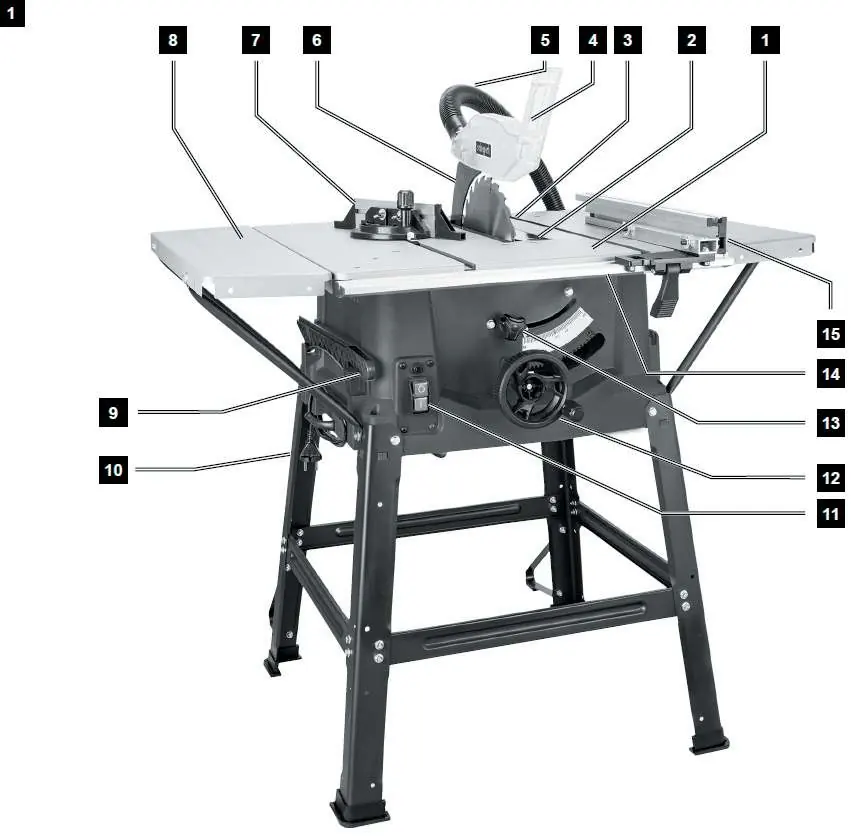
- 1: Saw bench, 2: Bench inlay, 3: Saw blade, 4: Blade guard, 5: Dust hose, 6: Riving knife, 7: Mitre guide, 8: Bench extension, 9: Push stick, 10: Frame, 11: On/Off switch, 11a: Overload protection, 12: Hand wheel, 13: Lock knob, 14:...
Model compatibility
- Use only saw blades that match the technical data and are tested according to EN 847-1.
- Do not use HSS steel saw blades.

Manual page author
Emily Carter
User documentation editor
Prepares concise manual descriptions and highlights the most useful setup, operation, and maintenance information for readers.