Automotive / Car Audio
Metra 107-GM4B Dash Kit Installation Guide
Installation guide for the Metra 107-GM4B dash kit, designed for Pioneer DMH-C2550NEX and DMH-C2500NEX radios in Chevrolet Silverado and GMC Sierra trucks. Includes step-by-step instructions for dash disassembly, kit preparation, and...
Table of contents
Manual images
Click an image to enlargeQuick Guide
The Metra 107-GM4B is an installation kit designed specifically for the Pioneer DMH-C2550NEX and DMH-C2500NEX radios. It is compatible with Chevrolet Silverado 1500 (2019-Up), GMC Sierra 1500 (2019-Up), and 2500/3500 models (2020-Up) equipped with a 2-knob 8-inch screen radio (RPO code IOS or IOT). Before starting, ensure the vehicle has sat with the key out of the ignition for a few minutes.
Tools Required
- Panel removal tool
- Phillips screwdriver
- 9/32" socket wrench
- T-15 Torx screwdriver
Dash Disassembly
For models with a full center console:
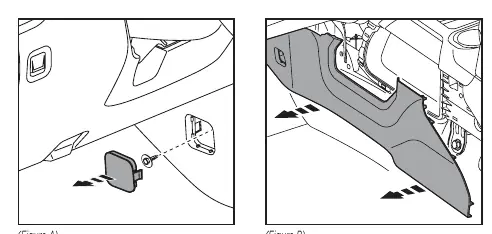
- Unclip the screw cover from the driver’s side of the center console and remove the 9/32" screw.
- Starting from the rear, unclip and remove the center console trim panel from each side.
- Starting from the rear, unclip and remove the cup holder panel.
For all models (continued):
- Unclip and remove the lower trim panel.
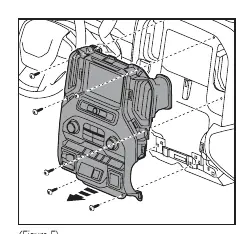
- Unclip and remove the trim panel surrounding the radio display.
- Remove the (6) 9/32" screws securing the climate and radio control panel, then unplug and remove the panel.
Kit Preparation
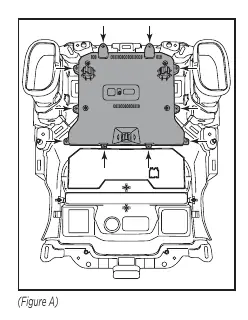
- Remove (10) T-15 Torx screws securing the cover from the back of the factory radio.
- Lift the bottom of the cover to access the ribbon cable, unplug it, and remove the display.
- Remove (4) T-15 Torx screws securing the radio controls and remove them.
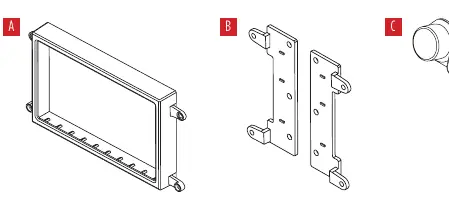
- Place the blank-out panel into the panel and secure it using the factory screws.
Kit Assembly
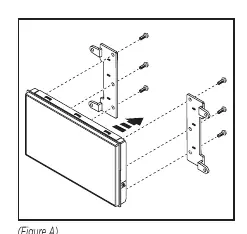
- Secure the display screen to the display screen brackets using (6) screws supplied with the radio. Note: The display screen and radio chassis use different types of screws; refer to the radio's installation manual.
- Route the RGB extension cable from the radio chassis to the display screen and connect it.
- Place the display screen assembly into the display screen housing and secure the entire assembly to the factory radio panel using the factory screws.
- Locate the factory wiring harness and antenna connector in the dash and complete all necessary connections.
- Reassemble the dash in reverse order of disassembly.
Wiring and Connections
The following parts are required but sold separately:
- Wiring Harness: AXTC-LN30 (for non-amplified models only)
- Antenna Adapter: 40-EU55
- RGB Extension Cable: Pioneer part # CD-RGB150E (not sold by Metra)
Important: Temporarily plug the climate control panel back in during testing to avoid vehicle error codes.
Support
If you encounter difficulties, contact Metra Tech Support at 386-257-1187 or email [email protected]. Ensure the installation was performed exactly as stated before contacting support.
Practical help
Common problems
Vehicle error codes during testing
Ensure the climate control panel is temporarily plugged back in while testing the radio.
Radio not fitting or hardware issues
Ensure you are using the correct screws; the display screen and radio chassis use two different types of screws. Refer to the radio's installation manual.
Before use
- Let the vehicle sit with the key out of the ignition for a few minutes before removing the factory radio.
- Verify vehicle compatibility: Silverado/Sierra 2019-Up (1500) or 2020-Up (2500/3500) with 2-knob 8-inch screen radio (RPO code IOS or IOT).
- Ensure all factory equipment is connected before cycling the key to ignition.
- Obtain required separate parts: AXTC-LN30 wiring harness, 40-EU55 antenna adapter, and Pioneer CD-RGB150E cable.
Specs in practice
- RPO code IOS or IOT
- Specific vehicle radio configuration required for this kit to be compatible.
Images and diagrams
- Dash Disassembly: Shows the sequence of removing trim panels and screws for both console and non-console models.
- Kit Preparation: Illustrates the removal of the factory display and installation of the blank-out panel.
- Kit Assembly: Shows how to attach the display screen to the brackets and housing.
Model compatibility
- Designed specifically for Pioneer DMH-C2550NEX and DMH-C2500NEX radios.
- AXTC-LN30 wiring harness is for non-amplified models only.

Manual page author
David Miller
Documentation analyst
Organizes user manual content into clear summaries, with attention to model details, product context, and everyday usability.