Automotive / Car Audio
Installation Guide for Metra 108-GM2B Radio Kit
Step-by-step installation guide for the Metra 108-GM2B radio kit, designed for 2007-2014 GM SUV and Truck models. Includes dash disassembly, radio mounting, and assembly instructions.
Table of contents
Manual images
Click an image to enlargeQuick guide from the manual
The Metra 108-GM2B is an installation kit designed specifically for the Pioneer DMH-C5500NEX 8-inch radio in 2007-2014 GM SUV and Truck models. Before beginning, ensure the vehicle is turned off and the key is removed from the ignition for a few minutes to prevent errors. Note that this kit is not compatible with Classic trim models and requires a full center console.
Tools required
- Panel removal tool
- Phillips screwdriver
- 9/32-inch socket wrench
Dash disassembly
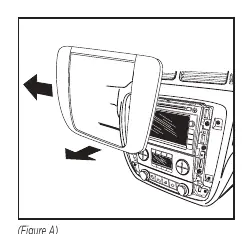
- Unclip and remove the radio trim panel.
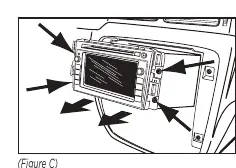
- Remove the four 9/32-inch screws securing the switch panel and climate controls. Unplug and remove the switch panel, setting the climate controls aside.
- Remove the four 9/32-inch screws securing the factory radio. Slide the radio out, then unplug and remove it.
- Enlarge the mounting holes from the switch panel as required. Reconnect the panel to the vehicle and set it aside.
- Remove the upper portion of the mounting tab on both sides of the climate control panel.
Kit assembly
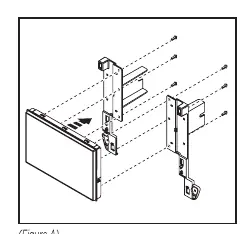
- Secure the radio display to the radio brackets using the six screws supplied with the radio.
- Secure the radio brackets to the radio chassis using the four screws supplied with the radio.
- Locate the factory wiring harness and antenna connector in the dash. Use the proper mating adapter from Metra or AXXESS. Test the radio for proper operation.
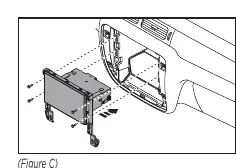
- Slide the radio assembly into the dash and secure it using the four #8 x 1/2-inch Phillips screws provided.
- Secure the climate controls to the vehicle using the two #8 x 3/8-inch Phillips screws provided.
- Secure the switch panel to the vehicle using the factory screws.
- Attach the six panel clips provided to the radio trim panel.
- Reassemble the dash in reverse order of disassembly using the 108-GM2B radio trim panel.
Troubleshooting and support
If you encounter difficulties, ensure the installation was performed exactly as stated. Have the vehicle apart and ready to perform troubleshooting steps before contacting support. You can reach Metra Tech Support by phone at 386-257-1187 or via email at [email protected].
Practical help
Common problems
Radio does not fit or mount correctly.
Ensure you are using the correct screws for the display screen versus the radio chassis, as they require different hardware.
Difficulty with dash reassembly or electrical issues.
Ensure all factory equipment is connected before cycling the key to the ignition position.
Before use
- Let the vehicle sit with the key out of the ignition for a few minutes before removing the factory radio.
- Verify vehicle compatibility (GM SUV/Truck 2007-2014, full center console, non-Classic trim).
- Obtain the proper wiring harness adapter (sold separately).
- Gather required tools: panel removal tool, Phillips screwdriver, 9/32-inch socket wrench.
Specs in practice
- Pioneer DMH-C5500NEX
- The specific 8-inch radio model this kit is designed to accommodate.
Images and diagrams
- Dash Disassembly: Shows the removal of the radio trim panel, switch panel, and climate controls.
- Kit Assembly: Illustrates attaching the radio brackets to the radio chassis and display.
Model compatibility
- Designed for GM SUV/Truck models from 2007-2014.
- Not compatible with Classic trim models.
- Requires full center console.

Manual page author
David Miller
Documentation analyst
Organizes user manual content into clear summaries, with attention to model details, product context, and everyday usability.