Automotive / Car Audio
Installation Instructions for Metra 108-TO6HG Dash Kit
Quick installation guide for the Metra 108-TO6HG dash kit for Toyota RAV4 2019-Up. Includes dash disassembly, kit assembly, and wiring tips.
Table of contents
Manual images
Click an image to enlargeImportant Information
This document provides installation instructions for the Metra 108-TO6HG dash kit, designed for the Toyota RAV4 (2019-Up). Before beginning, ensure the vehicle has sat with the key out of the ignition for a few minutes. When testing aftermarket equipment, ensure all factory equipment is connected before cycling the key to the ignition position.
Tools Required
- Panel removal tool
- Phillips screwdriver
- 10mm socket wrench
- Cutting tool
Dash Disassembly
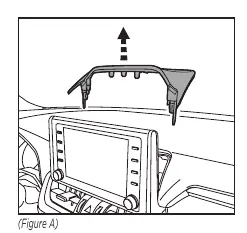
- Remove the trim panel located behind the radio.
- Remove the four 10mm screws securing the radio. Unclip and slide out the radio, then unplug and remove it.
- Remove the six screws on the back of the radio and separate the panels from around the factory radio face.
Kit Assembly
Note: For steps 1 and 2, refer to the installation manual provided with your radio to determine which hardware to use, as the display screen and radio chassis use different types of screws.
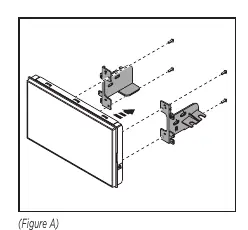
- Secure the radio display to the radio brackets using the four screws supplied with the radio.
- Secure the radio brackets to the radio chassis using the four screws supplied with the radio.
- Connect the radio display to the radio chassis.
- Using a cutting tool, carefully remove the center cross-shaped support brace from the radio trim panel.
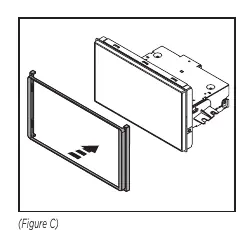
- Snap the radio trim panel to the new radio display.
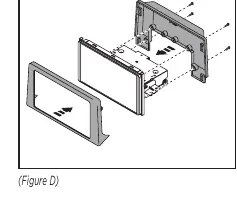
- Assemble the radio assembly into the factory radio panels using the outside four factory screws (screws are also provided if needed).
- Locate the factory wiring harness and antenna connector in the dash and complete all necessary connections to the radio. Metra recommends using the proper mating adapter from Metra and/or Axxess. Test the radio for proper operation.
- Slide the radio assembly into the dash, then secure using the factory screws.
- Reassemble the dash in reverse order of disassembly to complete the installation.
Technical Support
If you encounter difficulties, contact Metra Tech Support at 386-257-1187 or via email at [email protected]. Support hours are Monday - Friday: 9:00 AM - 7:00 PM, Saturday: 10:00 AM - 7:00 PM, and Sunday: 10:00 AM - 4:00 PM (Eastern Standard Time).
Practical help
Common problems
Radio not powering on after installation.
Ensure all factory equipment is connected before cycling the key to the ignition position.
Radio display does not fit into the trim panel.
Ensure the center cross-shaped support brace has been removed from the radio trim panel using a cutting tool.
Before use
- Let the vehicle sit with the key out of the ignition for a few minutes before removing the factory radio.
- Gather required tools: panel removal tool, Phillips screwdriver, 10mm socket wrench, and a cutting tool.
- Verify you have the correct wiring harness and antenna adapter (sold separately).
- Consult the installation manual provided with your specific radio for correct screw usage.
Images and diagrams
- Figure A (Dash Disassembly): Illustrates the removal of the trim panel behind the radio.
- Figure C (Kit Assembly): Illustrates snapping the radio trim panel onto the new radio display.
- Figure D (Kit Assembly): Illustrates the final assembly of the radio unit into the factory panels.
Model compatibility
- Compatible with Toyota RAV4 2019-Up.
- Designed for 8-inch Pioneer modular radios.
- Wiring and antenna connections are sold separately.

Manual page author
Michael Turner
Technical manual editor
Reviews PDF manuals for structure, safety notes, and practical product details so readers can find the right information quickly.