Automotive / Car Audio
Metra 109-KI1HG Dash Kit Installation Instructions
Step-by-step installation guide for the Metra 109-KI1HG dash kit, designed for Kia Seltos 2021-2023 vehicles. Includes detailed instructions for dashboard disassembly, kit preparation, and mounting the 9-inch Pioneer Modular Solutions...
Table of contents
Manual images
Click an image to enlargeImportant Information
Before beginning the installation, ensure the key is out of the ignition and disconnect the negative battery terminal. It is critical to ensure that all installation connections, especially the air bag indicator lights, are fully plugged in before reconnecting the battery or cycling the ignition to test the product. This kit is engineered exclusively for the 9-inch Pioneer Modular Solutions Receiver (DMH-WC6600NEX).
Tools Required
- Panel removal tool
- Phillips screwdriver
- 10mm socket
Dash Disassembly
- Unclip and remove the trim panel behind the radio display.
- Remove the (2) Phillips screws located under the trim panel removed in the previous step.
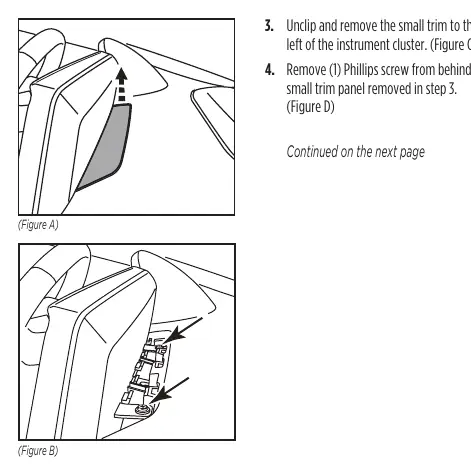
- Unclip and remove the small trim to the left of the instrument cluster.
- Remove (1) Phillips screw from behind the small trim panel removed in step 3.
- Unclip and remove the entire trim surrounding the instrument cluster, including the A/C vents under the radio display.
- Remove (1) Phillips screw securing the trim panel below the radio display (which contains the A/C vents), then unclip and remove the panel.
- Remove (2) Phillips screws and (1) 10mm nut securing the radio display and chassis.
- Unclip, unplug, and remove the radio display and chassis.
Kit Preparation
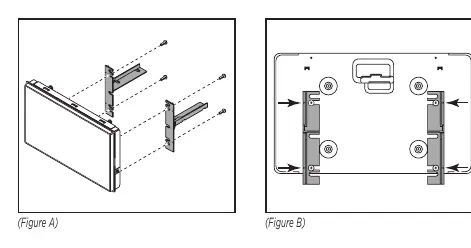
Attach the two included panel clips to the radio housing back.
Kit Assembly
Note: Reference the installation manual provided with your radio for specific hardware requirements, as the display screen and radio chassis use different types of screws.
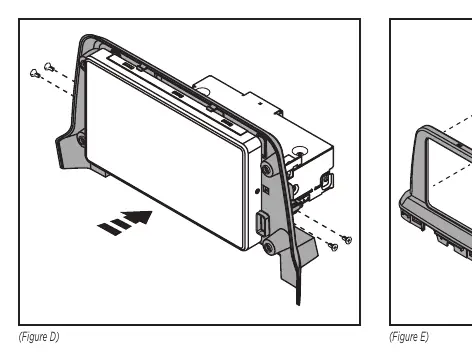
- Secure the radio display to the Pioneer brackets using (4) screws supplied with the radio. Use the divots on the Pioneer brackets to align the correct mounting positions to the screen.
- Connect the radio display/bracket assembly to the radio chassis using (4) screws supplied with the radio.
- Secure the radio assembly into the radio housing back using screws supplied with the radio.
- Secure the radio housing front to the back using the supplied #8 screws.
- Locate the factory wiring harness and antenna connector in the dash and complete all necessary connections to the radio. Metra recommends using the proper mating adapter from Metra and/or Axxess. Test the radio for proper operation.
- Slide the radio assembly into the dash and secure it using the factory screws.
- Reassemble the dash in reverse order of disassembly to complete the installation.
Practical help
Common problems
Airbag indicator light error
Ensure all installation connections, especially the air bag indicator lights, are fully plugged in before reconnecting the battery or turning on the ignition.
Radio display does not align with brackets
Ensure you are using the correct Pioneer Modular Solutions Receiver (DMH-WC6600NEX) and utilize the divots on the Pioneer brackets to align the correct mounting positions.
Before use
- Disconnect the negative battery terminal.
- Verify vehicle compatibility (Kia Seltos 2021-2023).
- Ensure you have a panel removal tool, Phillips screwdriver, and 10mm socket.
- Have the aftermarket radio's installation manual available for hardware reference.
Specs in practice
- Panel removal tool
- Essential for safely unclipping dashboard trim without causing damage.
Images and diagrams
- Dash Disassembly: Illustrates the sequence of removing trim panels and screws to access the radio unit.
- Kit Assembly: Shows how to attach the Pioneer radio to the brackets and secure the housing.
Model compatibility
- Designed exclusively for the 9-inch Pioneer Modular Solutions Receiver (DMH-WC6600NEX).
- Compatible with Kia Seltos 2021-2023.

Manual page author
David Miller
Documentation analyst
Organizes user manual content into clear summaries, with attention to model details, product context, and everyday usability.