Automotive / Car Audio
Installation Instructions for Metra 107-CH5 Dash Kit
Quick guide for installing the Metra 107-CH5 dash kit in a 1996-1998 Jeep Grand Cherokee. Includes dash disassembly, kit preparation, and radio installation steps for ISO DDIN and Pioneer Modular radios.
Table of contents
Manual images
Click an image to enlargeQuick guide from the manual
The Metra 107-CH5 dash kit is designed for the 1996-1998 Jeep Grand Cherokee. It supports ISO DDIN radios (with an L-shaped chassis) and Pioneer modular 6.8-inch radios. Before beginning, ensure the vehicle ignition is off and the key is removed for a few minutes. You will need a 3/8-inch socket set, a cutting tool or Dremel, a panel removal tool, and a Phillips screwdriver.
Dash Disassembly
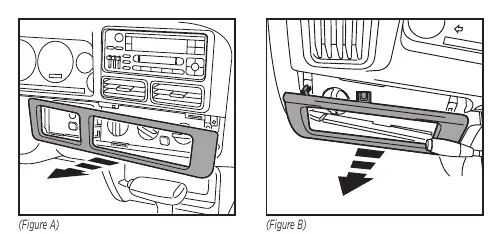
- Unsnap the climate control/wiper control trim panel and remove it.
- Unsnap the headlight switch trim panel and remove it.
- Remove the (10) Phillips screws from the top and bottom of the radio/instrument cluster trim bezel. Pry out on the bottom edge of the bezel and remove it.
- Remove the (2) 3/8-inch hexhead screws securing the factory radio and disconnect the wiring.
Kit Preparation
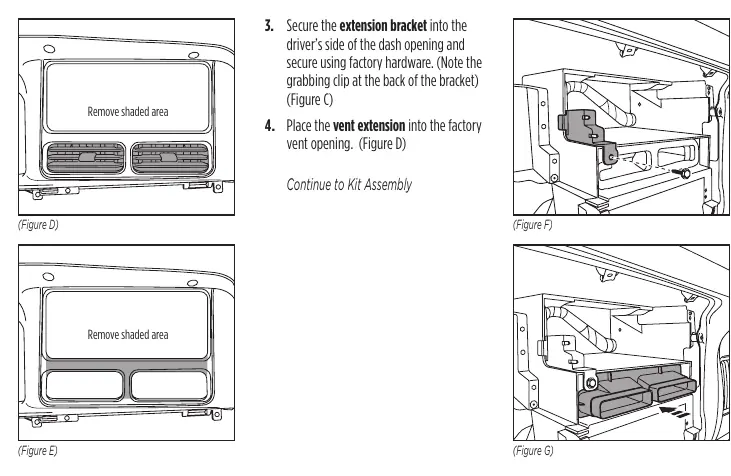
- Cut and remove the climate vents from the factory dash panel.
- Cut the vent area of the factory dash panel.
- Secure the extension bracket into the driver's side of the dash opening using factory hardware. Note the grabbing clip at the back of the bracket.
- Place the vent extension into the factory vent opening.
Kit Assembly
ISO DDIN radio provision
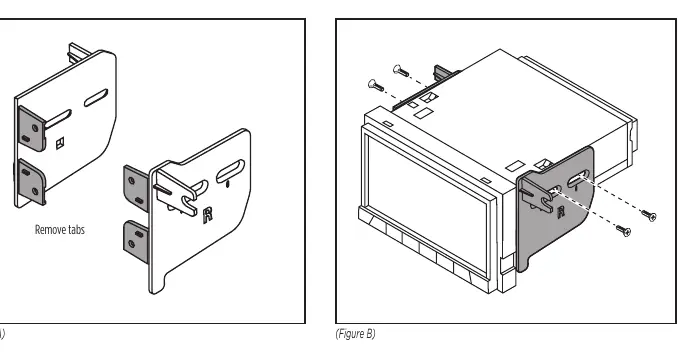
- Snap the front mounting tabs off of the radio brackets.
- Secure the radio brackets to the radio using the screws supplied with the radio.
- Locate the factory wiring harness and antenna connector in the dash and complete all necessary connections. Metra recommends using the proper mating adapter (e.g., 70-1817). Test the radio for proper operation.
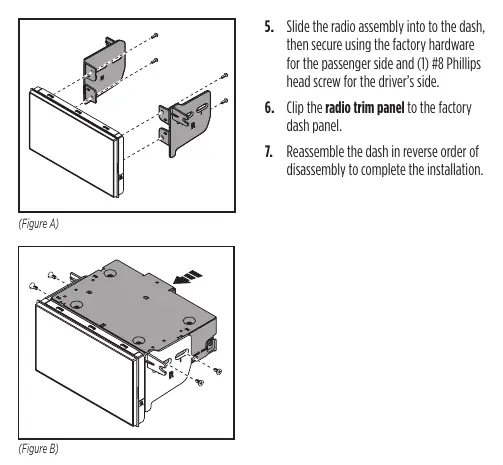
- Slide the radio assembly into the dash, then secure using the factory hardware for the passenger side and (1) #8 Phillips head screw for the driver's side.
- Clip the radio trim panel to the factory dash panel.
- Reassemble the dash in reverse order of disassembly.
Pioneer Modular radio provision
- Secure the radio brackets to the radio chassis using (4) screws supplied with the radio.
- Secure the radio display to the radio brackets using (4) screws supplied with the radio.
- Connect the radio display to the radio chassis.
- Locate the factory wiring harness and antenna connector in the dash and complete all necessary connections. Test the radio for proper operation.
- Slide the radio assembly into the dash, then secure using the factory hardware for the passenger side and (1) #8 Phillips head screw for the driver's side.
- Clip the radio trim panel to the factory dash panel.
- Reassemble the dash in reverse order of disassembly.
Technical Support
If you encounter difficulties, contact Metra Tech Support at 386-257-1187 or via email at [email protected]. Support hours are Monday-Friday 9:00 AM - 7:00 PM, Saturday 10:00 AM - 7:00 PM, and Sunday 10:00 AM - 4:00 PM (Eastern Standard Time).
Practical help
Common problems
Radio does not fit properly
Ensure you are using an ISO DDIN radio with an L-shaped chassis (radio chassis at the top of the screen) or a compatible Pioneer modular 6.8-inch radio.
Wiring connections
Use the recommended wiring harness 70-1817 (sold separately) for proper integration.
Before use
- Disconnect the vehicle battery or remove the key from the ignition for a few minutes before starting.
- Ensure you have the required tools: 3/8-inch socket set, cutting tool/Dremel, panel removal tool, and Phillips screwdriver.
- Verify your radio type (ISO DDIN or Pioneer Modular) to follow the correct assembly steps.
- Ensure all factory equipment is connected before cycling the key to ignition during testing.
Specs in practice
- Pioneer Modular
- Specific 6.8-inch modular radio type supported by this kit.
Images and diagrams
- Figures on page 2 show the removal of trim panels and the radio bezel.
- Figures on page 3 illustrate the cutting and preparation of the factory dash panel.
- Figures on pages 4 and 5 show the bracket attachment for the two supported radio types.
Model compatibility
- Compatible with Jeep Grand Cherokee 1996-1998.
- Wiring harness 70-1817 is sold separately.

Manual page author
Michael Turner
Technical manual editor
Reviews PDF manuals for structure, safety notes, and practical product details so readers can find the right information quickly.