Automotive / Tyre Inflators
User Manual for Michelin 62003 Programmable 12V Tyre Inflator
Quick guide for the Michelin 62003 12V Tyre Inflator. Learn how to set pressure, use the digital gauge, replace the fuse, and troubleshoot common inflation issues.
Table of contents
Manual images
Click an image to enlargeQuick Guide from the Manual
The Michelin 62003 is a programmable 12V tyre inflator designed for car and bicycle tyres. Key operational requirements include ensuring the vehicle is parked safely with the handbrake on, using only vehicles with a negative earth system, and never running the unit for more than 10 minutes without a cooling period. Always check your vehicle handbook for the correct tyre pressure before inflation.
Product Overview
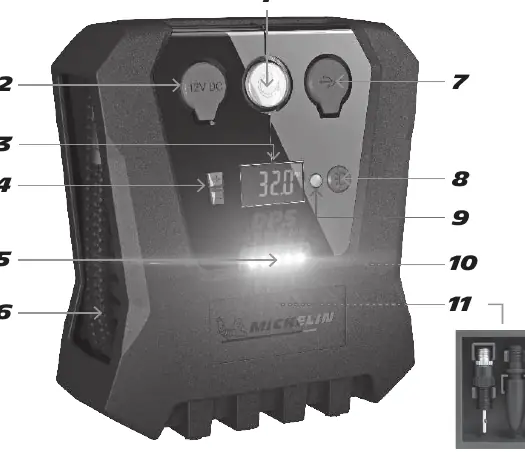
The unit features a digital display, pressure pre-set buttons, and a built-in 12V power socket and 5V USB port for accessories. The control panel includes an On/Off button, a unit/reset button (for bar, psi, kPa), and LED light controls. The power cord and air hose are stored within the unit.
Safety Warnings
- The inflator contains no user-serviceable parts; do not open the casing.
- Never leave the unit connected to a 12V socket unattended.
- Do not kink or block the air hose during operation.
- Never overinflate tyres; under or overinflated tyres can be dangerous.
- Allow the unit to cool down after every 10 minutes of continuous use.
- Inspect the unit for damage (bent, broken, melted, or wet components) before each use.
Tyre Inflation Procedure
- Unwind the power cord completely and plug it into the vehicle's 12V socket.
- Press the yellow button to cycle through pressure formats (bar, psi, kPa).
- Connect the air hose to the tyre valve. The gauge will display the current tyre pressure.
- Use the pre-set buttons to adjust to the desired pressure. The unit has a memory function and will default to the last set pressure.
- Press the On/Off button to start inflation. The unit will automatically stop once the pre-set pressure is reached.
- Remove the connector carefully after inflation.
Using Adaptors
The unit includes a snap-in storage compartment at the rear containing adaptors for other items, such as sports balls, small inflatable toys, and Presta valves for high-pressure cycle tyres. Always follow the manufacturer's instructions for the item being inflated to avoid overinflation.
Maintenance and Fuse Replacement
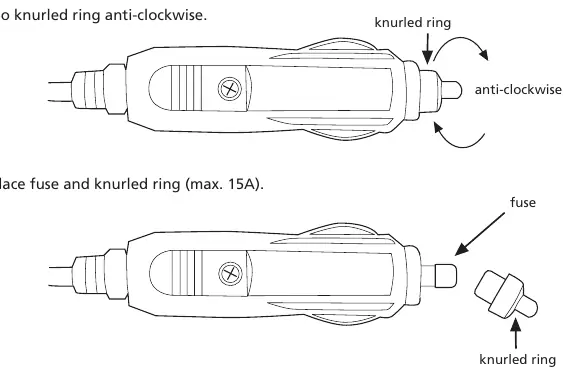
The 12V power plug contains a 15A glass fuse. If the unit fails to run, check this fuse. To replace it, undo the knurled ring on the plug by turning it anti-clockwise, replace the fuse, and reassemble.
Troubleshooting
- Gauge does not illuminate: Ensure the plug is fully inserted into the 12V socket.
- Unit fails to run: Check the internal 15A glass fuse in the plug. Ensure the ignition is in the accessory position if required by the vehicle.
- Gauge displays ERR: Connect to 12V power, do not connect to the tyre, and press/hold the yellow reset button for 5 seconds to reset the sensor.
- Gauge reads 0.0: Disconnect from the tyre, unplug from power for 5 seconds, reconnect, and hold the yellow reset button until digits appear.
Specifications
- Max Pressure: 50 psi (car tyres), 100 psi (cycle tyres)
- Pressure Accuracy: +/- 1 psi up to 50 psi
- Max Current: 10A / 120W
- Fuse: 15A glass
- Hose Length: 60 cm
- Power Cord: 300 cm
Manufacturer information
Michelin
Practical help
Common problems
Gauge does not illuminate
Check that the plug is fully inserted into the 12V socket.
Unit fails to run
Check the internal 15A glass fuse in the power plug. Ensure the vehicle ignition is in the accessory position.
Gauge displays ERR message
Connect to 12V power (do not connect to tyre), allow to settle, and press/hold the yellow reset button for 5 seconds.
Gauge reads 0.0
Disconnect from tyre, unplug from power for 5 seconds, reconnect, and hold the yellow reset button until digits appear.
Before use
- Ensure the vehicle is parked in a safe location off the road.
- Engage the vehicle handbrake.
- Check the vehicle owner's manual for recommended tyre pressures.
- Unwind the power cord completely from the storage compartment.
- Ensure the 12V socket is clean and free of debris.
Specs in practice
- Max Pressure
- 50 psi for car tyres; 100 psi for cycle tyres.
Images and diagrams
- 1: On/Off button
- 2: 12V power outlet
- 3: LCD digital display
- 4: Pressure pre-set buttons
- 7: 5V USB outlet
Model compatibility
- Only suitable for vehicles with a negative earth system.
- Do not use for space saver tyres.
- 12V socket is suitable for accessories like inspection lights or vacuum cleaners (max 12A).

Manual page author
David Miller
Documentation analyst
Organizes user manual content into clear summaries, with attention to model details, product context, and everyday usability.