Lighting / Fixtures
Minka Lavery 4173-249 3-Light Pendant Installation Guide
Installation guide for the Minka Lavery 4173-249 3-Light Pendant. Includes step-by-step mounting instructions, wiring diagrams, and bulb specifications.
Quick answers from the manual
Quick answer
- This manual provides instructions for assembling, hanging, wiring, and completing the installation of the Minka Lavery 4173-249 3-light pendant fixture. p. 1
Key actions
- Assemble the fixture by attaching the mounting bar to the junction box and preparing the chain. p. 1
- Connect electrical wires according to the diagram, ensuring the ground wire is connected to the mounting bar. p. 1
- Install bulbs and secure glass diffusers. p. 1
First start
- Shut off power at the circuit breaker and remove the old fixture. p. 1
Show 2 more answers Show less
Technical specifications
| Parameter | Value | Meaning | Pages |
|---|---|---|---|
| Bulb Type | Medium base | Socket type for bulbs | p. 1 |
| Maximum Wattage | 100W per bulb | Maximum power rating per socket | p. 1 |
| Bulb Quantity | 3 | Number of bulbs required | p. 1 |
Where to find it in the PDF
- Installation Instructions p. 1
Table of contents
Manual images
Click an image to enlargeQuick guide from the manual
This document provides instructions for installing the Minka Lavery 4173-249 3-Light Pendant. Before starting, ensure the power is shut off at the fuse or circuit breaker. The installation involves mounting the crossbar to the junction box, adjusting the chain length, connecting the electrical wires, and assembling the fixture body with diffusers and bulbs.
Preparation and Safety
Before beginning the installation, carefully remove the fixture from the carton and verify that all parts are included. Ensure you have the necessary tools, such as chain pliers. Always shut off the power at the circuit breaker and remove the old fixture, including the mounting hardware, before proceeding.
Hanging the Fixture
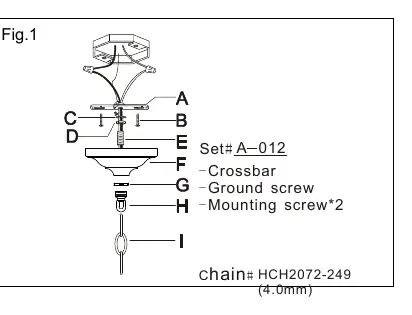
- Thread the all-thread (E) into the ceiling loop (H) until snug.
- Attach the hex nut (D) and lock washer (C) to the all-thread.
- Secure the mounting bar (A) assembly to the ceiling junction box using the provided mounting screws (B). Ensure the side marked "GND" faces out.
- Use chain pliers to open one link of the chain (I) and connect it to the fixture loop (J).
- Determine the desired hanging height and adjust the number of chain links accordingly.
- Lace the fixture wires through the chain links and slide the screw collar ring (G) and canopy (F) over the chain.
- Connect the other end of the chain to the ceiling loop (H) and feed the wires through the loop and all-thread.
Wiring
Connect the electrical wires according to standard electrical practices. Ensure all wire connectors are secured. If your junction box has a ground wire (green or bare copper), connect the fixture's ground wire directly to the mounting bar (A) using the provided green screw. After connections are made, carefully tuck the wires inside the junction box.
Completing Installation
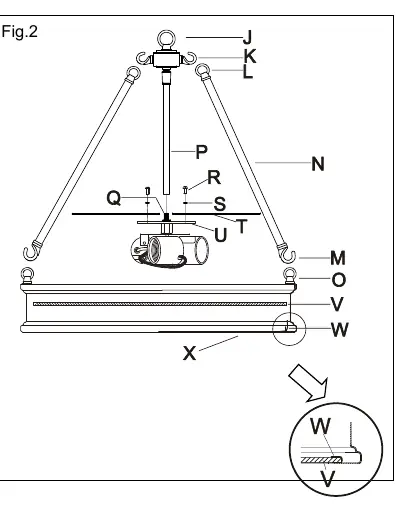
- Raise the canopy (F) to the ceiling and secure it by threading the screw collar ring (G) onto the ceiling loop (H).
- Place the diffuser (V) onto the fixture body (X) and secure it by bending the small glass holder tabs (W).
- Thread the pipe (P) onto the all-thread (Q).
- Attach the hook (M) of the rods (N) into loop (O), and the loop (L) of the rods (N) into hook (K).
- Install three medium base bulbs, up to 100 watts each (or CFL/LED equivalent). Do not exceed the specified wattage.
- Secure the glass diffusers (T) to the metal plate (U) using the provided screws (R) and plastic washers (S).
Practical help
Common problems
Fixture does not hang at the desired height
Measure and adjust the number of chain links using proper chain pliers before finalizing the connection to the ceiling loop.
Grounding issues
If the junction box has a ground wire, it must be connected directly to the mounting bar using the provided green screw.
Before use
- Shut off power at the fuse or circuit breaker
- Verify all parts are included in the carton
- Ensure the junction box has a ground wire
- Use proper chain pliers for adjusting chain links
- Check that the mounting bar is oriented with 'GND' facing out
Show more Show less
Specs in practice
- Compatibility
- Compatible with CFL or LED equivalents
Images and diagrams
- Fig 1: Illustrates the mounting bar, ceiling loop, and chain assembly process.
- Fig 2: Illustrates the fixture body assembly, including the diffuser, rods, and glass attachment.
Model compatibility
- Supports CFL or LED equivalent bulbs of medium base.

Manual page author
Emily Carter
User documentation editor