Lighting / Fixtures
Installation Manual for Minka Lavery 5907-655 10-Light Chandelier
A comprehensive installation guide for the Minka Lavery 5907-655 10-Light Chandelier. Includes step-by-step assembly instructions, wiring diagrams, mounting procedures, and safety warnings.
Table of contents
Manual images
Click an image to enlargeQuick Installation Guide
This document provides instructions for installing the Minka Lavery 5907-655 10-Light Chandelier. Before beginning, ensure the power is shut off at the fuse box or circuit breaker. The fixture is heavy (over 10 lbs), so ensure your junction box is securely mounted and capable of supporting the weight. Always remove decorative flowers before attempting to remove the canopy for future maintenance.
Assembly and Mounting
Follow these steps to assemble the fixture:
- Preparation: Shut off power and remove the old fixture. Unpack all parts in a clean area.
- Arm Adjustment: Adjust the arms to the proper position as shown in the illustration.
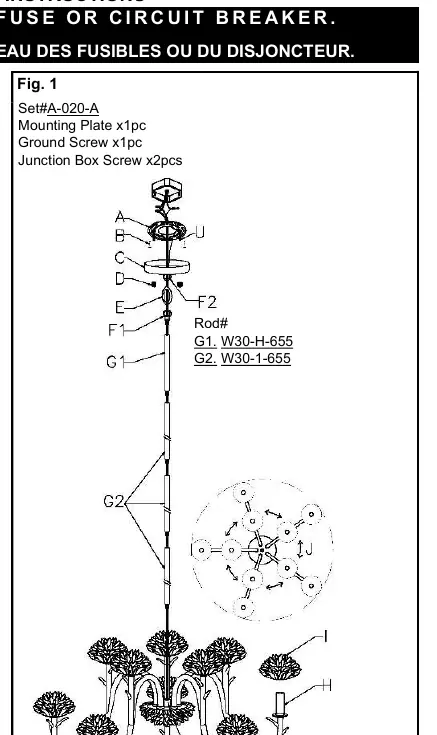
- Rod Assembly: Determine the desired hanging height. Thread the rods (G2, G1) to the fixture body (K). Screw the loop (F1) to the rod (G1). Carefully feed the wires through each rod during assembly.
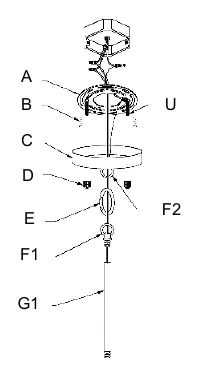
- Canopy Attachment: Attach the quick link (E) to the loop (F1) and the loop (F2) on the canopy (C). Feed the wire through the loop (F1), quick link (E), and loop (F2).
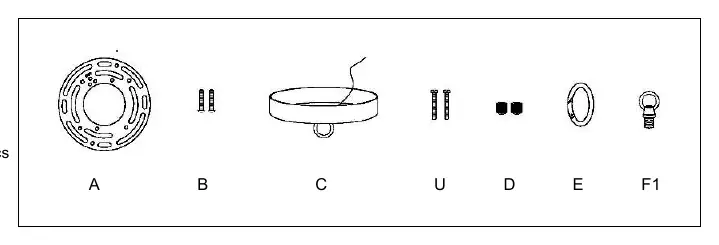
- Mounting Plate: Attach the mounting plate (A) to the junction box using the provided screws (B). Ensure the side of the mounting plate marked with GND and two convex points faces outward.
Wiring Instructions
Connect the electrical wires according to the following color codes:
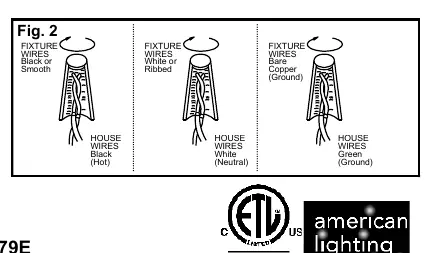
- Black or Smooth wire (Fixture): Connect to the Black (Hot) wire from the house.
- White or Ribbed wire (Fixture): Connect to the White (Neutral) wire from the house.
- Bare Copper wire (Fixture): Connect to the Green (Ground) wire from the house. If the junction box does not have a ground wire, connect the fixture's ground wire directly to the mounting plate (A) using the provided green screw.
After connecting, secure all wire connectors and tuck them neatly into the junction box.
Completion and Maintenance
To finish the installation:
- Slide the canopy (C) over the mounting screws (U) attached to the mounting plate (A) and secure it with the knobs (D).
- Place the decorative flowers (I) over the candle covers (H).
- Install ten (10) candelabra base bulbs. Do not exceed 60 watts per bulb. CFL or LED equivalents are acceptable.
Note: The fixture is over 10 lbs. Please remove all flowers before removing the canopy from the mounting plate to inspect wire connections in the future. This allows you to hold the fixture body securely during inspection or removal.
Practical help
Common problems
Fixture is heavy (over 10 lbs)
Remove all decorative flowers before removing the canopy from the mounting plate to inspect wire connections. This allows you to hold the fixture body securely.
Mounting plate orientation
Ensure the side of the mounting plate marked with 'GND' and two convex points faces outward.
Before use
- Shut off power at the fuse box or circuit breaker.
- Verify the junction box is compatible and secure.
- Ensure all parts (rods, canopy, mounting plate, screws) are present.
- Have a helper available to support the fixture weight during installation.
Show more Show less
Specs in practice
- Fixture Weight
- Over 10 lbs; requires secure mounting.
Images and diagrams
- Fig 1: Shows the assembly sequence of rods, loops, and canopy attachment.
- Fig 2: Illustrates the correct wiring connections (Hot, Neutral, Ground).
- Fig 3: Provides an exploded view of the fixture components.
Model compatibility
- Junction box is not included.
- Bulbs are not included.

Manual page author
Emily Carter
User documentation editor