Lighting / Fixtures
Installation Instructions for Minka Lavery 5723 3-Light Bath Light
Quick installation guide for the Minka Lavery 5723 3-Light Bath Light. Includes step-by-step wiring diagrams, mounting instructions, and safety precautions for proper setup.
Table of contents
Manual images
Click an image to enlargeImportant Safety Information
Before starting the installation, you must shut off the power at the fuse box or circuit breaker. Do not attempt to install the fixture while the power is on. Ensure you do not exceed the maximum wattage rating specified for the fixture.
Installation Steps
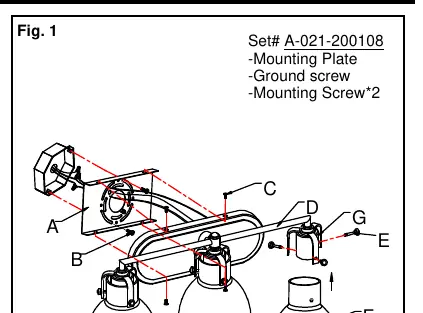
- Prepare the outlet box: If necessary, remove the old fixture and its mounting hardware.
- Mounting plate: Attach the mounting plate (A) to the outlet box using the provided mounting screws (B). Ensure the side of the mounting plate marked GND faces outward.
- Wiring: Connect the electrical wires according to the wiring diagram. If your outlet box has a ground wire (green or bare copper), connect the fixture's ground wire to it. If not, connect the fixture's ground wire directly to the mounting plate using the provided green screw. Carefully tuck all wires inside the outlet box.
- Fixture body: Place the fixture body (D) over the mounting plate (A) and secure it using screws (C).
- Shades and bulbs: Place the glass shade (F) over the socket cup (G). Insert the ball screws (E) through the decorative arms of the fixture body (D) and the glass shade (F), then secure them to the socket cup (G). Install the light bulbs (not included) according to the fixture's specifications.
Wiring Guide
Follow these connections to ensure proper operation:
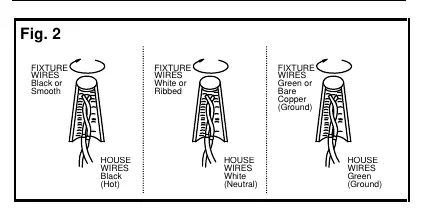
- Black or Smooth fixture wire: Connect to the Black (Hot) house wire.
- White or Ribbed fixture wire: Connect to the White (Neutral) house wire.
- Green or Bare Copper fixture wire: Connect to the Green (Ground) house wire.
After completing the installation, return power to the outlet box and test the fixture.
Practical help
Common problems
Fixture does not light up
Verify that the power is turned on at the circuit breaker and check that all wire connections are secure and correctly matched.
Fixture is loose or unstable
Ensure the mounting screws (C) are fully tightened to the mounting plate (A) and that the ball screws (E) are securely fastened.
Before use
- Shut off power at the fuse box or circuit breaker
- Verify all parts are included: Mounting Plate, Ground screw, Mounting Screws
- Ensure the outlet box has a ground wire or use the provided green screw for grounding
- Check that the mounting plate is oriented with the GND side facing out
Show more Show less
Specs in practice
- Maximum Wattage
- Do not exceed the wattage rating specified on the fixture to prevent overheating and damage.
Images and diagrams
- Fig. 1 illustrates the mounting plate installation and the assembly of the fixture body and glass shades.
- Fig. 2 provides a clear guide for connecting the fixture wires to the house supply wires.
Model compatibility
- The illustration provided in the manual is for installation purposes only and may vary slightly from the actual product purchased.

Manual page author
Emily Carter
User documentation editor