Lighting / Fixtures
Installation Manual for Minka Lavery 6734-1 Bath Light
A comprehensive installation guide for the Minka Lavery 6734-1 4-Light Bath Light, including step-by-step mounting instructions, wiring diagrams, and safety precautions for a successful setup.
Quick answers from the manual
Quick answer
- This document provides step-by-step instructions for installing the Minka Lavery 6734-1 bath light fixture, including mounting and wiring procedures. p. 1
Key actions
- Shut off power at the fuse or circuit breaker box. p. 1
- Attach the mounting plate to the outlet box. p. 1
- Connect fixture wires to house wires (Black to Hot, White to Neutral, Ground to Ground). p. 1
- Secure the fixture back plate to the mounting plate. p. 1
- Install the glass shade and bulb. p. 1
First start
- Shut off power, mount the plate, connect wires, attach the fixture, and install the shade and bulb. p. 1
Show 1 more answers Show less
Where to find it in the PDF
- Installation Instructions p. 1
- Wiring Diagram p. 1
- Parts Diagram p. 1
Table of contents
Manual images
Click an image to enlargeQuick guide from the manual
Before beginning the installation, ensure the power supply is completely shut off at the fuse box or circuit breaker. This fixture requires a standard electrical outlet box for mounting. Do not exceed the maximum wattage rating when installing bulbs.
Mounting the fixture
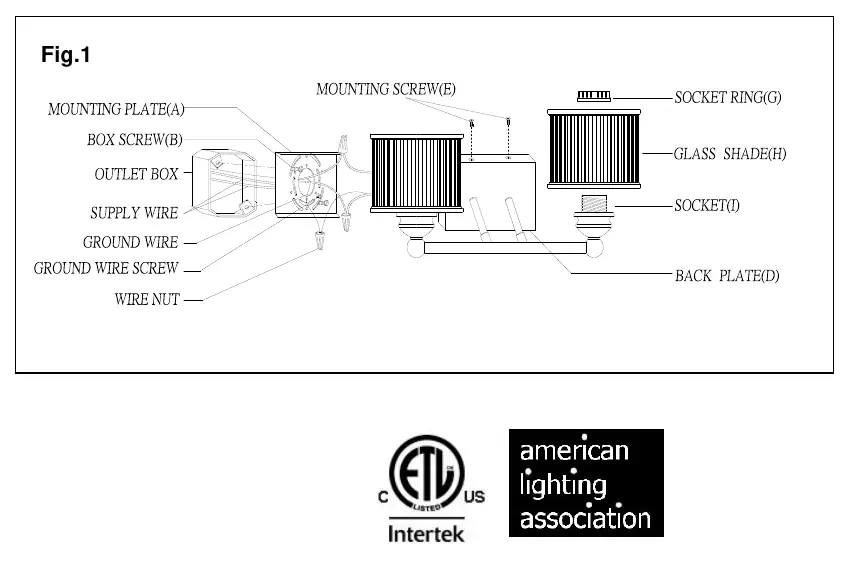
- Shut off the power supply at the fuse box or circuit breaker box and remove the old fixture from the wall, including the old cross bar.
- Carefully unpack the new fixture and lay out all parts in a clear area to ensure nothing is lost.
- Attach the mounting plate (A) to the outlet box using the provided outlet box screws (B). Ensure the side of the mounting plate marked GND faces outward.
- Attach the fixture back plate (D) over the mounting plate (A) and secure it using the mounting screws (E).
- Place the glass shade (H) over the socket (I) and secure it in place using the socket ring (G).
- Install the light bulbs according to the fixture's specifications.
Wiring instructions
Follow these steps to connect the electrical wires safely:
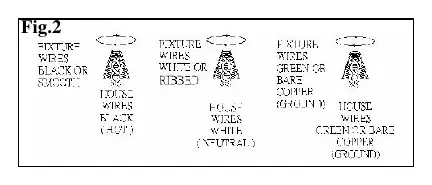
- Connect the black wire from the fixture to the black (HOT) house wire.
- Connect the white wire from the fixture to the white (Neutral) house wire.
- Ensure all wire nuts are secured tightly. You may wrap the connections with electrical tape for extra security.
- If your outlet box has a ground wire (Green or Bare Copper), connect the fixture's ground wire to it. Otherwise, attach the bare copper fixture wire to the green ground screw on the mounting plate.
- Tuck the wire connections neatly into the wall junction box.
Finishing and testing
Once the fixture is mounted and wired, return power to the junction box and test the fixture to ensure it operates correctly.
Practical help
Common problems
Fixture not working after installation
Verify that all wire connections are secure and that the circuit breaker has been turned back on.
Ground wire connection uncertainty
If the outlet box has a ground wire (Green or Bare Copper), connect the fixture's ground wire to it. If not, attach the bare copper fixture wire to the green ground screw on the mounting plate.
Before use
- Shut off power at the fuse or circuit breaker box
- Remove the old fixture and cross bar
- Verify all parts are present
- Ensure the mounting plate is oriented with 'GND' facing out
Show more Show less
Images and diagrams
- Fig. 1 illustrates the assembly order: Mounting Plate (A), Box Screws (B), Back Plate (D), Mounting Screws (E), Socket Ring (G), Glass Shade (H), and Socket (I).
- Fig. 2 illustrates the wiring connections: Black to Black (Hot), White to White (Neutral), and Ground to Ground.
Model compatibility
- Requires an existing wall junction box for mounting.
- Ensure the outlet box is properly grounded.

Manual page author
Michael Turner
Technical manual editor