Lighting / Fixtures
Installation Instructions for Minka Lavery 1106-66A Pendant Light
Quick installation guide for the Minka Lavery 1106-66A pendant light. Includes step-by-step assembly, wiring diagrams, and bulb specifications.
Table of contents
Manual images
Click an image to enlargeImportant Information
Before starting the installation, ensure the power is shut off at the fuse box or circuit breaker box. This fixture is designed for standard junction boxes. Do not exceed the maximum wattage rating of 100 watts per bulb.
Preparation
- Shut off power at the fuse box or circuit breaker.
- Remove the old fixture and mounting hardware.
- Unpack the new fixture and organize all parts in a clean area to avoid losing small components.
Assembly
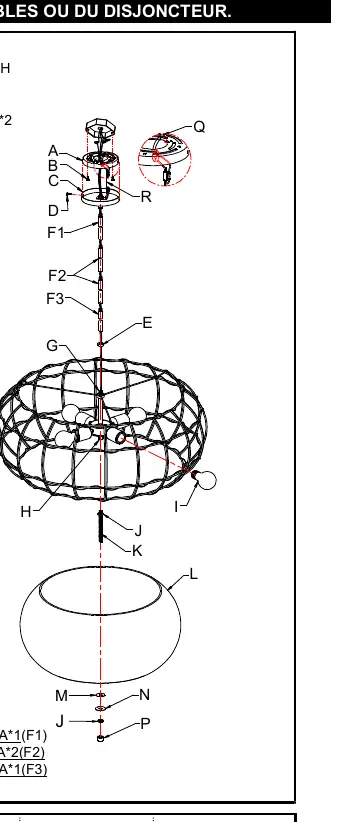
- Place the metal cover (E) over the all-thread (G).
- Determine the desired hanging height and thread the rods (F1, F2, F3) onto the all-thread (G).
- Attach the canopy (C) by screwing it onto rod (F1). Ensure wires are passed through each rod during assembly.
- Attach the mounting plate (A) to the junction box using the provided mounting screws (B). Ensure the side marked with "GND" and the two convex points face outward.
- Use the support cable (R) to hold the fixture's weight while wiring. Attach the hook (Q) to the slot on the mounting plate (A).
Wiring
Connect the electrical wires as follows:
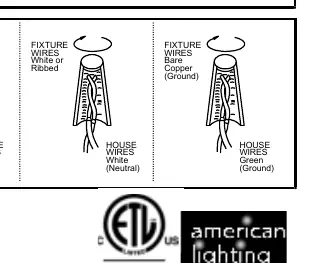
- Black or Smooth fixture wire: Connect to the Black (Hot) house wire.
- White or Ribbed fixture wire: Connect to the White (Neutral) house wire.
- Bare Copper fixture wire: Connect to the Green (Ground) house wire or directly to the mounting plate using the provided green screw.
Ensure all wire connectors are secure and tuck them neatly into the junction box.
Final Installation
- Place the canopy (C) over the mounting plate (A) and secure it with screws (D).
- Thread the all-thread (K) into the coupling (H) and tighten with the hex nut (J).
- Install four medium base bulbs (up to 100W each, or CFL/LED equivalent).
- Place the glass shade (L), plastic washer (M), and metal plate (N) through the all-thread (K) and secure with the hex nut (J).
- Screw the finial (P) into the all-thread (K) until tight.
Once complete, restore power to the junction box and test the fixture.
Practical help
Common problems
Fixture is too heavy to hold while wiring
Use the provided support cable (R) to hang the fixture from the mounting plate (A) while making electrical connections.
Ground wire connection issues
If the junction box lacks a ground wire, connect the fixture's ground wire directly to the mounting plate using the provided green screw.
Bulb overheating
Ensure you do not exceed the maximum wattage rating of 100 watts per bulb.
Before use
- Power is turned off at the circuit breaker.
- Junction box is installed and ready.
- All parts (rods, canopy, mounting plate) are unpacked and accounted for.
- Four medium base bulbs (max 100W each) are available.
- Wire connectors are available and secure.
Show more Show less
Specs in practice
- Mounting Screw Size
- #8-32N*L0.5"
Images and diagrams
- Fig. 1: Exploded view showing the assembly order of rods, canopy, mounting plate, and glass shade.
- Fig. 2: Wiring diagram showing correct connections for Hot, Neutral, and Ground wires.
Model compatibility
- Compatible with medium base bulbs (incandescent, CFL, or LED).

Manual page author
David Miller
Documentation analyst