Lighting / Fixtures
Installation Manual for Minka Lavery 1405-781 Pendant Light
Step-by-step installation guide for the Minka Lavery 1405-781 pendant light. Includes instructions for assembly, wiring connections, and bulb installation to ensure safe setup.
Table of contents
Manual images
Click an image to enlargeQuick installation guide
This document provides instructions for installing the Minka Lavery 1405-781 pendant light. Before beginning, ensure the power is shut off at the circuit breaker. The installation involves assembling the fixture rods, mounting the crossbar to the junction box, connecting the electrical wires, and installing the shade and bulb. It is recommended that a qualified electrician performs the installation.
Safety Information
Warning: Always shut off power at the fuse or circuit breaker before starting any electrical work. The fixture should be installed by a qualified electrician to ensure proper wiring and compliance with local codes.
Assembly and Installation
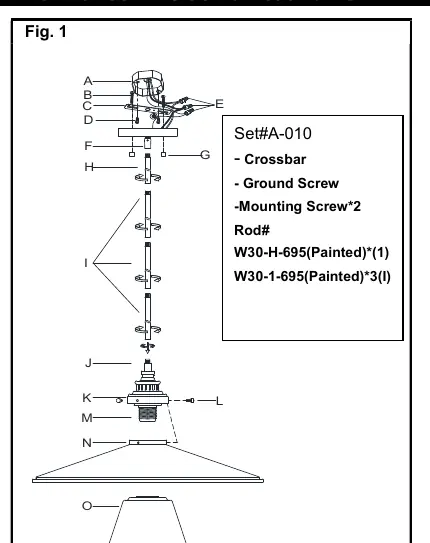
- Remove the fixture from the carton and verify all parts are included.
- Determine the desired hanging height and thread the rods (H, I) onto the fixture body (J). Feed the wires through each rod as you assemble.
- Secure the swivel (F) on the canopy to the rod (H).
- Thread the mounting screws (B) into the crossbar (C).
- Attach the crossbar (C) to the junction box (A) using the provided mounting screws (D). Ensure the side marked "GND" faces outward.
- Slide the canopy over the screws (B) and secure with finials (G).
- Place the shade (N) over the socket (M) and secure with shade screws (L).
- Place the glass (O) over the socket (M) and secure with the socket ring (P).
Wiring Instructions
Connect the electrical wires as follows:
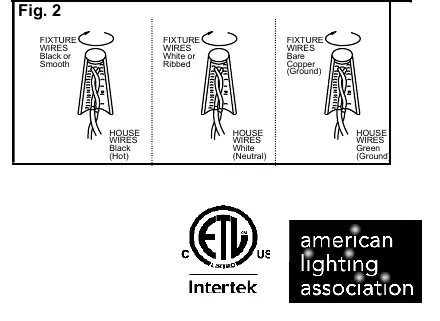
- Black (Hot) wire: Connect the fixture's black or smooth wire to the house black wire.
- White (Neutral) wire: Connect the fixture's white or ribbed wire to the house white wire.
- Ground wire: Connect the fixture's bare copper or green wire to the house ground wire (green or bare copper). If the junction box does not have a ground wire, connect the fixture's ground wire directly to the crossbar (C) using the provided green screw.
Ensure all wire connectors are secure and tuck them neatly into the junction box.
Bulb Installation
Install one medium base bulb (Q) up to 60 watts or the CFL/LED equivalent. Do not exceed the maximum wattage rating specified on the fixture.
Practical help
Common problems
Fixture does not turn on
Verify that the circuit breaker is on and the bulb is securely tightened in the socket.
Wiring uncertainty
Follow the color-coding: Black to Black (Hot), White to White (Neutral), and Bare Copper/Green to Ground.
Before use
- Shut off power at the circuit breaker
- Verify all parts are present
- Ensure junction box is compatible
- Have a medium base bulb (max 60W) ready
Show more Show less
Images and diagrams
- Fig 1 illustrates the assembly order of the rods, canopy, shade, and glass.
- Fig 2 provides a visual guide for connecting the fixture wires to the house wires.
Model compatibility
- Requires a standard junction box (not included).
- Compatible with incandescent, CFL, or LED bulbs with a medium base.

Manual page author
Michael Turner
Technical manual editor