Lighting / Fixtures
Installation Instructions for Minka Lavery 6203-44 Vantage 1-Light Pendant
A comprehensive installation guide for the Minka Lavery 6203-44 Vantage 1-Light Pendant. This manual covers mounting procedures, wiring connections, wire length adjustment, and bulb specifications to ensure a safe and correct installation.
Quick answers from the manual
Quick answer
- This manual provides instructions for installing the Minka Lavery 6203-44 pendant light, covering mounting, wiring, and bulb installation. p. 1
Key actions
- Mount the fixture p. 1
- Adjust wire length p. 1
- Connect wires p. 1
- Install bulb p. 1
First start
- Shut off power p. 1
Show 2 more answers Show less
Technical specifications
| Parameter | Value | Meaning | Pages |
|---|---|---|---|
| Bulb Base | Medium base (E26) | Compatible bulb base type | p. 1 |
| Maximum Wattage | 60 watts | Maximum wattage per bulb | p. 1 |
Where to find it in the PDF
- Installation Instructions p. 1
Table of contents
Manual images
Click an image to enlargeImportant Information
This document provides installation instructions for the Minka Lavery 6203-44 Vantage 1-Light Pendant. It is strongly recommended that the fixture be installed by a qualified electrician to ensure proper wiring and safety. Always shut off power at the fuse box or circuit breaker before beginning any installation work.
Mounting the Fixture
Follow these steps to mount the pendant:
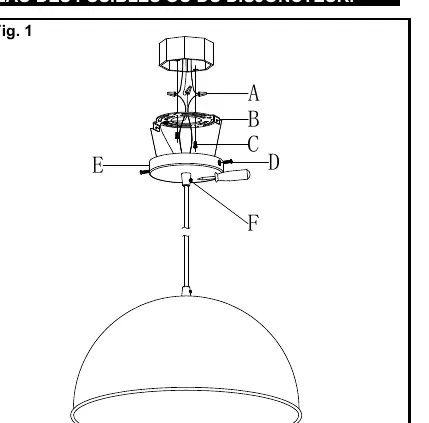
- Shut off power at the fuse box or circuit breaker and remove the old fixture.
- Attach the mounting plate (B) to the outlet box (not included) using the provided outlet box screws (C). Ensure the side of the mounting plate marked "GND" faces outward.
- Adjust the wire to the desired hanging length using the small screw located on the side of the wire grip (F) with a flathead screwdriver. Re-tighten the set screw after adjustment.
- If the cord needs straightening, use a blow dryer.
- Remove excess wire, leaving approximately 7 inches beyond the canopy (E) for connections.
Connecting the Wires
Proper wiring is essential for safety:
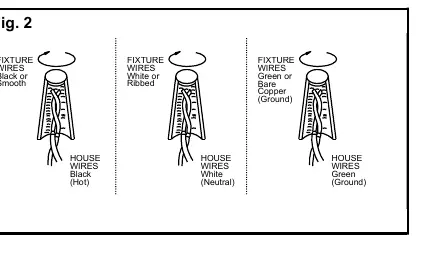
- Connect the fixture wires to the house wires as follows:
- Connect the black or smooth fixture wire to the black (hot) house wire.
- Connect the white or ribbed fixture wire to the white (neutral) house wire.
- Connect the green or bare copper fixture wire to the green (ground) house wire. If the outlet box does not have a ground wire, connect the fixture's ground wire directly to the mounting plate (B) using the provided green screw.
- Ensure all wire connectors (A) are secured and tuck the connections neatly into the outlet box.
Finishing the Installation
Once wiring is complete:
- Place the canopy (E) over the mounting plate (B) and secure it with the screws (D).
- Install one medium base (E26) bulb (G). Do not exceed the maximum wattage rating of 60 watts per bulb. CFL or LED equivalents are acceptable.
- Return power to the circuit and test the fixture.
Practical help
Common problems
Fixture cord is not straight
Use a blow dryer to gently heat and straighten the cord.
Wire length needs adjustment
Use a flathead screwdriver to loosen the small screw on the side of the wire grip (F), adjust the length, and re-tighten the screw.
Before use
- Shut off power at the fuse box or circuit breaker
- Verify the outlet box is compatible and securely mounted
- Ensure you have a flathead screwdriver
- Confirm bulb type is E26 (max 60W)
Show more Show less
Images and diagrams
- Fig. 1 illustrates the assembly of the mounting plate, canopy, and wire grip
- Fig. 2 shows the correct wiring connections for hot, neutral, and ground wires
Model compatibility
- Compatible with incandescent, CFL, or LED bulbs with E26 base

Manual page author
David Miller
Documentation analyst