Lighting / Fixtures
Installation Instructions for Minka Lavery 5282-788 Wall Sconce
Quick installation guide for the Minka Lavery 5282-788 wall sconce. Includes wiring diagrams, mounting steps, and bulb requirements.
Quick answers from the manual
Quick answer
- This document provides instructions for installing the Minka Lavery 5282-788 wall sconce, including mounting, wiring, and bulb installation. p. 1
Key actions
- Turn off power at the fuse box or circuit breaker. p. 1
- Connect fixture wires to house wires. p. 1
First start
- Install 2x E12 base light bulbs (up to 60 watts each) after mounting the fixture. p. 1
Show 2 more answers Show less
Technical specifications
| Parameter | Value | Meaning | Pages |
|---|---|---|---|
| Bulb Base | E12 | Candelabra base | p. 1 |
| Max Wattage | 60W | Maximum power per bulb | p. 1 |
Where to find it in the PDF
- Installation Instructions p. 1
Table of contents
Quick guide from the manual
This document provides the necessary steps to safely install the Minka Lavery 5282-788 wall sconce. Before beginning, ensure you have turned off the power at the fuse box or circuit breaker. The installation requires a junction box (not provided) and basic tools.
Installation steps
Follow these steps to mount and connect your fixture:
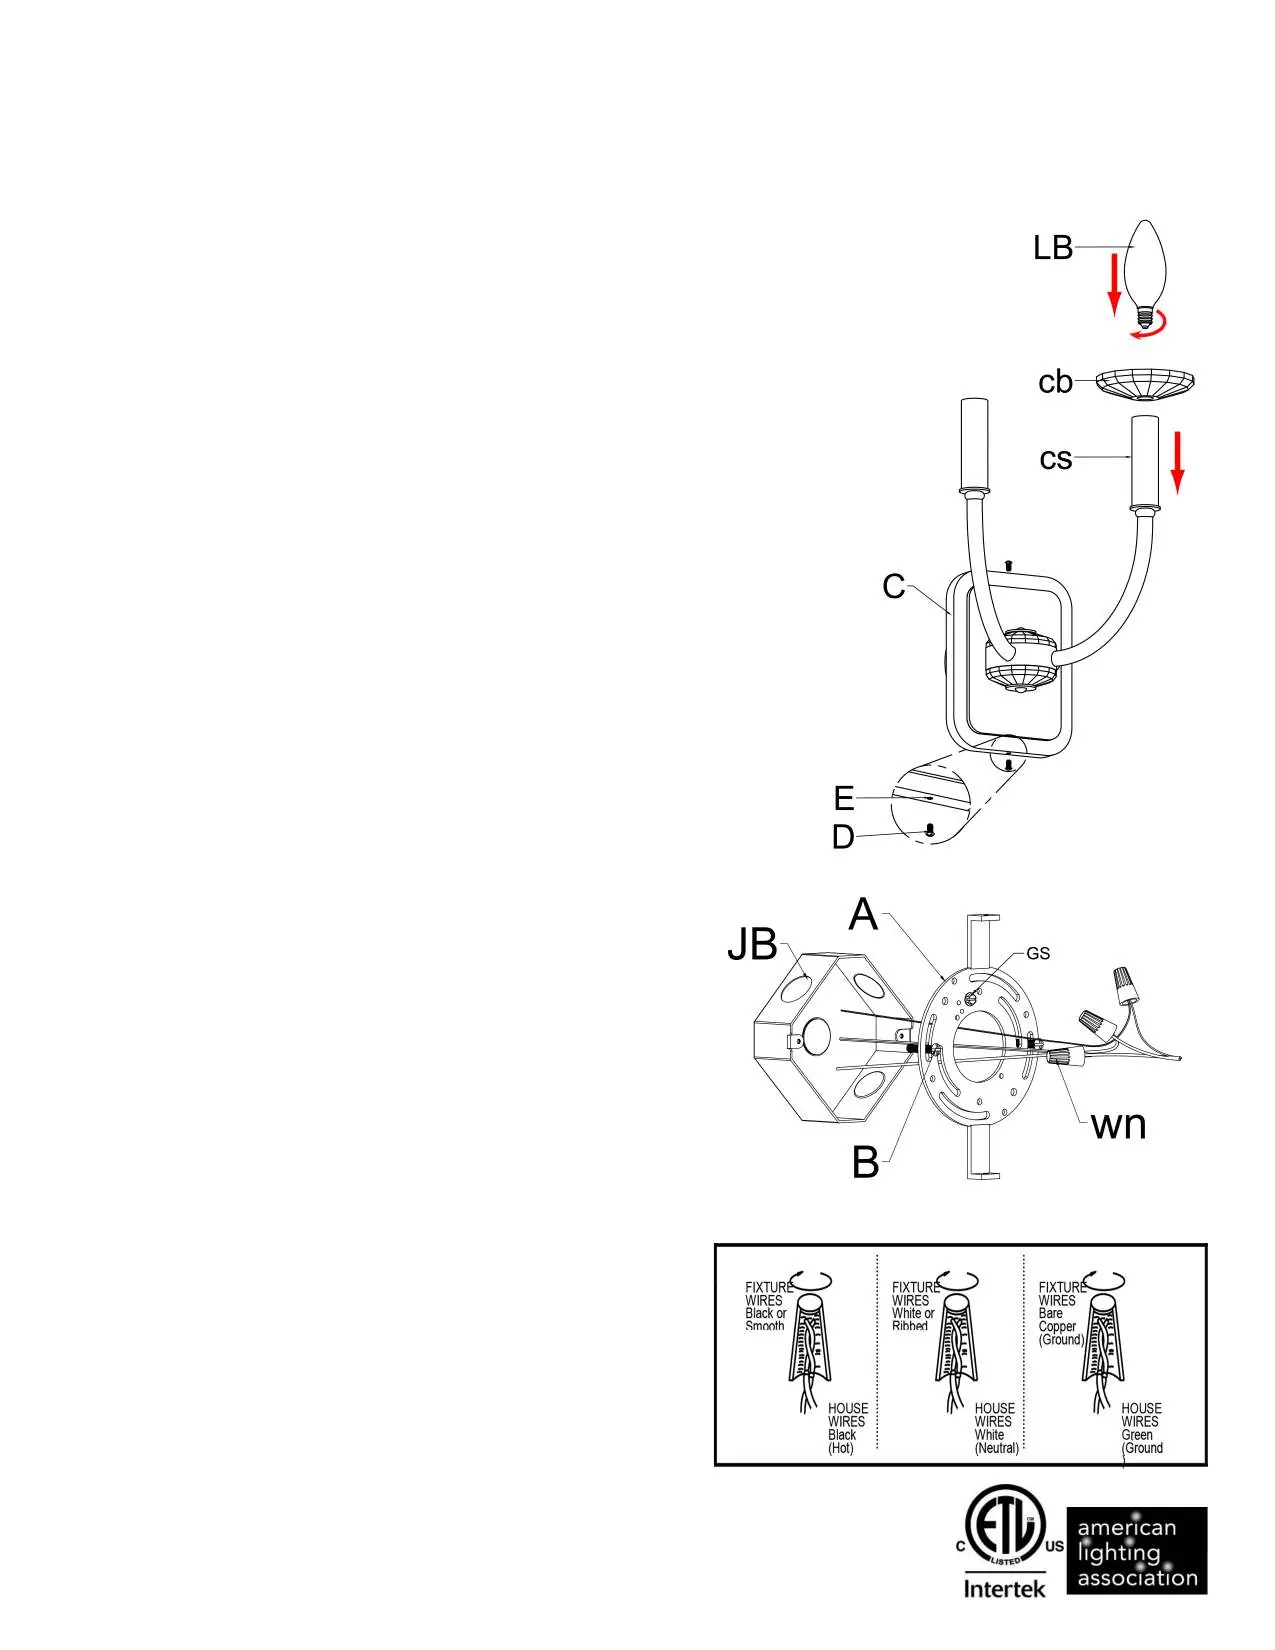
- Preparation: Turn off the power supply. Unpack the fixture and organize all parts. Remove the mounting plate (A) from the back plate (C) by unscrewing the side screws (D).
- Mounting: Attach the mounting plate (A) to your junction box (JB) using the provided 8-32 screws (B) or existing screws. Ensure the threaded holes are positioned at the top and bottom. The side of the mounting plate marked with GND and two convex points must face outward.
- Wiring: Connect the fixture wires to the house wires as shown in the wiring diagram:
- Connect the fixture's ground wire to the junction box ground wire (green or bare copper). If no ground wire is present, connect the fixture ground wire directly to the mounting plate (A) using the provided green screw.
- Connect the fixture's black wire to the house's black (hot) wire.
- Connect the fixture's white wire to the house's white (neutral) wire.
- Secure all connections with wire connectors and tuck them neatly into the junction box.
- Finishing: Place the back plate (E) over the mounting plate (A), aligning the holes. Secure it using the screws (D) removed earlier.
- Accessories and Bulbs: Slide the crystal bobeche (cb) over the candle sleeve (cs). Repeat for all crystals. Install two E12 base light bulbs (up to 60 watts each).
Technical specifications
Ensure you adhere to the following requirements for safe operation:
- Bulb Type: E12 base (CFL, LED, or incandescent).
- Maximum Wattage: Do not exceed 60 watts per bulb.
Practical help
Common problems
Fixture not working after installation
Verify that the circuit breaker is on and all wire connections are secure and correctly matched (Black to Black, White to White, Ground to Ground).
Bulb does not fit
Ensure you are using E12 base bulbs as specified in the manual.
Before use
- Turn off power at the fuse box or circuit breaker.
- Ensure you have a junction box (not provided).
- Verify you have the mounting plate (A) and screws (B, D).
- Check that the mounting plate (A) is level.
Show more Show less
Images and diagrams
- Fig. 1 illustrates the mounting plate (A) attachment to the junction box (JB) and the assembly of the back plate (E).
- Fig. 2 shows the correct wiring connections: Black to Black (Hot), White to White (Neutral), and Ground to Ground.
Model compatibility
- Compatible with CFL, LED, or incandescent bulbs with E12 base.
- Requires a standard junction box for installation.

Manual page author
Michael Turner
Technical manual editor