Electronics / Video Lighting
User Manual for Nanlite PavoBulb 10C RGBWW LED Bulb
Quick guide for the Nanlite PavoBulb 10C RGBWW LED Bulb. Learn how to power the light, use the controls, set up DMX/2.4G remote control, and perform firmware updates.
Table of contents
Manual images
Click an image to enlargeQuick Guide from the Manual
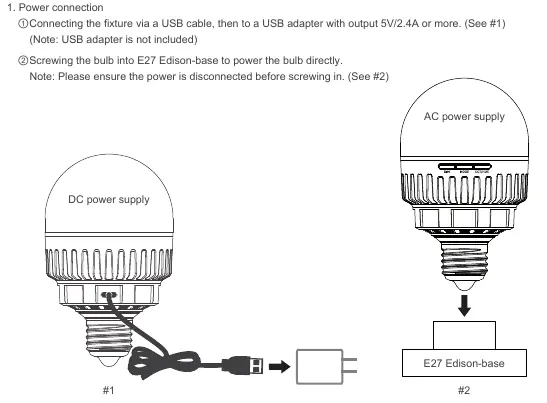
The Nanlite PavoBulb 10C is an RGBWW LED bulb designed for video lighting. It can be powered via a standard E27 Edison-base or through the USB Type-C port using a 5V/2.4A adapter. The light supports DMX, 2.4G wireless, and Bluetooth control.
Product Overview
The bulb features a diffuser for soft light and three control buttons on the side:
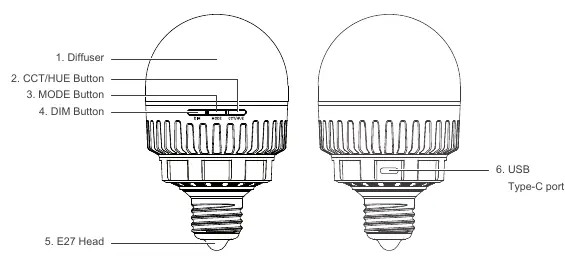
- DIM Button: Adjusts brightness in intervals (0%, 20%, 40%, 60%, 80%, 100%).
- MODE Button: Switches between CCT and HSI modes.
- CCT/HUE Button: Adjusts color temperature or hue.
The USB Type-C port is located on the side and is used for power input, firmware updates, and DMX signal input/output (requires a separate USB-C to DMX cable splitter).
Operating Instructions
The bulb lights up automatically once powered.
- Brightness Adjustment: Short press the DIM button. At 100%, pressing again resets to 0%.
- Mode Switching: Short press the MODE button to toggle between CCT and HSI.
- CCT/HUE Adjustment: Short press the CCT/HUE button to cycle through values.
- Bluetooth Reset: Long press all three buttons simultaneously until the bulb flashes blue for 3 seconds.
Remote Control
The PavoBulb 10C supports multiple control methods:
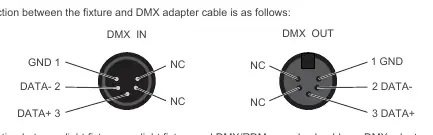
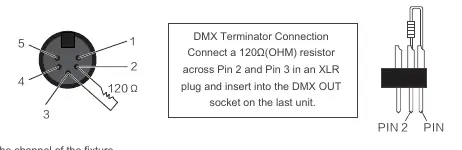
- DMX Control: Connect the fixture to a DMX/RDM console using a DMX adapter cable. Ensure the last fixture in the chain uses a DMX terminator (120Ω resistor across Pin 2 and Pin 3).
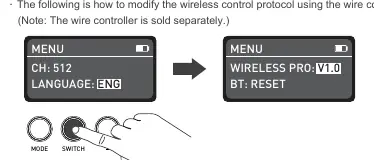
- 2.4G Remote Control: Requires a compatible remote controller or transmitter box. Ensure the wireless protocol (V1.0 or V2.0) matches your remote controller settings.
Firmware Update
To update firmware:
- Insert a USB flash drive with the new firmware.
- If powered by E27 Magnetic Mount, long press the MODE button until the bulb flashes blue.
- Long press the DIM and CCT/HUE buttons simultaneously to start the upgrade.
- The bulb will flash green upon successful completion. If it flashes red, the upgrade failed.
Safety and Maintenance
- Do not look directly at the emitter when the light is on.
- Keep flammable or explosive articles at least 0.5m away from the fixture.
- Clean with a soft cloth and neutral detergent; do not use abrasives.
- Ensure ventilation holes are not obstructed to prevent overheating.
- Do not disassemble the fixture; repairs should be performed by qualified professionals.
Practical help
Common problems
The light won't start up
Ensure a standard E27 lamp holder is used and the power voltage matches the specifications.
Firmware update fails
The bulb flashes red for 3 seconds. Ensure the procedure is followed correctly and try again.
DMX signal interference
Connect a DMX terminator (120Ω resistor) to the DMX output of the last fixture in the chain.
Before use
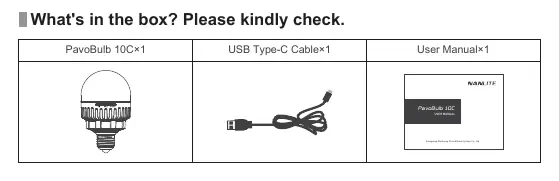
- Check the package for any damage.
- Ensure the power supply voltage is correct and compatible.
- Use a standard E27 lamp holder with safety certification.
- Keep flammable items at least 0.5m away from the fixture.
- Turn off power before screwing the bulb into the socket.
Specs in practice
- Input Voltage
- DC 5V/2.4A or AC 100-240V 50Hz/60Hz
- Color Temperature
- 2700K-7500K
Images and diagrams
- Buttons: DIM, MODE, CCT/HUE located on the side of the bulb.
- Ports: USB Type-C port for power, firmware, and DMX connectivity.
- Mounting: E27 Edison-base for direct power.
Model compatibility
- Supports DMX, 2.4G, and Bluetooth control.
- USB-C to DMX cable splitter is sold separately.
- Wire controller is sold separately.
- Supports 2.4G wireless protocol V1.0 and V2.0.

Manual page author
Emily Carter
User documentation editor
Prepares concise manual descriptions and highlights the most useful setup, operation, and maintenance information for readers.