Home Appliances / Fans
User Manual for Neo Tools Digital Caliper 150mm (75-011)
Quick guide for the Neo Tools 75-011 digital caliper. Includes operating instructions, measurement techniques, battery replacement, and troubleshooting steps.
Table of contents
Manual images
Click an image to enlargeQuick guide from the manual
The Neo Tools 75-011 is a precision digital caliper designed for external, internal, and depth measurements. Before use, ensure all measurement surfaces are clean and free from grease, dust, or metal filings. Use a soft cloth to wipe the surfaces. Do not use organic solvents like benzene or acetone. Always loosen the slider lock screw before attempting to move the slider.
Device Overview
The caliper consists of the following main components:
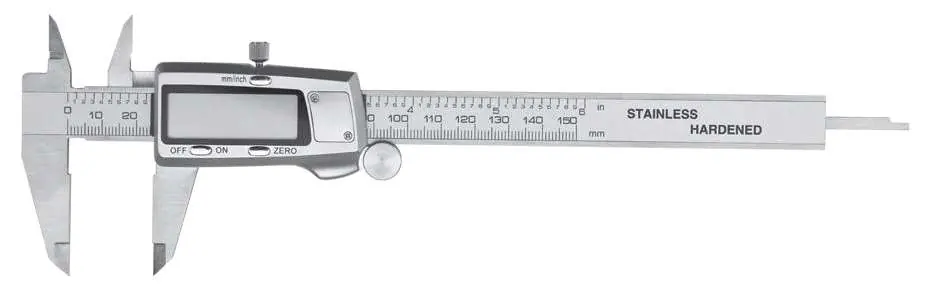
- External measurement jaws
- Internal measurement jaws
- Depth measurement rod
- Slider with LCD display
- Slider lock screw
- Slider shift roller
- Unit toggle button (mm/inches)
- Zero adjustment button (ZERO)
- ON/OFF button
- Battery compartment
Operation
General Operation:
- Loosen the slider lock screw.
- Press the ON/OFF button to activate the display.
- Select the desired unit (mm or inches) using the toggle button.
- Use the slider shift roller to move the jaws.
- To zero the display at any point within the measurement range, press the ZERO button.
Measurement Techniques:
- External measurements: Place the object between the external jaws and close them until they touch the object.
- Internal measurements: Insert the internal jaws into the object's opening as far as possible.
- Depth measurements: Insert the depth measurement rod into the hole and position the guide perpendicular to the reference surface.
- Differential measurements: Use the ZERO button to set a reference point and measure deviations from that norm.
Maintenance
Keep the caliper dry and clean. If the device will not be used for an extended period, remove the battery to prevent leakage. To replace the battery, unscrew the battery compartment lid, remove the old battery, and insert a new one (SR44 type) with the positive side facing up.
Troubleshooting
If the display flickers, the battery voltage is likely below 1.45V and needs replacement. If there is no display, check the battery voltage and ensure it is seated correctly with the proper polarity. If the display does not change when the slider moves, remove the battery for 30 seconds to reset the internal circuit. If accuracy is lower than specified, the sensor may be dirty; clean the interior with compressed air.
Technical Specifications
- Measuring range: 0 - 150 mm / 0 - 6 inches
- Resolution: 0.01 mm / 0.0005 inches
- Accuracy: +/- 0.02 mm / +/- 0.001 inches
- Maximum measuring speed: 1.5 m/s
- Power supply: Silver oxide (AgO) 1.55V, type SR44, 180 mAh
- Working temperature: 5°C - 40°C
Practical help
Common problems
Digits flicker on display
Battery voltage is below 1.45V. Replace the battery.
No digits on display
Battery voltage is below 1.4V or there is a bad contact. Check battery position and polarity.
Digits do not change when slider moves
Random fault in the internal circuit. Remove the battery for 30 seconds and reinsert.
Accuracy lower than specified
Sensor is dirty. Clean the interior with compressed air (5 bar).
Before use
- Ensure all measurement surfaces are free from grease, dust, and dirt.
- Wipe surfaces with a clean cloth.
- Check that all buttons and the LCD display operate correctly.
- Loosen the slider lock screw before starting.
- Ensure the battery is installed correctly.
Specs in practice
- Measuring range
- 0 - 150 mm / 0 - 6 inches
- Power supply
- Silver oxide (AgO) 1.55V, type SR44, 180 mAh
Images and diagrams
- 1: External measurement jaws
- 2: Internal measurement jaws
- 3: Depth measurement rod
- 5: Battery compartment lid
- 7: Slider lock screw

Manual page author
Emily Carter
User documentation editor
Prepares concise manual descriptions and highlights the most useful setup, operation, and maintenance information for readers.