Home Appliances / Vacuum Cleaners
User Manual for Ozito Cordless 2-in-1 Nail & Staple Gun PXNGS-018
Quick guide for the Ozito Cordless 2-in-1 Nail & Staple Gun PXNGS-018. Includes setup, loading instructions, operation, maintenance, and troubleshooting steps.
Quick answers from the manual
Quick answer
- This manual covers the operation, maintenance, and safety of the Ozito PXNGS-018 Cordless 2-in-1 Nail & Staple Gun. It details how to load staples/nails, adjust firing force, and clear jams. p. 1, 2, 3, 4
Key actions
- Loading staples p. 3
- Clearing a jam p. 5
First start
- Install the battery by sliding it into the base until it clicks. p. 2
Problems and fixes
Jammed staple or nail
Remove battery, open cartridge, use pliers to remove obstruction, or remove nose plates if necessary.
p. 5Technical specifications
| Parameter | Value | Meaning | Pages |
|---|---|---|---|
| Input | 18V | Voltage requirement | p. 1 |
| Firing Rate | 20/min | Speed of operation | p. 1 |
Where to find it in the PDF
- Product Overview p. 2
- Loading Staples p. 3
- Maintenance p. 5
Table of contents
Manual images
Click an image to enlargeQuick guide from the manual
This manual provides instructions for the Ozito Cordless 2-in-1 Nail & Staple Gun (PXNGS-018). The tool is designed for DIY use and is compatible with the Ozito Power X Change battery system. Always ensure the battery is removed before performing any maintenance, loading, or adjustments.
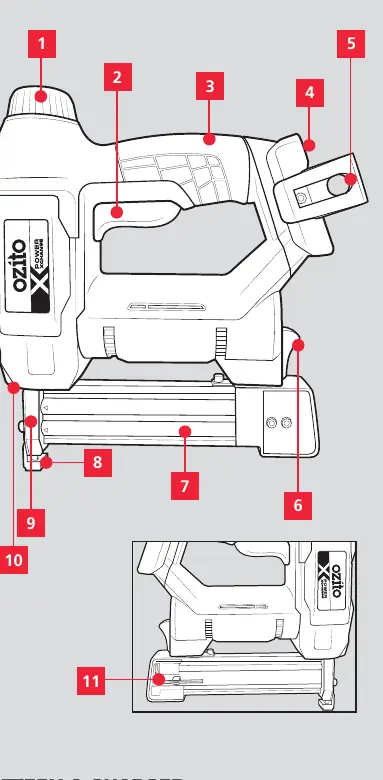
Product Overview
The tool features a force adjustment dial, on/off trigger, sure grip handle, battery seating, belt clip, cartridge latch, cartridge, safety striker guard, nose piece, status indicator light, and hex key storage.
Setup and Preparation
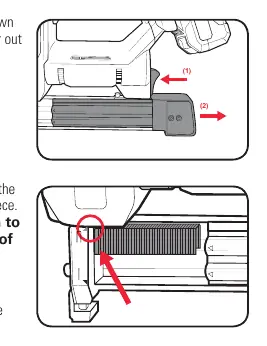
To install the battery, slide it into the tool base until it clicks into place. To remove, hold down the battery release button and slide the battery out.
Fastener Selection
The tool accepts 18 gauge fasteners. Use 16-22mm Narrow Crown staples or 15-32mm C1 Brad nails. Using incorrect fasteners will cause the unit to jam.
Loading the Cartridge
Ensure the battery is removed before loading. Press the cartridge latch down and pull the magazine slider out. Insert a row of staples or nails into the opening behind the nose piece, ensuring they are aligned to the upper left (staples) or lower left (nails) corner of the cartridge. Push the magazine slider back until it clicks into place.
Operation
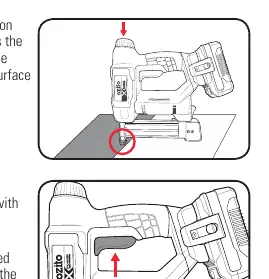
The tool uses a Safety Striker System. To fire, push the safety striker guard and nose piece down onto the worksurface, then squeeze the on/off trigger. Use the force adjustment dial to increase or decrease firing strength based on the material.
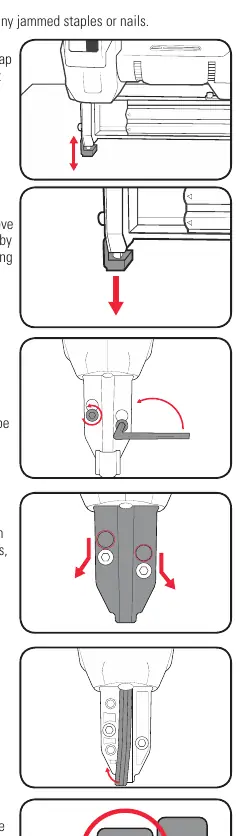
Maintenance
If the tool jams, remove the battery, open the cartridge, and use pliers to remove the obstruction. If necessary, remove the rubber safety striker guard and use the hex key to loosen the bolts on the top of the tool to access and clear the nose plates. Always ensure spring washers are positioned correctly during reassembly.
Safety
Always wear eye and ear protection. Do not point the tool at yourself or others. Do not use for fastening electrical cables. Always use both hands to operate the tool.
Manufacturer information
Ozito
Practical help
Common problems
Tool jammed
Remove battery, open cartridge, use pliers to remove jammed fasteners, tap safety guard, or remove nose plates to clear.
Staples/nails not penetrating
Increase firing force using the adjustment dial or hold the tool firmly with two hands.
Before use
- Ensure battery is charged
- Check fastener type (18 gauge)
- Wear eye and ear protection
- Test on scrap material
Images and diagrams
- Diagram shows force adjustment dial, trigger, cartridge latch, and nose piece.
Model compatibility
- Compatible with Ozito Power X Change batteries and chargers.

Manual page author
Emily Carter
User documentation editor
Prepares concise manual descriptions and highlights the most useful setup, operation, and maintenance information for readers.