Tools / Air Tools
WEN 18-Gauge 2-Inch 2-in-1 Nailer 61718
A comprehensive guide for the WEN 61718 18-Gauge 2-in-1 Nailer. Includes setup, air supply connection, loading fasteners, depth adjustment, maintenance, and troubleshooting steps.
Quick answers from the manual
Quick answer
- The WEN 61718 is a pneumatic 2-in-1 nailer and stapler designed for 18-gauge brad nails (5/8" to 2") and 18-gauge 1/4" narrow crown staples (5/8" to 1-5/8"). It requires an air supply between 60 and 100 PSI. p. 2, 9
Key actions
- Lubricate the tool p. 8, 12
- Connect to air supply p. 8
- Load fasteners p. 9
First start
- Check air pressure and connections p. 8, 10
Problems and fixes
Fasteners driven too deep
Replace bumper, adjust air pressure, or adjust depth wheel.
p. 13
Tool skips a fastener
Replace bumper/spring, clean drive channel, check airflow, or replace O-rings.
p. 13Maintenance and reset
- Routine lubrication p. 12
Technical specifications
| Parameter | Value | Meaning | Pages |
|---|---|---|---|
| Operating Pressure | 60-100 PSI | Required air pressure range | p. 2 |
| Magazine Capacity | 100 pcs | Max fasteners | p. 2 |
Where to find it in the PDF
- Technical Data p. 2
- Safety Rules p. 4, 5, 6
- Know Your Nailer p. 7
- Preparation and Adjustments p. 8, 9
- Operation p. 10, 11
- Maintenance p. 12
- Troubleshooting p. 13
- Exploded View and Parts List p. 14, 15
Table of contents
Manual images
Click an image to enlargeQuick Start and Safety
The WEN 61718 is a pneumatic 2-in-1 nailer and stapler. Before operating, ensure you have read all safety rules. Always wear ANSI Z87.1 compliant safety glasses, ear protection, and a dust mask. Never point the tool at yourself or others, and always disconnect the air supply before performing maintenance, clearing jams, or when the tool is not in use. The tool requires clean, dry, and regulated air between 60 and 100 PSI.
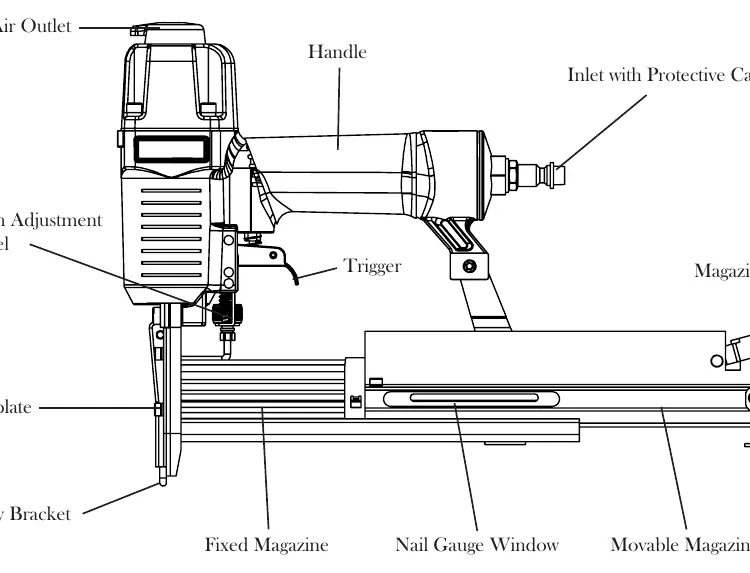
Technical Specifications
- Model: 61718
- Operating Pressure: 60 - 100 PSI
- Air Inlet: 1/4"- 18 NPT
- Nail Type: 18 Gauge Brad (5/8" to 2")
- Staple Type: 18 Gauge 1/4" Narrow Crown (5/8" to 1-5/8")
- Magazine Capacity: 100 pcs
- Weight: 3.4 lbs
Preparation and Setup
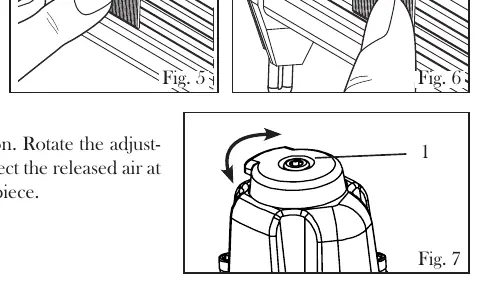
Lubrication
Routine lubrication is required for best performance. If not using an in-line oiler, place 3 to 4 drops of pneumatic tool oil into the air inlet at the beginning of each workday.
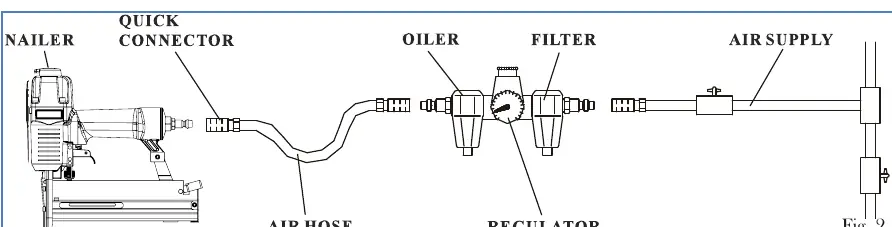
Connecting to Air Supply
Ensure the magazine is empty and the tool is pointed away from you. Connect the compressed air hose to the tool's inlet. The connections must click into place audibly. Use a regulator to maintain pressure between 60 and 100 PSI.
Loading Fasteners
- Depress the magazine lock and pull out the movable magazine fully.
- For staples: Place a clip of staples over the fixed magazine track.
- For nails: Place a clip of nails into the grooves of the fixed magazine with tips pointing downwards.
- Push the movable magazine forward until it locks.
Operation
Depth Adjustment
Use the depth adjustment wheel to set the penetration depth. Turn clockwise to increase depth (wheel moves downwards) and counterclockwise to decrease depth (wheel moves upwards).
Shooting Nails
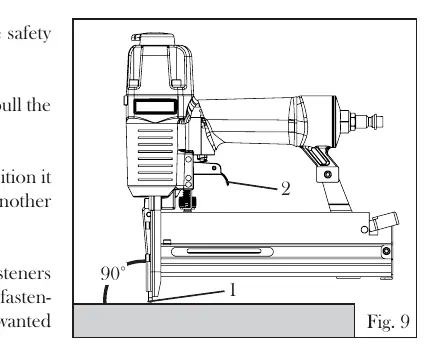
- Hold the nailer upright on the workpiece.
- Press down on the safety bracket.
- Pull the trigger to drive the fastener.
- Release the trigger and lift the tool to reposition.
Maintenance and Troubleshooting
Keep the tool clean by wiping with a damp towel and soft soap. Regularly inspect the trigger and safety mechanism for proper function. If the tool runs slowly or has power loss, check for insufficient oil or air supply. If fasteners jam, disconnect the air supply before clearing the magazine or nosepiece.

Practical help
Common problems
Air leaking at trigger area
Check and replace O-ring, trigger valve head, or trigger valve stem.
Trigger is pressed but no fastener is driven
Check air supply connections, check for air hose leaks, ensure fasteners are loaded correctly, or increase operating pressure.
Fasteners are driven too deep
Replace worn bumper, decrease air pressure, or adjust the depth wheel.
Fasteners repeatedly jam
Replace worn joint guide, use recommended/undamaged fasteners, tighten screws, or replace piston assembly.
Before use
- Read the entire instruction manual.
- Wear safety glasses (ANSI Z87.1), ear protection, and work gloves.
- Inspect the tool for damaged, inoperable, or missing parts.
- Ensure the air supply is clean, dry, and regulated (60-100 PSI).
- Lubricate the tool with 3-4 drops of pneumatic oil if no in-line oiler is used.
- Check that the magazine is empty before connecting to air.
Specs in practice
- Operating Pressure
- The required air pressure range (60-100 PSI) for safe and effective operation.
- Nail/Staple Type
- Compatible fastener specifications: 18 Gauge Brad nails (5/8"-2") and 18 Gauge 1/4" Narrow Crown staples (5/8"-1-5/8").
- Magazine Capacity
- The maximum number of fasteners (100 pcs) that can be loaded at once.
Images and diagrams
- Exploded view diagram (page 14) helps identify specific parts for repair or replacement.
- Connection diagram (page 8) shows the correct order of accessories: Nailer -> Quick Connector -> Air Hose -> Oiler -> Filter -> Regulator -> Air Supply.
Model compatibility
- Do not use bottled gases (oxygen, CO2, etc.) to power the tool.
- Only use 18-gauge fasteners within the specified length ranges.

Manual page author
Michael Turner
Technical manual editor
Reviews PDF manuals for structure, safety notes, and practical product details so readers can find the right information quickly.