Computers / PC Components
User Manual for StarTech.com 1-Port PCIe 2.5G Ethernet Network Adapter Card
Quick-start guide for the StarTech.com 1-Port PCIe 2.5G Ethernet Network Adapter Card. Includes installation instructions, driver download procedures, and verification steps for Windows and Linux systems.
Table of contents
Quick guide from the manual
This guide provides essential instructions for installing and configuring the StarTech.com 1-Port PCIe 2.5G Ethernet Network Adapter Card. Before beginning, ensure your host computer has an available PCI Express 2.0 or greater slot (x1, x2, x4, x8, or x16). Warning: Static electricity can damage the card. Always use an anti-static strap or mat, or discharge static by touching a grounded metal surface before handling the card.
Product Overview
The adapter card features the following components:
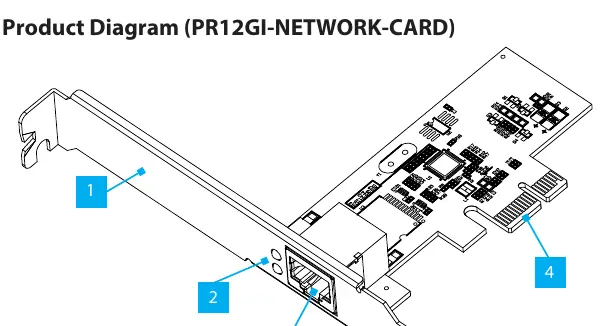
- Bracket: Secures the card to the host computer case. A full-profile bracket is pre-installed, and a low-profile bracket is included.
- LED Indicators: The top LED shows 1000/100/10 Mbps link activity (Solid Green: Link, Flashing Green: Activity). The bottom LED shows 2.5 Gbps link activity (Solid Green: Link, Flashing Green: Activity).
- Ethernet Port: For connecting your network cable.
- PCIe 2.0 x1 Connector: For insertion into the host computer's PCI Express slot.
Installation
- Turn off the host computer and disconnect all peripheral devices.
- Unplug the power cable from the host computer.
- Remove the computer case cover.
- Locate an open PCI Express slot and remove the corresponding slot cover plate from the back of the case.
- Gently insert the PCI Express card into the slot and fasten the bracket to the case.
- Replace the computer case cover.
- Reconnect the power cable and all peripheral devices.
- Turn on the host computer.
- Connect an Ethernet cable to the Ethernet port.
Driver Installation
To install the necessary drivers:
- Visit www.startech.com/PR12GI-NETWORK-CARD and navigate to the Drivers & Downloads tab.
- Download the driver package for Windows.
- Extract the zipped folder.
- Follow the instructions in the accompanying Intel_Windows_DIG file.
Verifying Driver Installation
Windows
Navigate to the Device Manager, locate Network Adapters, right-click Intel Ethernet Controller I225-V, and select Properties to confirm the driver is working.
Linux
Ensure you are using kernel 5.8 or higher (LTS versions only). Check your kernel version with uname -r. Open a terminal and run sudo dmesg | grep Intel to verify the driver integration.
Official resources from the manual
Practical help
Common problems
Static electricity damage
Ensure you are adequately grounded using an anti-static strap or mat before touching the card.
Driver not found or not working
Download the latest driver package from the StarTech.com support website and follow the included installation instructions.
Linux driver not detected
Verify you are using kernel 5.8 or higher (LTS) by running 'uname -r'. Use 'sudo dmesg | grep Intel' to check for driver integration.
Before use
- Verify the host computer has an available PCI Express 2.0 or greater slot.
- Ensure you have an anti-static strap or mat.
- Turn off the host computer and disconnect all peripherals.
- Unplug the power cable from the host computer.
- Ensure you have a screwdriver to remove the slot cover plate.
Specs in practice
- LED Indicators
- Solid green indicates a link; flashing green indicates data activity.
Images and diagrams
- Bracket: Secures the card to the computer case.
- Ethernet Port: Connects the network cable.
- PCIe Connector: Inserts into the motherboard slot.
Model compatibility
- Compatible with PCI Express x1, x2, x4, x8, or x16 slots.
- Requires Linux kernel 5.8 or higher (LTS versions only).

Manual page author
David Miller
Documentation analyst
Organizes user manual content into clear summaries, with attention to model details, product context, and everyday usability.