Electronics / Monitors
Philips 24B2D5300 Business Monitor Quick Start Guide
Quick start guide for the Philips 24B2D5300 Business Monitor. Includes setup instructions, connection diagrams, and an overview of PIP/PBP multi-source features.
Quick answers from the manual
Quick answer
- The Philips 24B2D5300 is a business monitor supporting dual-source display modes (PIP/PBP) and USB-C connectivity. Setup involves connecting your PC via HDMI or USB-C and using the OSD buttons to select inputs and adjust settings. p. 1
Key actions
- Connect your PC using HDMI or USB-C cables. p. 1
- Use the OSD buttons to switch inputs or enable PIP/PBP modes. p. 1
First start
- Connect the AC/DC adapter to power the monitor. p. 1
- Connect your video source (PC) using the provided HDMI or USB-C cables. p. 1
Show 1 more answers Show less
Where to find it in the PDF
- Quick Start Guide p. 1
Table of contents
Manual images
Click an image to enlargeQuick guide from the manual
This document provides the essential setup and configuration steps for the Philips 24B2D5300 Business Monitor. It covers physical connections, multi-source display modes (PIP/PBP), and basic OSD control navigation.
Package contents
Ensure the following items are included in your package:
- AC/DC Adapter
- HDMI cable
- USB C-C cable
- USB C-C/A cable
- USB C-A cable
- Audio cable
Connections and setup
The monitor supports multiple input sources, including HDMI and USB-C. To set up your monitor:
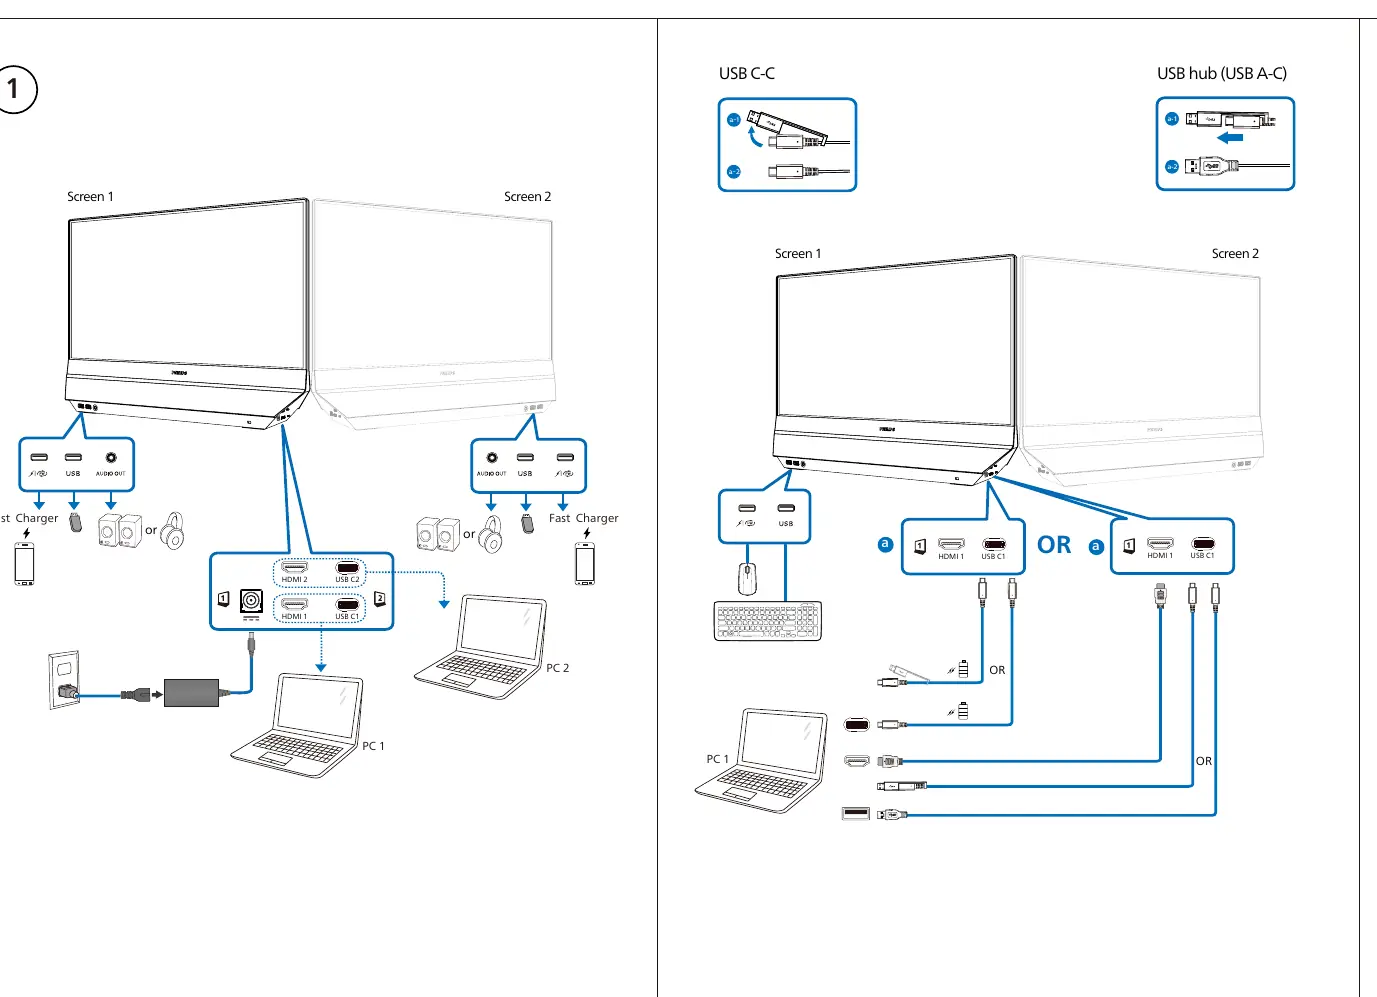
- Connect your PC or laptop using the appropriate cable (HDMI or USB-C).
- The monitor features a USB hub functionality (USB A-C).
- The monitor supports a "Fast Charger" feature via specific USB-C ports.
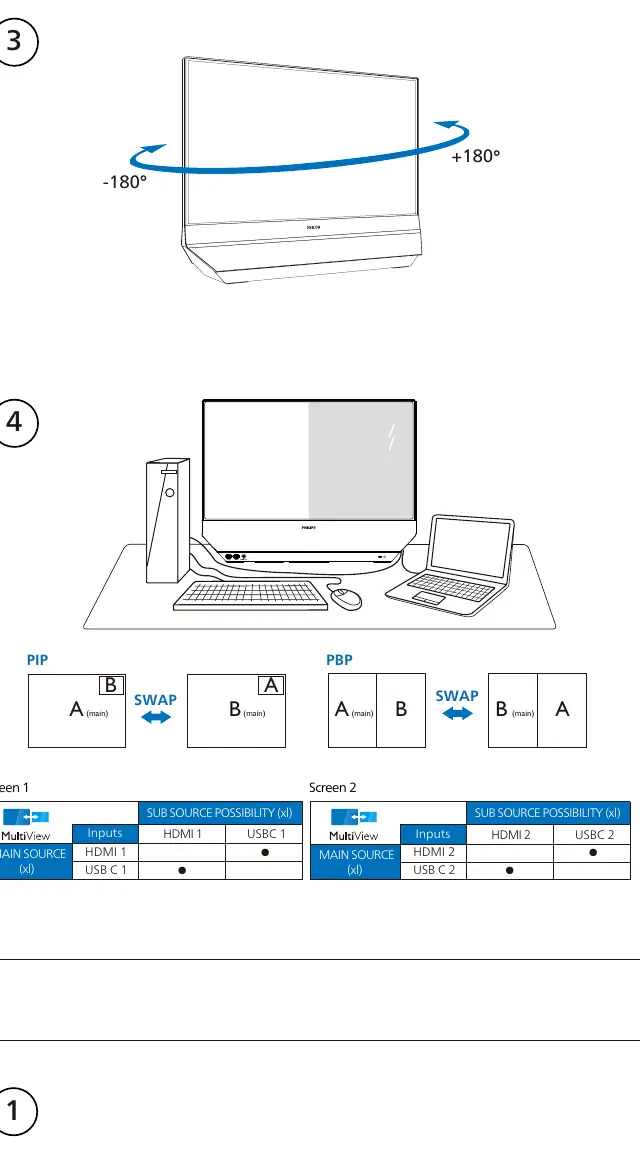
- The screen can be rotated -180 to +180 degrees.
Multi-source features (PIP/PBP)
The monitor supports Picture-in-Picture (PIP) and Picture-by-Picture (PBP) modes to display content from two sources simultaneously. Refer to the connection diagrams to identify which input combinations (HDMI 1/2, USB C 1/2) are supported for the Main and Sub sources.
OSD controls
The monitor features an On-Screen Display (OSD) menu for adjustments. Use the physical buttons on the monitor to access:
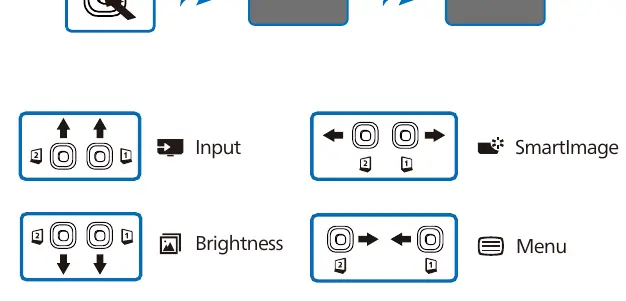
- Input: Select the video source.
- SmartImage: Adjust image presets.
- Brightness: Adjust screen brightness.
- Menu: Open the main OSD settings.
Manufacturer information
Philips
Practical help
Common problems
No display or signal
Verify that the correct input source is selected in the OSD menu and that the cables (HDMI/USB-C) are securely connected to both the monitor and the PC.
PIP/PBP mode not working
Ensure that the input combination you are using is supported for the selected mode (PIP or PBP) as per the connection table in the manual.
Before use
- Verify all cables (AC/DC, HDMI, USB-C) are included.
- Ensure the monitor is placed on a stable surface.
- Check that your PC supports the required video output (HDMI or USB-C).
- Connect the power adapter to a grounded outlet.
Show more Show less
Specs in practice
- PIP (Picture-in-Picture)
- Displays a secondary source in a smaller window over the main source.
- PBP (Picture-by-Picture)
- Splits the screen to display two sources side-by-side.
- Fast Charger
- Specific USB-C ports capable of providing higher power output for charging connected devices.
Images and diagrams
- The connection diagrams illustrate how to connect two PCs (PC 1 and PC 2) to the monitor using various cable combinations.
- The PIP/PBP table shows valid input combinations for the Main and Sub sources.
Model compatibility
- Actual product and accessories may vary by country or region.
- The monitor supports USB hub functionality via USB A-C connections.

Manual page author
David Miller
Documentation analyst