Electronics / Monitors
Philips 24B2N2200 Business Monitor User Manual
Quick guide for the Philips 24B2N2200 Business Monitor. Includes assembly instructions, OSD menu settings, technical specifications, and troubleshooting tips.
Quick answers from the manual
Quick answer
- The Philips 24B2N2200 is a 23.8-inch business monitor. Assembly involves attaching the stand to the base and connecting the power and signal cables (HDMI, DP, or VGA). p. 6, 7
Key actions
- Assemble the stand p. 6
- Connect cables p. 7
- Access OSD menu p. 8
First start
- Connect power, connect signal cable (HDMI/DP/VGA), turn on computer and monitor. p. 7
Show 4 more answers Show less
Problems and fixes
No image
Check power and signal cable connections.
p. 24
Image not centered
Use the AUTO function in the OSD menu.
p. 24Maintenance and reset
- Reset to factory settings via OSD menu (Setup > Reset). p. 26
Technical specifications
| Parameter | Value | Meaning | Pages |
|---|---|---|---|
| Panel | 23.8 inch IPS | Display panel type and size. | p. 15 |
| Resolution | 1920 x 1080 | Native resolution. | p. 15 |
| VESA | 100x100mm | Mounting standard. | p. 15 |
Where to find it in the PDF
- Safety and Maintenance p. 3, 4
- Assembly p. 6
- Connections p. 7
- OSD Menu p. 8, 9
- Technical Specifications p. 15, 16
Table of contents
Manual images
Click an image to enlargeQuick Guide
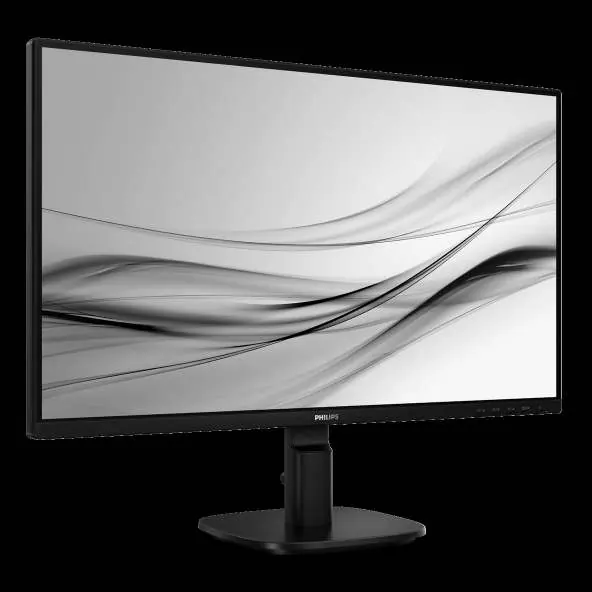
The Philips 24B2N2200 is a 23.8-inch business monitor. This guide covers the essential setup, operation, and maintenance procedures. Always ensure the monitor is placed on a stable surface and connected to a power source matching the specifications.
Assembly and Installation
To assemble the monitor stand:
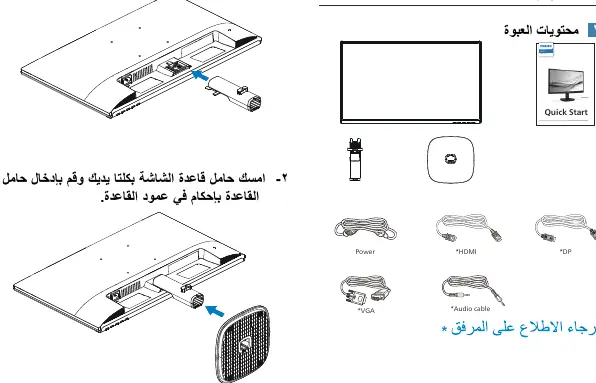
- Place the monitor face down on a soft, smooth surface to avoid scratching the screen.
- Attach the stand column to the base securely.
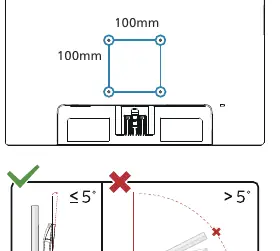
- For wall mounting, the monitor supports a 100mm x 100mm VESA mount.
Connections
The monitor features the following ports on the rear:
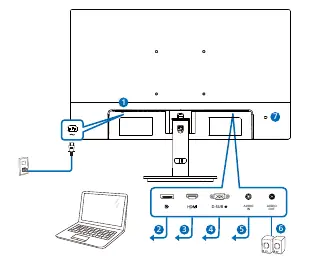
- AC Power input
- DisplayPort
- HDMI
- VGA
- Audio In/Out
- Kensington lock slot
To connect, power off the computer, connect the signal cable (HDMI, DP, or VGA) to the computer and monitor, then connect the power cable.
OSD Menu and Controls
The On-Screen Display (OSD) menu allows you to adjust monitor settings. Use the buttons on the front bezel to navigate the menu:
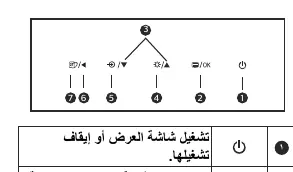
- Power: Turn the monitor on or off.
- OSD/OK: Access the OSD menu or confirm selections.
- Up/Down: Navigate the OSD menu.
- Brightness: Adjust brightness levels.
- Input: Change the signal source.
- SmartImage: Select from presets like EasyRead, Office, Photo, Movie, Game, Economy, D-Mode, or Off.
Maintenance and Safety
- Keep the monitor away from direct sunlight and heat sources.
- Do not block ventilation holes.
- Clean the screen with a soft, dry cloth. Do not use organic solvents like alcohol or ammonia.
- Avoid applying excessive pressure to the LCD panel.
Troubleshooting
- No image (LED off): Check if the power cable is connected properly.
- No image (LED on): Check if the signal cable is connected securely to the computer.
- Image not centered: Use the 'AUTO' function in the OSD menu (VGA mode only).
- Image shaking: Ensure the signal cable is connected securely.
Technical Specifications
- Panel Type: IPS
- Screen Size: 23.8 inches (60.5 cm)
- Resolution: 1920 x 1080 @ 60Hz (up to 120Hz via HDMI/DP)
- VESA Mount: 100mm x 100mm
- Tilt: -5 to +25 degrees
Manufacturer information
Philips
Practical help
Common problems
No image (LED off)
Ensure the power cable is connected to the monitor and a power outlet.
No image (LED on)
Check if the signal cable is connected securely to the computer and monitor.
Image not centered
Use the 'AUTO' function in the OSD menu (VGA mode only).
Image shaking
Ensure the signal cable is connected securely to the graphics card or computer.
Before use
- Ensure the power supply matches the specifications.
- Place the monitor on a flat, stable surface.
- Connect the signal cable securely.
- Install the stand correctly before use.
- Ensure the monitor is within the specified operating temperature range (0°C-40°C).
Show more Show less
Images and diagrams
- Stand assembly: Place monitor face down, attach stand column to base.
- OSD buttons: Located on the front bezel for menu navigation.
Model compatibility
- Compatible with Windows 10/11.
- Supports Adaptive Sync with compatible AMD GPUs.

Manual page author
Emily Carter
User documentation editor