Electronics / Networking
User Manual for Planet Technology IGS-4215 Series Industrial Managed Gigabit Switch
Quick installation and configuration guide for Planet Technology IGS-4215 series industrial managed switches. Learn how to wire power, configure console access, set IP addresses, and manage the device via web interface.
Table of contents
Manual images
Click an image to enlargeQuick guide from the manual
This guide provides essential steps for installing and configuring the Planet Technology IGS-4215 series industrial managed switches. Key procedures include wiring the power inputs, establishing a console connection for initial setup, and accessing the web management interface. The default IP address is 192.168.0.100. If you encounter issues, the device can be reset to factory defaults by holding the reset button for 10 seconds.
Package contents
Ensure your package contains the following items:
- Industrial Managed Switch
- Quick Installation Guide Sheet
- Dust Caps (RJ45 and SFP)
- DIN-rail Kit
- Wall Mounting Kit
Wiring the power inputs
The switch features a green terminal block connector on the upper panel for power input. Follow these steps to connect the power:
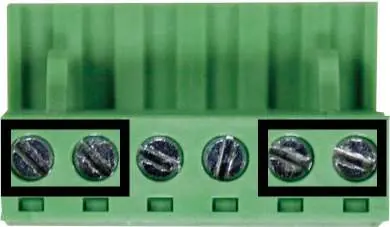
- Insert positive/negative DC power wires into contacts 1 and 2 for Power 1, or 5 and 6 for Power 2.
- Tighten the wire-clamp screws to secure the wires.
- Ensure the wire gauge is between 12 and 24 AWG.
- Note: PWR1 and PWR2 must provide the same DC voltage for load balancing.
Power Input Range: 9V-48V DC and 24V AC (for IGS-4215-8T4X and IGS-4215-16T4X); 48-54V DC (for IGS-4215-8UP4X).
Grounding the device
Users must complete the grounding wiring for the device to prevent damage from lightning or electrical surges.
Terminal setup
To configure the system via console:
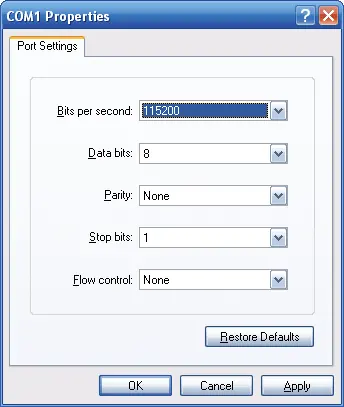
- Connect a USB cable from your PC to the USB Type-C console port on the switch.
- Run a terminal emulator (e.g., Tera Term or PuTTY).
- Configure the COM port settings as follows:
- Baud rate: 115200
- Data bits: 8
- Parity: None
- Stop bits: 1
- Flow control: None
- Log in with the default username admin. The default password is sw followed by the last 6 characters of the MAC ID (in lowercase).
Web management
To access the web interface:


- Ensure your PC is in the same subnet as the switch (default IP: 192.168.0.100).
- Open a web browser (Chrome, Edge, or Firefox) and enter https://192.168.0.100.
- Log in using the same credentials as the console.
- You will be prompted to change the initial password upon first login.
- To save configuration changes, click the Save icon on the top menu bar and press Apply.
Restoring default configuration
If you have forgotten the password or need to reset the IP address, locate the hardware-based reset button on the front panel. Press and hold the button for approximately 10 seconds until the device reboots.
Practical help
Common problems
Web interface is not accessible
Ensure your PC is set to the same IP subnet (e.g., 192.168.0.x). Disable anti-virus software or firewall temporarily.
Forgot admin password or IP address
Press the hardware-based reset button on the front panel for 10 seconds to restore factory defaults.
Before use
- Verify you have a USB Type-C console cable.
- Ensure power supply voltage matches the model specifications (9-48V DC/24V AC or 48-54V DC).
- Use 12-24 AWG wire for the terminal block.
- Install a terminal emulator like PuTTY or Tera Term on your workstation.
- Ensure the PC has an Ethernet NIC installed.
Specs in practice
- Console Baud Rate
- 115200 bps is required for the serial connection.
- Default IP Address
- 192.168.0.100 (Subnet Mask 255.255.255.0).
Images and diagrams
- Terminal block contacts 1/2 are for Power 1, and 5/6 are for Power 2.
- The reset button is located on the front panel, labeled 'Reset'.
Model compatibility
- Compatible with Windows 8/10/11, MAC OS X, Linux, and UNIX.

Manual page author
Emily Carter
User documentation editor
Prepares concise manual descriptions and highlights the most useful setup, operation, and maintenance information for readers.