Garden / Brushcutters & Trimmers
User Manual for BLACK+DECKER 20V MAX* String Trimmer LSTE523 / LSTE525
Quick guide for the BLACK+DECKER 20V MAX* String Trimmer (LSTE523, LSTE525). Includes assembly, operation, maintenance, and troubleshooting steps.
Quick answers from the manual
Quick answer
- The BLACK+DECKER 20V MAX* String Trimmer (LSTE523/LSTE525) is a cordless garden tool. It features an EasyFeed™ line advancement system, adjustable height, and a flip-to-edge mode for edging. p. 1, 8, 9
Key actions
- Install the guard before use. p. 6
- Convert to edging mode. p. 8, 9
First start
- Ensure the guard is installed, the battery is charged, and the cutting line is properly spooled. p. 6, 8, 10
Problems and fixes
Trimmer runs slowly
Clean spool housing, ensure line is not too long.
p. 13
EasyFeed™ does not feed line
Check for tangled line, ensure correct line size, clean spool.
p. 13Maintenance and reset
- Clear jams by removing the spool and clearing debris. p. 10
Technical specifications
| Parameter | Value | Meaning | Pages |
|---|---|---|---|
| Line Diameter | .065 inch (1.65 mm) | Required round nylon line size. | p. 10 |
Where to find it in the PDF
- Safety Warnings p. 2, 3, 4, 5
- Assembly p. 6, 7
- Operation p. 8, 9
- Maintenance p. 10, 11
- Troubleshooting p. 13
Table of contents
Manual images
Click an image to enlargeQuick guide from the manual
This manual provides instructions for the safe operation and maintenance of the BLACK+DECKER 20V MAX* String Trimmer (Models LSTE523 and LSTE525). Always wear eye protection and ensure the guard is installed before use. Use only .065 inch (1.65 mm) round nylon line and compatible BLACK+DECKER 20V MAX* batteries.
Assembly and Adjustment
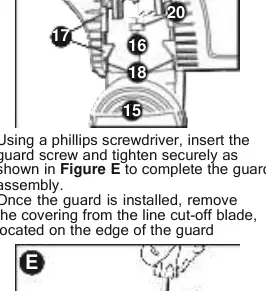
Installing the Guard: Remove the screw from the guard. Turn the trimmer upside down. Slide the guard (11) onto the motor housing (16) until it snaps into place. Secure with the screw using a Phillips screwdriver. Remove the covering from the line cut-off blade.
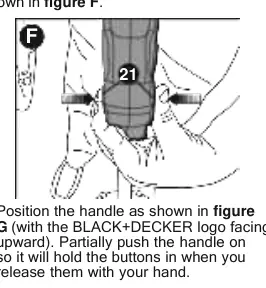
Attaching the Auxiliary Handle: Press the buttons (21) on both sides of the upper housing. Position the handle (with the logo facing upward) and push it onto the housing until it snaps into place. Adjust the handle height by pressing button (22).
Height Adjustment: Loosen the height-adjust collar (7), move the upper housing to the desired height, and tighten the collar.
Operation
Switching On and Off: Push the lock-off button (2) and squeeze the trigger (1) to start. Release the trigger to stop.
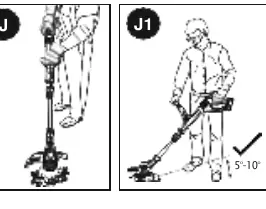
Trimming: Angle the unit and swing it side to side. Maintain a cutting angle of 5° to 10°. Use the tip of the line for cutting. Keep a minimum distance of 24 inches (609.6 mm) between the guard and your feet.
EasyFeed™ Button: To advance the cutting line, fully depress the EasyFeed™ button (4) while trimming and then release. Do not overfeed.
Edging Mode: Remove the battery. Push down on the flip-to-edge collar (8) and rotate it 180° counterclockwise until it snaps into place. Use the edge wheel (10) to guide the trimmer along the edge.
Maintenance
Clearing Jams: Remove the battery. Press the release tabs (23) on the spool cap (24) and remove the cap. Pull out the spool and clear any debris. Reinstall the spool and cap.
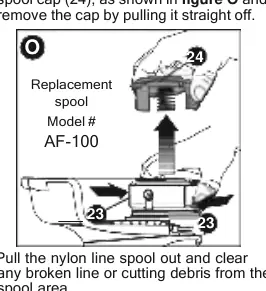
Replacing the Spool: Remove the battery. Depress the tabs (21) and remove the spool cap (22). Remove the empty spool. Clean the housing. Insert the new spool (AF-100 recommended) and push it onto the boss (27). Align the tabs on the spool cap with the slots in the housing and snap into place.
Technical Specifications
The trimmer uses .065 inch (1.65 mm) diameter round nylon line. It is compatible with BLACK+DECKER 20V MAX* batteries and chargers. Charge times vary based on the battery and charger model (e.g., LBXR20 battery with L2AFC charger takes approximately 0.75 hours).
Practical help
Common problems
Trimmer runs slowly
Remove battery, check that the spool housing rotates freely, clean if necessary, and ensure the cutting line does not protrude more than 4-13/16 inches (122mm) from the spool.
EasyFeed™ does not feed line
Check for tangled line on the spool, ensure correct line size (.065 inch), clean the spool and housing, or replace the spool if damaged.
Line unravels when cap or spool is removed
Ensure the line is parked in the holding slots before removing the cap or spool.
Before use
- Wear safety spectacles or goggles.
- Ensure the guard is firmly attached.
- Check that the battery is fully charged.
- Inspect the area for wire, cord, or string-like objects.
- Ensure the cutting line is not tangled.
Specs in practice
- .065 inch (1.65 mm) ROUND line
- The only compatible line size; using heavier or serrated line will overload the motor.
Images and diagrams
- Figure A: Charging procedure.
- Figure B/C: Battery installation and removal.
- Figure D/E: Guard assembly.
- Figure F/G/H: Auxiliary handle assembly and adjustment.
- Figure J/J1/J2/J3: Proper trimming technique and angles.
Model compatibility
- Use only BLACK+DECKER 20V MAX* batteries.
- Use only .065 inch (1.65 mm) ROUND nylon line.
- Recommended replacement spool: AF-100.
- Recommended replacement spool cap: RC-100-P.

Manual page author
David Miller
Documentation analyst
Organizes user manual content into clear summaries, with attention to model details, product context, and everyday usability.