Documents / Terms Conditions
Installation Guide for Rizoma Fox License Plate Kit PTS718
Step-by-step installation guide for the Rizoma Fox License Plate Kit (PTS718). Includes wiring, assembly, and safety instructions for proper motorcycle setup.
Table of contents
Manual images
Jump to the sectionQuick guide from the manual
The Rizoma Fox License Plate Kit (PTS718) is designed for specific motorcycle models. Before starting, ensure the motorcycle is stable and the engine/exhaust are at ambient temperature. Important: This kit is not compatible with the use of side bags. Professional installation is strongly recommended to ensure safety and compliance with road regulations.
Safety and Warnings
- Electrical Safety: Disconnect the battery before installing the license plate light, rear light, or turn signals to prevent electrical shock or fire. Ensure all connectors are properly isolated and polarity is respected.
- Installation: Do not modify or tamper with the product. If parts are missing, damaged, or worn, contact an authorized Rizoma dealer.
- Compatibility: Rizoma products may not be compatible with all motorcycles or previously installed aftermarket accessories.
- Road Compliance: Ensure the license plate holder is installed according to the provided instructions to comply with European norms.
Installation Steps
Rear Light Assembly
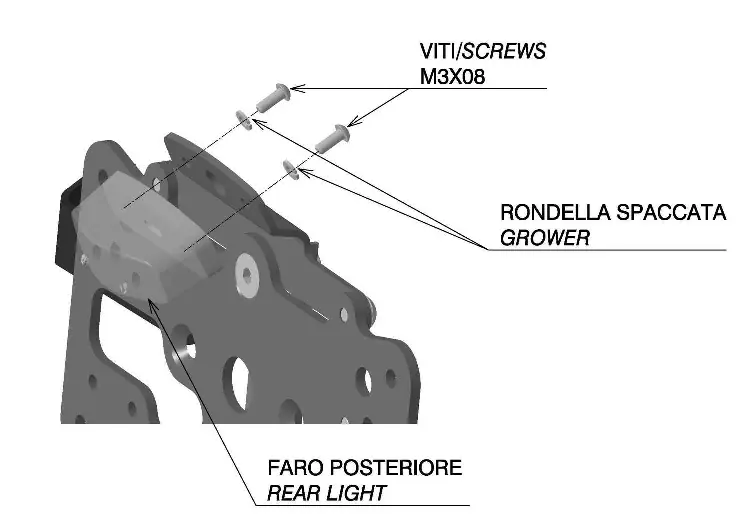
Begin by attaching the rear light to the support structure using the provided M3x08 screws and grower washers.
License Plate Support
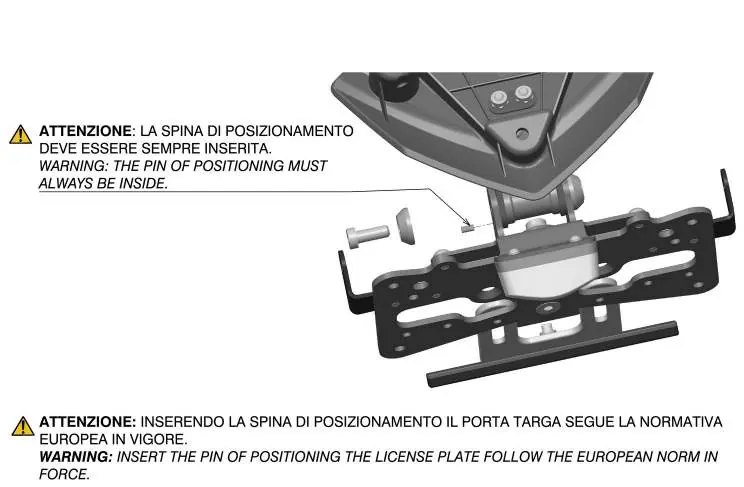
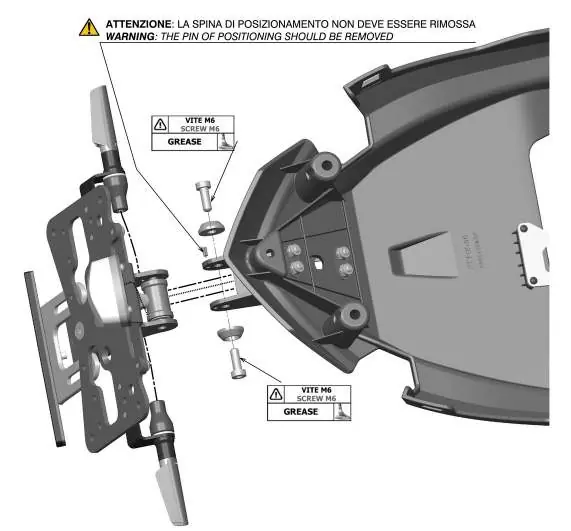
Assemble the license plate support. Ensure the positioning pin is inserted correctly; this pin must always remain in place to ensure the license plate follows European norms. Apply grease to the M6 screws during assembly.
Indicators Installation
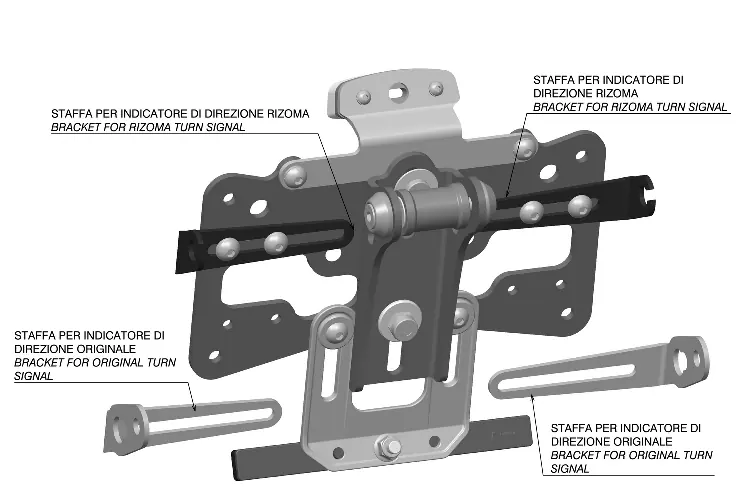
Install the turn signal brackets. The kit includes brackets for both Rizoma turn signals and original turn signals. Ensure the mounting is valid for both sides of the motorcycle.
Wiring and Electrical Connections
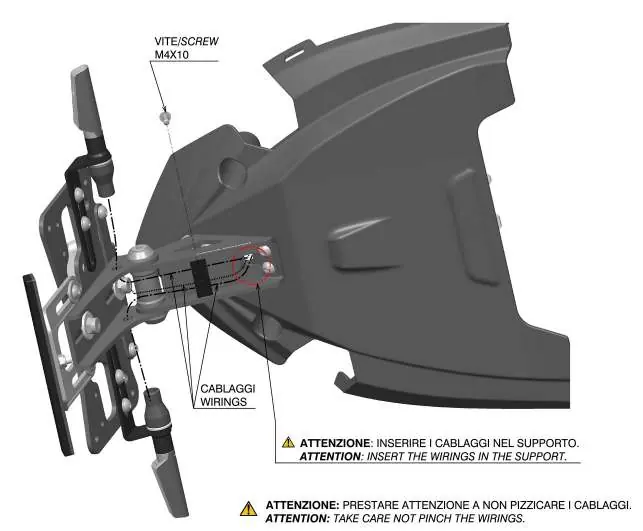
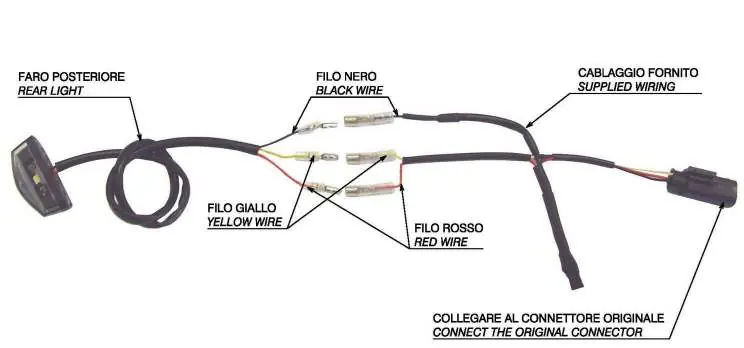
Route the wirings carefully through the support, ensuring they are not pinched. Connect the rear light wiring to the original connector, matching the black, yellow, and red wires. For turn signals, use the included Rizoma wiring (EE142-01) or consult the specific manual for your indicators to choose the correct connection schema.
Final Adjustments
Adjust the reflector position. It must be perpendicular to the ground axis and positioned as close as possible to the lower part of the license plate to avoid contact with the rear wheel during suspension travel.
Maintenance and Cleaning
Regularly inspect all fasteners and components, especially after long trips or periods of inactivity. To clean the license plate holder, use only neutral detergent and cold water. Do not use aggressive products, degreasers, or abrasive sponges, as these can damage or scratch the finish.
Practical help
Common problems
Incompatibility with side bags
This specific license plate holder (PTS718) is not compatible with the use of side bags.
Electrical system damage
Disconnect the battery before starting electrical work. Ensure all pins are isolated and polarity is respected. Do not cut connectors.
Loose components
Tighten all fasteners to appropriate torque specifications before riding. Regularly inspect the assembly.
Before use
- Verify kit completeness against the parts list.
- Ensure the motorcycle is standing firmly on a stable surface.
- Allow exhaust and engine to cool to ambient temperature.
- Disconnect the battery before electrical installation.
- Check that the positioning pin is inserted.
Specs in practice
- Difficulty Level
- Medium (does not include removal of OEM components).
- Time of Assemblage
- 20-25 minutes.
- Reflector Position
- Must be perpendicular to the ground axis.
Images and diagrams
- Step 1: Exploded view of rear light mounting with M3x08 screws.
- Step 5.0: Diagram showing bracket options for Rizoma vs. original turn signals.
- Step 8: Wiring diagram for rear light connections.
- Step 10: Geometric diagram showing the required 90-degree angle for the reflector.
Model compatibility
- Not compatible with side bags.
- Requires checking compatibility with existing aftermarket equipment.
- Some products may not be homologated for road use in all countries.

Manual page author
Michael Turner
Technical manual editor
Reviews PDF manuals for structure, safety notes, and practical product details so readers can find the right information quickly.