Electronics / USB Hubs & Docking
User Manual for Rocstor SolidKVM SK05 2x1 KVM Switch
Quick guide for the Rocstor SolidKVM SK05 2x1 KVM Switch. Includes installation steps, connection diagrams, hotkey operations, and technical specifications.
Table of contents
Manual images
Click an image to enlargeQuick guide from the manual
The Rocstor SolidKVM SK05 is a high-performance 2x1 KVM switch designed to route high-definition video (up to 4Kx2K@60Hz) and audio from two sources to a single display. It supports both key-press switching and intelligent hotkey functionality.
Package Contents
- Main Unit x1
- 5V/3A Power Adapter x1
- IR Remote Control x1
- IR Extender x1
- USB 3.0-B Male to USB 3.0-A Male Cable x2
- User Manual x1
- Ear Hanger Bracket x2 (Optional)
Panel Description
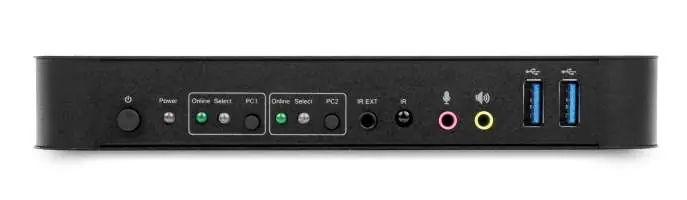
Front Panel
The front panel features the power button, power indicator, input selection buttons (PC1/PC2), IR receiver, 3.5mm MIC input, 3.5mm stereo output, and two USB 3.0 ports for peripherals like printers or scanners.
Back Panel
The back panel contains the output ports for keyboard, mouse, audio, and display (HDMI/DisplayPort), as well as the input ports for PC1 and PC2 (DisplayPort, USB, MIC, stereo) and the DC 5V power input.
Installation Procedures

- Connect Host Computers: Use USB cables to connect host computers to the KVM Switch USB-B ports. Connect the MIC and stereo ports of the host computers to the corresponding ports above the 'DisplayPort In' using 3.5mm audio cables. Connect the host computers to the 'DisplayPort In' ports using DisplayPort cables.
- Connect Peripherals: Attach the keyboard and mouse to the USB-A ports on the back panel. Connect microphones and amplifiers to the MIC and stereo ports. Connect your display to either the 'DisplayPort Out' or 'HDMI Out' port. Note: If both are connected, DisplayPort takes priority.
- Power On: Connect the 5V power supply and press the power button. The 'Power' indicator will light up.
- Input Selection: Use the front panel buttons or the IR remote to select the active PC. The 'Select' indicator will confirm the active source.
Special Function Operation
Mouse Traversal: Slide the mouse to the far right of the display for 2 seconds to automatically switch to the next port.
USB-B Detection: The switch automatically detects when a PC is connected via USB-B and switches to it. If the current PC is powered off or disconnected, it switches to the next active PC.
Hotkey Functions: Use the following combinations on a standard keyboard (connected to the back panel USB-A ports):
- Switch to next port: Scroll Lock + Scroll Lock + Right Arrow or Down Arrow
- Switch to previous port: Scroll Lock + Scroll Lock + Left Arrow or Up Arrow
- Switch to PC N: Scroll Lock + Scroll Lock + [N]
- Automatic switching: Scroll Lock + Scroll Lock + S (Default: 15 seconds)
- Set auto-switch interval: Scroll Lock + Scroll Lock + I + [N] + Enter (5-999 seconds)
- Buzzer on/off: Scroll Lock + Scroll Lock + B + [1/0]
- Reset hotkeys: Scroll Lock + Scroll Lock + F + L + A + S + H + Enter
Safety Notice
It is normal for the unit to become warm during use. Ensure proper ventilation around the unit. Do not place the hub under pillows, blankets, or your body when connected. Do not use in locations with water and avoid handling with wet hands.
Practical help
Common problems
Device becomes very warm
This is normal during operation. Ensure proper ventilation and avoid extended skin contact.
Video output not displaying on desired port
If both DisplayPort and HDMI are connected, the device prioritizes DisplayPort. Ensure the correct cable is used.
Hotkeys not working
Hotkeys do not work on functional keyboards; ensure the keyboard is connected to the 2 USB-A ports on the back panel.
Before use
- Verify all USB-B cables are connected to host computers.
- Ensure 3.5mm audio cables are connected for MIC and stereo functionality.
- Connect the 5V/3A power adapter.
- Check that the 'Online' indicators light up when USB-B ports are connected.
- Ensure DisplayPort cables do not exceed 2 meters in length.
Specs in practice
- Max Resolution
- Supports up to 4Kx2K@60Hz.
- Power Requirement
- DC 5V, 12W maximum power consumption.
- Operating Temperature
- 0°C to 45°C (32°F to 113°F).
Images and diagrams
- Front Panel: Shows power button, input selection, IR receiver, and peripheral ports.
- Back Panel: Shows PC input ports, console output ports, and power input.
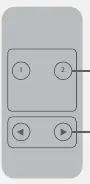
- Remote Control: Shows buttons for input selection and loop switching.
Model compatibility
- Supports Windows 2000/XP/Vista/Win7/Win8/Win10/Linux/Apple Mac OS.
- Supports RGB 4:4:4, YCbCr 4:4:4, YCbCr 4:2:2, YCbCr 4:2:0.

Manual page author
Emily Carter
User documentation editor
Prepares concise manual descriptions and highlights the most useful setup, operation, and maintenance information for readers.